How to Automate Lead Assignment for Salesforce Platforms
Lead assignment in Salesforce is crucial for making sure sales-ready leads reach the right person to make contact, at the right time.


5 mins

Book a call to discuss:
Integrating 3rd-party platforms and implementation
Auditing data and segmentation in HubSpot and Salesforce
Underperforming journeys and automations
Reducing license costs and inefficiencies
Campaign attribution modelling and proving ROI
AI readiness, Agent POC's and Claude integration
In just 30 minutes, we'll know whether we're a mutual fit.
Lead assignment in Salesforce is crucial for making sure sales-ready leads reach the right person to make contact, at the right time.
5 mins
Exactly how leads are handed over from marketing to sales should never be assumed or taken lightly. Lead assignment is a crucial step in making sure sales-ready leads reach the right person to make contact, at the right time. Which is why automating lead assignment for Salesforce platforms, from Account Engagement to Sales Cloud, or Marketing Cloud to Sales Cloud, is so important.
The aim for any marketer is to assign inbound leads in the most efficient way, and the lead assignment features of Salesforce enable us to do just that.
If you’ve been assigning leads manually until now, you’re about to have your world changed.
And if you’re already assigning leads to sales reps using automated features in your Salesforce accounts, don’t exit just yet. Stick around to ensure you’re following best practices and making lead assignment (also known as lead routing) as seamless as it can be.
For this guide, we’re going to assume you are using Sales Cloud alongside Pardot and/or Marketing Cloud. This means there are two parts to ensuring lead assignment runs smoothly. The first is integrating and configuring your Salesforce products to work together, and the second is the setup of Lead Assignment Rules in Salesforce.
It’s somewhat obvious, but the first essential step is to connect your platforms using the Salesforce Connector (for Account Engagement aka Pardot), or Marketing Cloud Connect, depending on which you use.
Connecting Pardot and Sales Cloud using the Salesforce Connector is fairly straightforward, and essentially means the two platforms are able to ‘talk’ and share data, rather than marketers needing to manually export and import lead data.
You’ll find the Salesforce Connector in the AppExchange, and an implementation guide is provided by Salesforce here, including considerations before you install.
You’ll want to use the V2 Connector, so if you’re already using the connector but haven't upgraded yet, be sure to do that.
Marketing Cloud Connect, for connecting Sales Cloud and Marketing Cloud Engagement, is a little more challenging, so we’ve provided a full guide here.
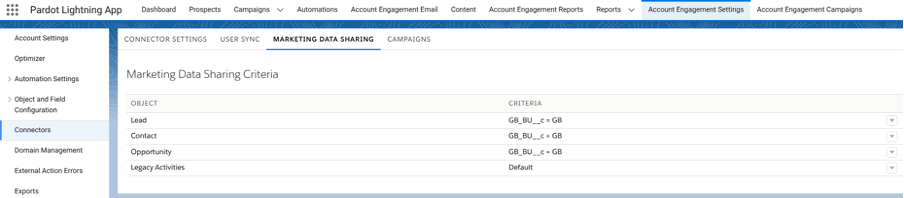
After installing the Pardot-Salesforce Connector, you’ll see an option for ‘Marketing Data Sharing’ which allows you to restrict which Leads, Contacts, Opportunities, and/or custom objects are eligible to sync from Salesforce to Pardot. This is ideal for those with multiple Business Units but can work well for those with just one, too.
What’s great about MDS is it gives you more control over when prospect and lead records are created, which is all part and parcel of ensuring correct lead management.
For a deep dive into MDS and to configure the settings in the best way for your business, have a read of this dedicated blog: How to Use Marketing Data Sharing in Pardot & Salesforce.
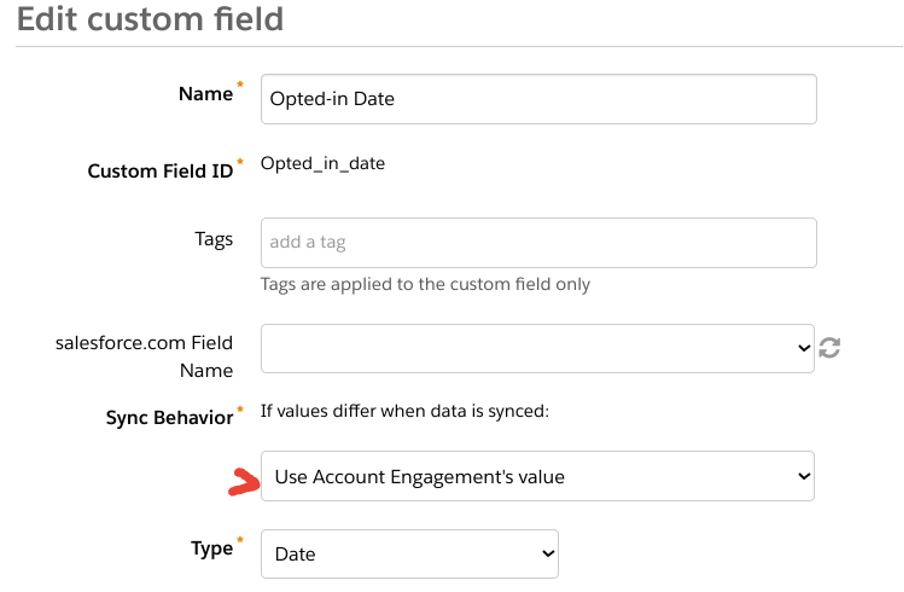
With your platforms connected, take some time to understand exactly how the two can and will sync. You can set either Pardot or Salesforce as the ‘master’ values, meaning if there are differences in a record between the two platforms, one will be used to override the other. You can also choose to ‘Use the most recently updated record’.
For Account Engagement and Sales Cloud, as a general rule, prospect records sync every two to four minutes. Most records sync immediately, but Account Engagement processes sync queues with over 400 records in batches. Standard batch processing syncs 12,000 records per hour.
Having said this, certain activities can trigger a sync, and this can be at a prospect, trigger, or system level. We have a full guide to Pardot and Salesforce sync behaviours, which we recommend reading if you’re new to this topic, or to sense check that your current sync behaviours are correct and without errors!
For a free audit of your Account Engagement, Salesforce, or Marketing Cloud account, including checks of your integration and sync behaviours, get in touch.
Let’s assume you have successfully connected and synced accounts. You are now ready to plan and implement your lead assignment, using preset lead criteria.
Remember, there’s a difference between implicit and explicit leads and you can determine this based on your lead scoring and grading.
The ideal sales-ready lead will meet both your explicit and implicit lead criteria. So, the very first item on your to-do list is to agree and document what makes a qualified lead. This should be a collaborative effort between marketing and sales teams.
Download the ‘How to Qualify Leads’ eBook for a step-by-step guide to planning and implementing lead qualification.
Only once you have a clear definition of a sales-ready lead, can you plan who should receive such leads, when, and how. Some considerations are:
Use these considerations to map out your precise criteria, such as:
Criteria 1: Unqualified leads - don’t assign those from regions we don’t service.
Criteria 2: ABM leads - high-value targets must be assigned to a specific sales rep.
Criteria 3: Country - all remaining leads must be assigned to their country-specific sales team.
Again, document your lead assignment plan offline first, before implementing anything in your Salesforce accounts. This really helps to get a clear picture of what will happen and allow you to sense check before changing any settings that could cause problems later.
You’ve got your lead assignment criteria sorted and you’re ready to get things set up. Enter the aptly named ‘Lead Assignment Rule’ in Salesforce.
Navigate to the ‘Marketing’ section in Salesforce and select ‘Lead Assignment Rules’.
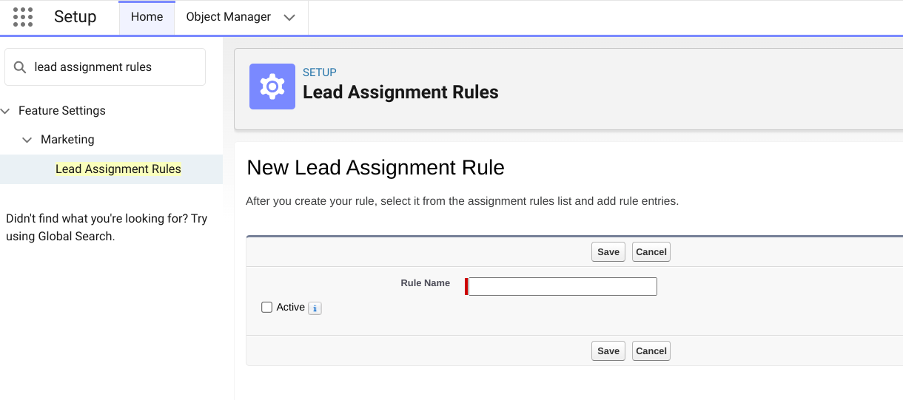
Here’s where you create your Lead Assignment Rule but heads up, you can only have one active rule at a time.
Now note that when you create a rule, you’ll specify the order that each criteria will be processed. Therefore, it’s easiest to input in priority order, with the most important rule criteria first.
Once you’ve entered your rule criteria (side note, you need to make sure you have the data values to match the rule!) you can choose the assignment action.
There are three options for lead assignment and these are:
To assign a lead to a ‘Queue’ you’ll need to first create the Queue in the Administration > Users > Queues section of Salesforce.
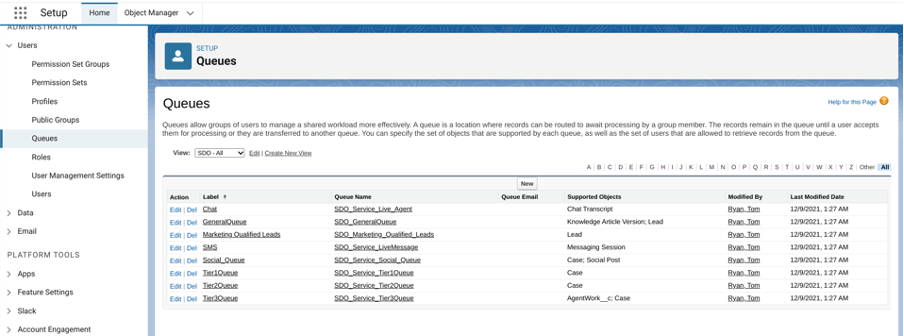
For example, you may have Queues for each region’s sales team, with the relevant users selected as members i.e. a Queue for ‘Leads - UK’ and a separate Queue for ‘Leads - Germany’.
Once activated, all leads will be assigned based on the active rule. It’s a good idea to have a final criteria in your rule that catches all other leads and assigns them to a default user, so you can review and update your criteria if required, or manually assign these leads.
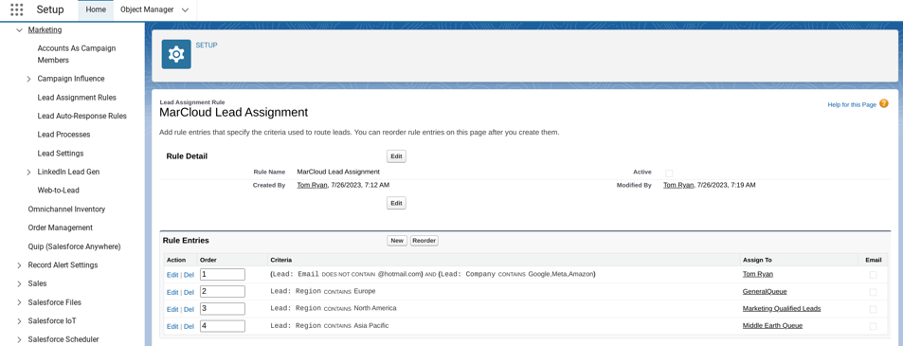
In the above screenshot, you can see that the Lead Assignment Rule has three criteria, in order of priority. First, we eliminate leads that should not be assigned, those that are clearly time-wasters. Next, we assign ABM leads to specific sales reps because these are priority leads. Then, we assign all remaining leads to different Queues based on their region: Europe, North America, or Asia Pacific.
Where things get a little tricky with lead assignment is when we start to consider how leads are assigned in Salesforce when coming from Pardot or Marketing Cloud.
Pardot/Account Engagement
In Pardot, a prospect must have an assigned user to allow them to sync to Salesforce in the first place. The problem is, having an assigned user means the prospect is ignored by the Salesforce Lead Assignment Rule.
This is all well and good if you have just one or two sales reps who handle all leads. You can simply ‘Assign to user’ or ‘Assign to Queue in Salesforce’. The complex Lead Assignment Rule might not be necessary.
For those who prefer a Lead Assignment Rule in Salesforce to better triage and automatically assign large volumes of leads to multiple users though, the solution is to select the ‘Assign Prospect Via Salesforce Active Assignment Rule’ within Completion Actions (for forms, form handlers, custom redirects, emails and page actions), Automation Rules, or Engagement Studio programs.
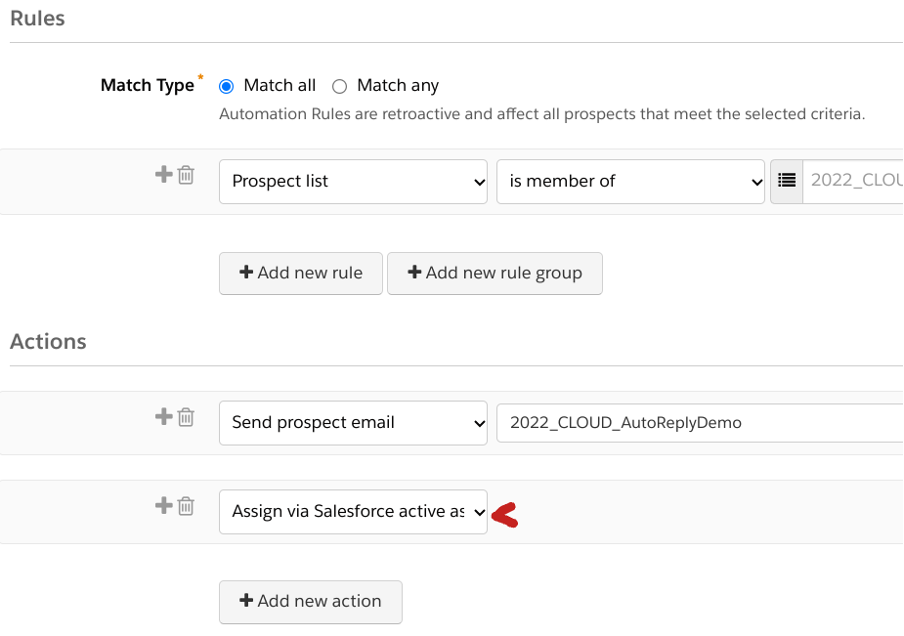
This will push prospects to the Salesforce Lead Assignment Rule when the criteria is met and the prospect syncs without an owner, allowing the LAR to assign accordingly.
Marketing Cloud
How do you trigger LARs in SFMC?
With Marketing Cloud evolving from a B2C focus, lead assignment is not as well defined as a tool. That’s not to say that effective lead assignment logic can’t be used, it just means you will have to leverage the powerful tools provided by Marketing Cloud Connect in conjunction with Journey Builder.
Journey Builder has a number of actions such as the Create Lead, Convert Lead, and Update Object which can all be configured to update records in Sales Cloud. This means that you can construct a logic flow to determine which route a lead goes down and then have a create lead/update lead action that assigns the lead to a particular salesperson. This could be random, a round-robin, based on working hours, or based on a lead’s profile.
Finding that your Lead Assignment Rules are not working? Here are a few common reasons why:
No lead assignment in Salesforce can be relied on confidently without first agreeing on a shared definition of what a ‘sales-ready lead’ means for your business.
Start with a robust scoring and grading model using our free ‘Pardot Scoring & Grading That Works’ eBook, to quickly surface only the most qualified leads and be sure you’re following the best practices for long-term success.
Founder & CEO of MarCloud, Tom has been on both sides of the fence, client-side and agency, working with Salesforce platforms for the best part of a decade. He's a Salesforce Marketing Champion and certified consultant who loves to co-host webinars and pen original guides and articles. A regular contributor to online business and marketing publications, he's passionate about marketing automation and, along with the team, is rapidly making MarCloud the go-to place for Marketing Cloud and Salesforce expertise. He unapologetically uses the terms Pardot, Account Engagement and MCAE interchangeably.
More by Tom RyanThis handbook gives a straightforward explanation of Pardot grading and scoring. It outlines default versus custom models and provides a basic understanding of lead qualification. If you’ve ever wondered what the difference is between grading and scoring, we cover it.
Download nowAccount Engagement (Pardot) is now a dwindling skillset as Salesforce has shown its strongest signal that the platform is no longer a part of the roadmap. The certification is being phased out, which means a 'Pardot consultant' could instead become an Agentforce marketer.
Tom Ryan
5 mins
When MarCloud audits a HubSpot portal, lifecycle stages are one of the things we look at. Pretty frequently, they’re either misconfigured or not being used at all. Setting HubSpot up correctly requires a conversation between marketing, sales, and revenue operations teams because any gap in alignment will cause issues in HubSpot. In this case, it’s lifecycle stages that reflect internal assumptions rather than true buyer behaviour, and damage reporting.
Tom Ryan
7 mins
There are two ways most HubSpot users handle custom properties. The first is avoiding them entirely because the platform already feels complicated. The second is going in without a plan and creating sixty fields with inconsistent names, several of which duplicate each other and most of which are never reliably populated. Whether you fall into the avoidant or abundant approach, both can leave you with a problematic HubSpot account.
Tom Ryan
5 mins

MarCloud is a team of certified Pardot, HubSpot, Marketing Cloud, and Salesforce specialists. We help businesses to unlock the potential of marketing automation. Join 2,000+ professionals who receive actionable insights to boost their automation performance.
Sign up to the newsletterThis handbook gives a straightforward explanation of Pardot grading and scoring. It outlines default versus custom models and provides a basic understanding of lead qualification.
Download now