Knowing where leads come from is a crucial piece of information for businesses, which is why the lead source field is so important across Salesforce and Account Engagement (formerly known as Pardot).
However, it’s not always smooth sailing when it comes to how this field is populated, making reporting a real challenge. In this blog post, I’ll be addressing the following:
Importance of tracking lead source
One of the questions a marketer faces regularly is “Where did that lead come from?”.
Being confident in knowing the answer allows marketers to demonstrate which marketing initiatives are working (or not working).
There are a few ways to track “source” between Account Engagement and Salesforce:
- Lead Source
- Campaigns
- UTMs
The Lead Source field needs focus because:
- it looks at the first touchpoint i.e. what brought in the lead.
- as a default field, it is mapped to Salesforce Contact and Account objects.
- it’s massively useful in Sales Cloud reporting and in B2BMA.
How Account Engagement populates ‘Source’
The ‘Source’ field is a text field that can be automatically or manually populated. Auto-population happens when a prospect first converts and:
- if there is a UTM Source value in the URL, this will be used.
- if AE can recognise the referring URL (i.e. person came from LinkedIn) then it will be populated with ‘LinkedIn’.
- if Google Ads are being used, there are a few value options.
- if none of the above are present, then the field remains blank.
Manual population happens when:
- Prospects are imported and a value is set for “Source”.
- The prospect record is manually edited.
How Salesforce populates ‘Lead Source’
In Sales Cloud, ‘Lead Source’ is a picklist field that comes with certain values out-of-the-box. There is no ‘auto-population’ in the way Account Engagement allows. With Salesforce, a value will populate when:
- Leads/Contacts are imported and a value is set for ‘Lead Source’.
- The Lead/Contact record is manually edited.
Why doesn’t this setup work well?
Perhaps you’ve already spotted a few key differences in how Account Engagement and Salesforce are handling the lead source fields respectively, and why problems can occur. The issue lies in how the fields are configured.
In Salesforce, Lead Source is a picklist field that can be set as restricted if you’re trying to maintain consistent values. However, this will no doubt cause sync errors with AE, because of the more-automated way AE populates the source field.
If you chose to not have a restricted picklist in Salesforce, this would avoid the issue of sync errors as the field is technically ‘open’ to accepting any value. But now you have the problem of values appearing in this field despite them not being on your picklist, and wreaking havoc from a consistency perspective.
Equally in AE, where the Source is auto-populated, there really is no governance on the values being captured, causing misalignment with what’s in Salesforce. In addition, it isn’t possible to set restrictions with the AE field, like a restricted picklist, to ensure the field is always being populated correctly.
What to do?! At MarCloud we have an approach that will help you master lead source between Salesforce and Account Engagement in no time!
How to master lead source tracking
Now you have decided to take control of your lead source tracking, there are several actions you will need to take in both Account Engagement and Salesforce. Let’s start with Salesforce.
Lead Source in Salesforce
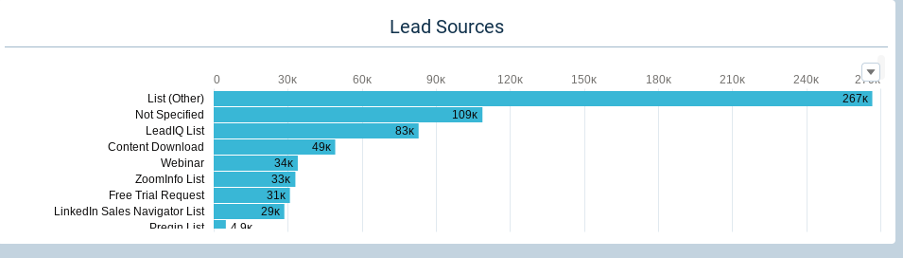
To start collecting more consistent values from your Lead Source field, you first need to decide what those values should be. A good place to start would be to review your current values.
- Create two Salesforce reports, one for leads, and one for contacts, and ensure the ‘Lead Source’ field is present in both reports. You can group the reports by the Lead Source field to better understand your current values.
- Export both of these reports and add all the unique Lead Source values in a single column. What you’ll end up with is a list of all your unique Lead Source values.
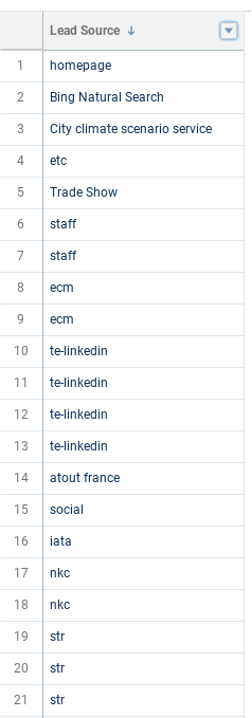
- Now, take a close look at these values. Do you really need all of them? Let’s say for example, in your list of current Lead Source values, you have three separate values containing ‘PR’, ‘Public Relations’, and ‘Press Release’. Is there any reason why they can’t all be one value, say ‘Public Relations’? If not, then let’s do something about that!
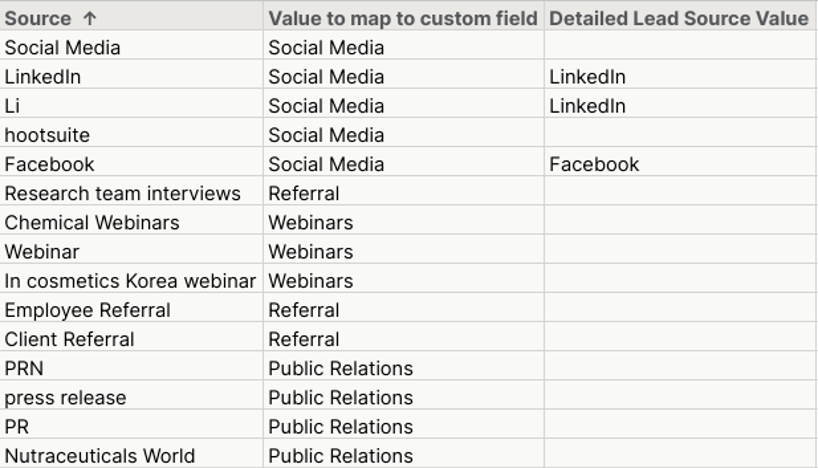
- In the column beside your list of current Lead Source values, list out the values that the current values can be mapped to. Using the example just mentioned, this would look like this:
PR | Public Relations
Press Release | Public Relations
Public Relations | Public Relations
- Continue going down your list of current values, mapping them to new consolidated values.
- Once this is done, export your Account Engagement prospects, and sort them by the Source field. Add all unique ‘Source’ values to your list of current Salesforce values and go through the same process.
You may have certain values that you want to keep more granular data on. A good example of this is social media. If you map all of your social media Lead Sources to the value ‘Social Media’, there’s a lot of valuable data you miss, the most obvious one being the specific social media platforms someone came from.
There is a simple fix to this. Once you have mapped your Lead Source values to a high-level value, for example ‘Social Media’, start a new column beside this called ‘Detailed Lead Source’, and add your detailed values. For example, Facebook, Linkedin, and Twitter.
- Once complete, you should be left with a smaller and more-consolidated list of values that make a lot more sense to you and your team. Now, it’s time to go back into Salesforce.
- Before we make any changes, export your lead and contact data from Salesforce. This is best practice, as there is nothing worse than not having a copy of your data on the off-chance something goes wrong!
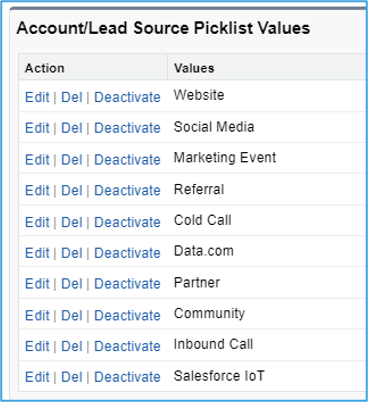
- Now, go to Setup > Object Manager > Lead > Fields and Relationships > Lead Source. Scroll down until you find a list of all your picklist values. Now, it’s time to add the new picklist values from your spreadsheet, and add the old values to these new ones. The ‘Replace’ tool will be your best friend here. One by one, replace all your old values with the new ones you created. After replacing each old value, ensure you are deactivating them.
That’s it on the Salesforce side. Now let’s take a look at what you will need to do in Account Engagement.
Lead Source in Account Engagement
- First, create two new fields in Account Enagement:
- ‘Salesforce Lead Source’ (picklist)
- Detailed Lead Source (text - optional)
These are the new fields you will be using to track Source in Account Engagement.
Next, unmap the ‘Source’ field and ‘Lead Source’ and align your new ‘Salesforce Lead Source’ field to ‘Source’.
2. After the new fields have synced across, export your prospects again to check for any rogue values that may have slipped through the net. Import this data back into AE, ensuring that the new values map to the new Salesforce Lead Source field.
Now that your current values are correct, we need to make sure that going forward, these new Lead Source values continue to populate accurately and automatically. Engagement Studio is our tool of choice as you can do everything in one program, rather than building out lots of Automation Rules.
Standardise lead source values going forward
The primary goal of your Engagement Studio program is to update your new ‘Salesforce Lead Source’ field based on the Account Engagement ‘Source’ field value.
A secondary goal is to populate the ‘Detailed Lead Source’ field, but this step is optional.
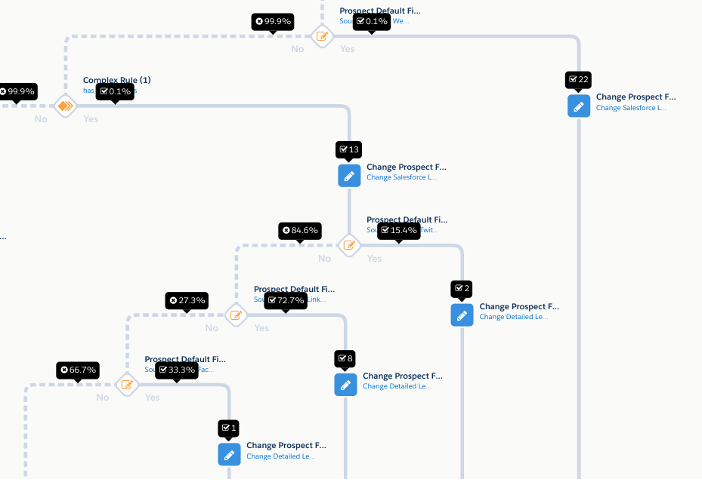
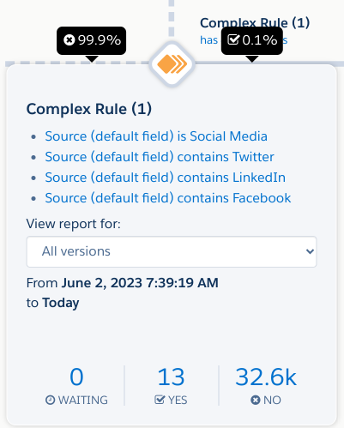
Go back to the spreadsheet you created earlier, with all your unique Account Engagement ‘Source’ values, and start listing them out in separate Complex Rule steps.
For example, if you have four separate ‘Source’ values for ‘Public Relations’, your rule would look like this:
- Any Conditions Are Met
- Source is ‘PR’ OR
- Source is ‘Public Relations’ OR
- Source is ‘Press Release’ OR
- Source is ‘Promotion’
The actions for those that match the complex rule will be to change your ‘Salesforce Lead Source’ field to your chosen value, for example, ‘Public Relations’.
Those of you who are taking the optional step to add more granular values to the ‘Detailed Lead Source’ field will then add a Rule after this action. This Rule will check for the granular value you want a record of in the ‘Source’ field (for example, Twitter) and add it to the ‘Detailed Lead Source’ field.
Once this is done, your Engagement Studio is almost ready to go! But there’s one final step to add which will help in the future administration of your new lead source process.
It is advisable to add an extra step at the very end of the program for those prospects that have not matched any of your current Engagement Studio values. Why? It’s possible that in the future, a prospect may enter Account Engagement with a value that doesn’t exist, so being able to track these prospects by adding them to a list and sending yourself a notification can help ensure your Engagement Studio continues to track the relevant and up-to-date ‘Source’ values.
Recap
Wow, that was a lot of information! Let’s rewind a little to remind ourselves of what we discussed.
- The importance of capturing accurate and consistent lead source data. You need this information to successfully track which marketing initiatives are working.
- The modifications needed to help Account Engagement and Salesforce track lead source with consistent alignment. Changes are needed in both platforms.
- Follow the MarCloud step-by-step approach to achieve lead source harmony.
A couple of tips:
- Monitor how well your Lead Source fields are populating and adjust as needed over time.
- Internally educate all teams using the Lead Source field to use correct values - especially anyone who imports records.
Go forth and assign lead sources without a headache! If you have no idea whether your values are currently aligned, request a free Salesforce Audit and/or Account Engagement (Pardot) audit today.


![Coloured background with text New Guide to Salesforce Marketing GPT [eBook]](https://www.datocms-assets.com/103555/1721624386-guide-salesforce-marketing-gpt-ebook-blog.png?auto=format&dpr=0.5&w=1568)


