This blog was written before Pardot was renamed to Marketing Cloud Account Engagement. You can read more about the name change and what it means here.
It’s an ongoing debate in the Pardot community whether we should use lists or tags, they’re both very useful and both offer ways to provide structure and segment your prospects.
Here at MarCloud, we see clients who favour using tags to segment their database and others who have never created tags before. Whilst we encourage clients to use all Pardot features and tags are very good at grouping assets, we have to be honest, we are definitely on the “team list” on most occasions.
So, we decided to write this blog to explain just why.
In a hurry? Skip to the section that interests you most…
- What are Pardot Tags?
- What are Pardot Lists?
- Considerations for each
- Use cases for Pardot Lists
- Use cases for Pardot Tags
What are Pardot Tags?
Tags are a useful feature of Pardot that allow you to quickly stick a label on any asset, for organisation, segmentation, identification and filtering.
For example, you could create the tag based on a specific content type “Whitepapers”, which will make it easier to categorise files in Pardot.
Tagging files in Pardot certainly makes it easier to find them and you can even report on specific items!
Navigate to Reports > Marketing Assets > Content and then use the Tags’ dropdown to see all your created tags in Pardot. Select a specific tag and you can report on the assets that are associated with that tag.
This is also available on other reports such as Pardot forms, emails and landing pages.

We don’t disapprove of tags, of course, they’re handy because every single thing in Pardot can be tagged, and multiple tags can be assigned to one asset. But… there is no structure around tags and they’re too often used in a one and done’ way, which can lead to messy and unhelpful tagging.
If you already have a tagging system in place that has spiralled out of control, don’t worry, tags can easily be merged and deleted from the Tags overview page (Marketing > Segmentation > Tags).
What are Pardot Lists?
Lists are one of the most powerful features of segmentation within Pardot.
They can be used for emailing, adding prospects to nurture programs, subscriptions and, the big one, segmentation.
Pardot offers a range of lists and the purpose and use of the list will usually determine which type to create:
- Static Lists for manually grouping prospects.
- Dynamic Lists for automatically refreshing lists based on criteria. We have a great blog that goes into more depth on using dynamic lists here.
- Email test lists for internally testing emails before sending.
- Public lists to show on the Email Preference Centre.
- CRM visible lists to allow prospects to be assigned to the list from Salesforce.
- Suppression Lists to omit a specific group of prospects from receiving list emails or entering engagement studio programs.
Using Pardot Lists can offer a number of benefits:
- Prospects can be added to an unlimited number of lists.
- Once a list is created, you can add prospects to the lists manually or using automation or segmentation rules. If the list is dynamic, it is automatically sorted!
- Lists can be used to segment to gain a more granular analysis of your Prospects.
- Any list, static or dynamic, can be used as a suppression list during an email send or within an Engagement Studio.
You can even now add a Send to Pardot List’ button into Salesforce, making adding to lists that little bit easier!
Considerations for each
Before you create Lists:
- Membership is based on prospects meeting the rule-based criteria, users are unable to manually add/remove prospects to dynamic lists, but you can manually add to static lists.
- Account or opportunity rule criteria will only match prospects that have an associated opportunity or account.
- Deleting the list will move the dynamic list to the recycling bin only and will not delete the prospects on the list.
- When splitting a list, the prospects are split randomly. The original list will also still be available for use.
Before you begin tagging:
- A naming structure and monthly reviews should be set.
- Keep tagging to a minimum. Although you can apply multiple tags to an item, tags are kept internally within Pardot and will not sync with prospects into Salesforce.
- Remember tags are not a substitute for folders.
Tags should be used sparingly and in line with the rest of Pardot for them to work most effectively.
Use cases for Pardot Lists
Engagement Studio:
The program is built around the recipient list and suppressions list.
The lists determine who is funnelled into Engagement Studios and who isn’t.
For example, if we wanted to remove prospects who have already been assigned from the program, yes we could use tags, but we could just simply have Prospect Assignment Status | Is Assigned’ criteria in the suppression list that is for the whole engagement studio program.

Segmentation:
Lists are a key aspect for segmenting prospects in Pardot. Any action e.g. any prospect completing a registration, can be funnelled into a list and this list can be used for further referencing/retargeting.
- Static Lists: A static list which consists of prospects that have been manually added.
Let’s say, we want to pull a list of everyone who signed up for a weekly webinar since September 2019 and export it, we could simply navigate to Segmentation > Lists > select the list > click Tools > CSV Export.
- Dynamic Lists: A dynamic list is rule-based and automatically updates when a prospect’s data changes. These types of lists are very helpful if you are wanting to create a list of prospects which is based on data that can change often. With dynamic lists updating automatically, we are removing another manual process and you’ll know that the list is up-to-date!
- Suppression Lists: Use suppression lists to stop certain prospects from receiving emails, this can be used as a way to stop competitors from receiving your emails!
Simply create a dynamic list, add in the criteria for prospects to match automatically and you’ll always have an up-to-date list of prospects you don’t want receiving emails.
If you use tags instead, well you’d have to tag the prospects, add them to a list with the tag, then if you wanted to remove them from the list you’d have to manually remove the tag. Using a suppression list certainly cuts out the manual labour!
Importing:
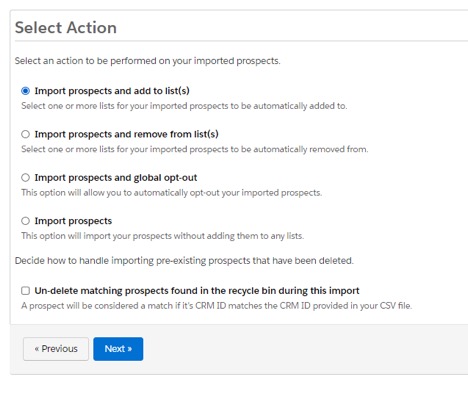
Whenever we’re importing prospects we want to funnel them into lists. This can be done whilst importing which is a great feature to utilise and a quick way to keep track of who was imported!
Additionally, say you migrate from a different platform to Pardot and you want to keep prospects on the same preference list you have in another platform. Simply add them to the list’ during import and ta-da! This removes yet another manual process.

Preference Centre:
When creating a list, as long as we’ve ticked the checkbox “Public”, the list will be displayed on the email preference page.
The Pardot email preference page is where your Pardot prospects, who are subscribed to receiving your marketing communications, are able to adjust the lists they are opted into.
Using Pardot lists allows us to label and add a description of the list which will help prospects understand why they are on that list and also select other lists that they want to be a part of.
By having prospects segmented into the lists that they want to be on, we can ensure that we are sending prospects the content that they want to receive. Whereas with tags, prospects will not see what tags they have and therefore cannot opt-out or into tags. Public lists provide transparency with your prospects.
Use cases for Tags
Engagement Studio:
- Create a tag as a long wait step:
- Adding a tag as a step with a long wait time allows for Prospects to be in the “paused” state without pausing the whole programme.
- This also means that the prospects at this stage won’t complete the Engagement Studio, as they do not reach the end step. This also means extra steps can be added.
- Tag prospects when they end an Engagement Studio nurture program.
- If a prospect moves through the whole programme they can be tagged e.g. Completed Program
- If a prospect drops off at any point they can be tagged at each point they drop off e.g. Disengaged Week2
- This creates segmentation that allows for re-engagement and also, we will know which prospects have received which content.
- Ensure prospects are not in multiple nurture programmes:
- By utilising tags as steps you can immediately tag prospects as they enter an Engagement Studio.
- This ensures that prospects can be seen, filtered and managed based on the programme they are in.
- If a step has been put in place to tag a prospect as they enter an Engagement Studio, you will need to ensure that you create a step to remove the tag if prospects are leaving the programme.
Tracking key touchpoints:
Tagging allows you to take advantage of the first-touch attribution model.
All we need to do is create an automation rule that will tag a lead on their first interaction in a Salesforce Custom Field on the Lead object. Then preserve that Field as the Lead is converted into a Contact and then Opportunity.
Replicate Campaigns:
Because tags can be associated with any marketing asset, you can utilise them as a less restrictive folder structure for campaigns. By filtering by tags you can relaunch an old campaign quickly and easily.
Filter multilingual assets:
If you’re a marketing team working with various languages, in addition to a great folder structure, tagging by language is a great way to filter your assets to keep them organised.
Quick lists:
Tags can help you make quick lists of prospects that you want to identify. They can be added to multiple assets at a time. So it can help guide you when replicating campaigns or when importing new prospects. This can be handy when it comes to B2B Marketing Analytics, as having tagged assets will help you easily navigate through your datasets.
So there you have it, a detailed breakdown of Pardot lists versus tags and why we always recommend lists as the most important of the two. If this post has raised questions for you or you simply don’t agree, feel free to send us a message!

Hollie Fitzpatrick
Hollie joined the MarCloud team with extensive B2B marketing experience. With a keen interest in marketing technologies, they strive to find the best solution to increase the efficiency and quality of marketing campaigns through rigorous testing and data analysis. A certified Pardot consultant, Hollie spends her days at MarCloud being fully solutions-focused.
More by Hollie FitzpatrickFeatured resource

Qualifying Pardot Leads Guide
When it comes to taking your marketing and sales efforts up a notch, it’s vital to understand different types of leads, how to define and qualify them, and why it matters! Our ‘Qualifying Pardot Leads’ eBook explains exactly that.
Download now


