This blog was written before Pardot was renamed to Marketing Cloud Account Engagement. You can read more about the name change and what it means here.
The most basic capability of a marketing automation software is the ability to input fields of information we can use to fill out a prospect’s profile. Pardot field definitions are the types of fields that exist to contain the essential information we need.
For those just getting started with Pardot, it’s handy to know the difference between default Pardot fields and custom fields, as well as how to map these correctly to Salesforce.
Read on for a complete guide to the types of fields that are possible in a Pardot account, how to create custom fields and how to map to Salesforce.

Complete guide to Pardot Field Definitions:
Default Pardot Fields vs Custom Fields
Pardot’s default fields are premade fields and are generally not specific to your organisation.
These fields include basic information such as Contact information provided by the prospect.
While some default fields may be relevant to us, we can use custom fields to gather specific data from prospects. This will allow us to gain a more detailed overview on how we can support our customers and essentially maximise our sales. Now, who doesn’t want that?
Pardot fields map to Salesforce fields for syncing, and these field mappings for individual records (prospects and leads/contacts) are set up when you verify your Salesforce connector.
By default, Salesforce is the master for these fields, except where noted.
Types of Pardot fields:
- Custom Account Fields created in Pardot will sync over to Salesforce Account Records, if mapped to a Salesforce.com Field Name.
- Custom Opportunity Fields sync to Opportunity records in Salesforce if mapped.
- As we have prospects in Pardot and Lead and Contact records in Salesforce, Prospect Field data can map to either a Lead or a Contact field in Salesforce. When creating the fields in Pardot, It is important to ensure that we have mapped these correctly to the correct Salesforce field, we can do this by checking the API name. To map a custom field on both the lead object and contact object to the same Pardot field, the API name of the Salesforce Lead and Contact fields must be identical.
How to create custom fields in Pardot
1. Go to Admin > Configure Fields
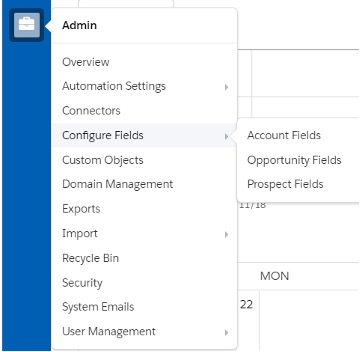
2. For Prospect custom fields, select this option and click + Add Custom Field

3. Fill in all the relevant information.
- Leave the Custom Field ID blank as this is populated automatically once the Name field is complete.
- Tags are optional, however, we suggest utilising this feature as we can take advantage of the first-touch attribution model following progress through the sales funnel.
- Select the corresponding CRM Custom Field Name. This option allows changes in Salesforce to be synced with Pardot, if you do not wish to sync these fields then leave blank. Click here to head straight to this section!
- Sync Behaviour chooses which platform (Salesforce, Pardot or the most recently updated) will be the master of records. Depending on which choice is selected will overwrite data in the corresponding field in the other instance.
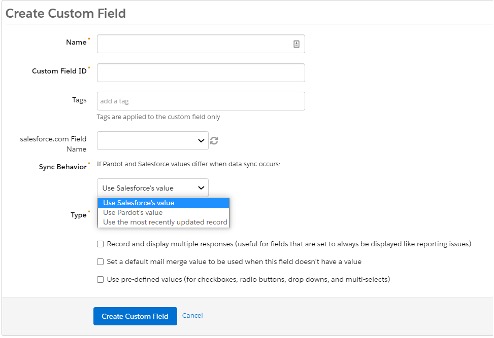
Note: If the value is blank in either instance, it will be overwritten with the value in the other platform by default. To prevent data from overwriting blank values, we can set up automation rules in Pardot.
- The Type of field will depend on what data you would like to collect.
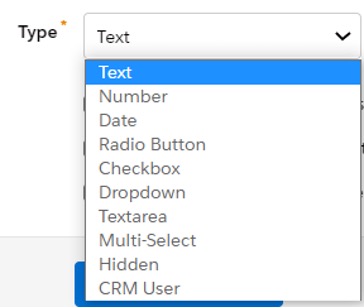
| Type |
Description |
| Text |
This is free-form data entry, this includes text, numbers and symbols. |
| Number |
This type of data can only be number values only. |
| Date |
This data can only be date values. This can be input by typing it out or selecting it from a pop-up calendar. |
| Radio Button |
This is customised to have pre-made options, where only one can be selected. |
| Checkbox |
This is also customised to have pre-made options, where the user will select multiple answers. |
| Dropdown |
Similar to Radio buttons in the sense of one out of multiple options will be selected. The format will display once the dropdown is clicked. |
| Textarea |
Similar to Text Type, but with a larger capacity. The limit is 65,535 characters. |
| Multi-select |
Like Checkbox types, users will select multiple options. The formatting is different so will depend on the style you seek. |
| Hidden |
This field is invisible on forms but still collects data. |
| CRM User |
Connects to the Salesforce user. This can’t be used on Pardot Forms. |
4. Choose the ‘Record and Display multiple option’. This allows all data entries to be recorded in list form, with the most recent at the bottom. This is a useful feature for ‘Comments’ as it may be completed multiple times.
Note: If ‘record and display multiple option’ is enabled, we are not able to use this field as a variable tag if we are using Pardot Merge Language (PML). See our blog on other reasons to switch to Handlebars Merge Language (HML).
5. ‘Set a default mail merge value if the field is blank’ is a particularly useful feature to enable if using variable tags in email templates. If the field required is blank, the default merge field will be selected instead.
For example if ‘Company’ is selected and the prospect field is blank, the default value could be set as ‘your organisation’, this ensures email accuracy and prevents any awkwardness!
6. ‘Use Predefined Values’ is exclusive for checkboxes, multi-selects, radio buttons and drop-downs. This feature gives the prospect a choice of pre-made options to select from. Once this is chosen, a selection called ‘Values’ will appear (see screenshot below).
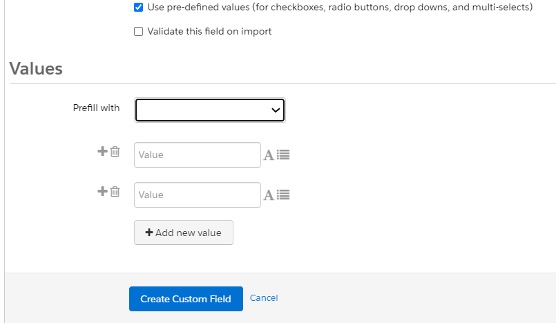
Simply add any values by clicking the +Add new value button.
Note: If you would like to update your values in future, please be mindful that renaming values will overwrite the pre-existing value in the prospect record and alter any existing automation rules. Alternatively, you can add new ones and remove ones that are no longer needed.
- Additionally, once use predefined values is selected, a further checkbox appears: ‘validate this field on import’. This simply refers to comparing prospect data with predefined values in Pardot and as a result, only importing prospects with applicable answers. This is useful as it allows the data to be imported to correspond with Pardot values and therefore, the data will be clean.
7. Select Create Custom Field when you are finished.
For Custom Account and Opportunity Fields, the setup process is similar but includes a “Required” checkbox, offering the option for this field to be compulsory.
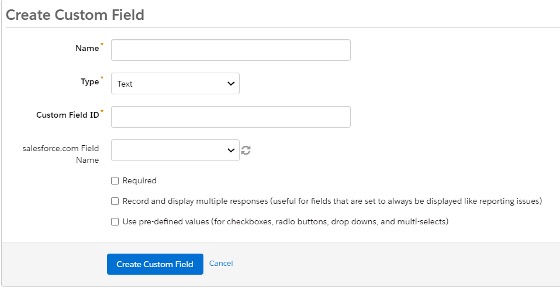
In Pardot Lightning, accessing custom fields is slightly different. To add custom fields, head to the Pardot Settings tab > Object and Field Configuration.
Mapping Salesforce and Pardot fields
Mapping Salesforce and Pardot fields ensures that data is passed seamlessly through the two instances, accurately.
If not mapped correctly, you may find yourself with a Sync Error that looks like this: “Required field missing: Required fields are missing: [XXX]”. To fix these, head over to our blog Common Pardot Sync Errors & How To Approach Them.
To map Salesforce and Pardot fields, we must ensure we have:
- The Salesforce- Pardot Connector installed
- A Pardot admin role assigned
- The corresponding custom field created in Pardot.
Now, we are able to map the steps:
- Open the custom field and click edit
- In the Salesforce Field Name dropdown, choose the corresponding CRM field e.g:
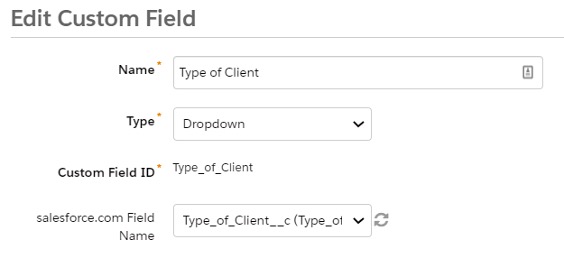
Make sure this is the correct field name by checking the API name (Type_of_Client__c) in Salesforce
3. When creating a custom field in Pardot, in order to sync correctly the field type will need to mirror the exact setup of the Salesforce field, otherwise it will result in additional sync errors. For example, if the Salesforce field is text, the Pardot field type will need to be text also.
If you would like to learn more on Understanding Pardot and Salesforce Sync Behaviours, please click the link.
Here at MarCloud we think that Custom Pardot fields are a great way of capturing detailed information about our customers, offering a more personalised service and maximising our sales! If you have any questions about field definitions and the above steps to set fields up, please contact the MarCloud Team.


