Marketing Cloud’s Advertising Studio is a powerful tool that integrates with online advertising channels, allowing you to run ad campaigns targeting contacts within your database. Did you know that it’s possible to connect Pardot and Advertising Studio, so you can include these prospects in your campaigns too?
Whether you’re using the full Marketing Cloud suite or Pardot (Account Engagement) and Advertising Studio as standalone products, the ability to connect the two is available to you.
Why connect Pardot and Advertising Studio?
Without a connection between Pardot and Advertising Studio, it is still possible to target Pardot prospects on digital ad platforms but uploading the data is a manual process.
For example, Meta Ads Manager (aka Facebook and Instagram) allows you to import contacts using their email address, phone number, and other data points as a simple .csv file. However, this involves manually exporting the contacts from Pardot, organising the data into a spreadsheet template compatible with Meta (or your chosen ad platform), and then uploading the list.
Now, whenever manual handling of data is required, we get nervous.
With manual data handling comes the risk of data corruption, non-compliance, and potential GDPR breaches. Not only this, the process is time-consuming and tedious for your team and means contacts will only be included in ad campaigns when the imported list is refreshed manually.
Advertising Studio on the other hand makes it easy to target prospects in ad campaigns by allowing you to connect your accounts and create audiences directly within the system. Your data is kept safely within the CRM and records can be synced instantly, meaning no contacts are left out of campaigns.
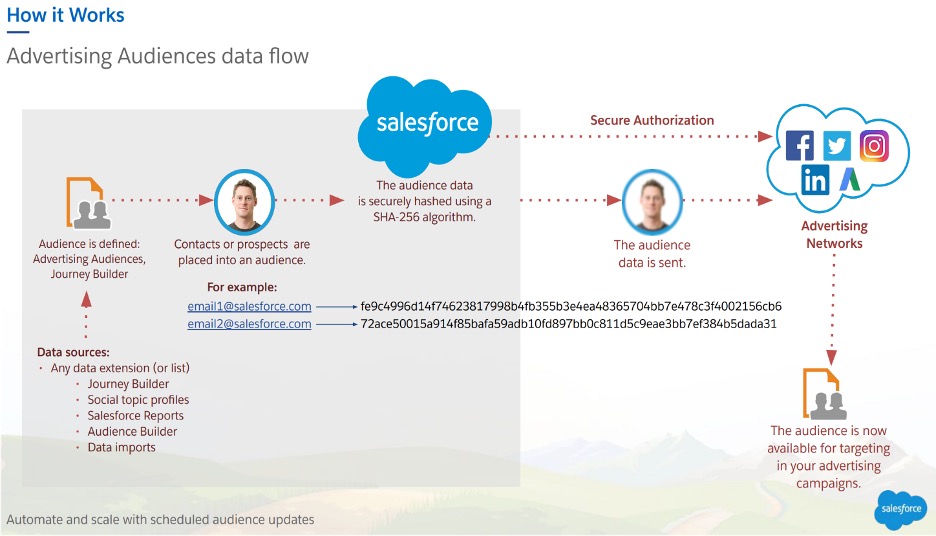
Image: Salesforce
This is useful for running real-time campaigns to:
- re-engage inactive subscribers
- extend the reach of your email marketing by coordinating with advertising
- retarget contacts based on their recent behaviour
- exclude certain contacts from advertising, i.e. those who have already purchased the product you are promoting
- immediately capture and import leads from Facebook Lead Ads into Sales Cloud
You can even use first-party data to create ‘lookalikes’ of your best prospects for ad campaigns and when you uncover new leads, these are instantly imported into Salesforce for follow-up by the Sales team.
All of which results in a better return on investment for your online advertising campaign. All that’s required is the configuration of your accounts to allow data to flow between Pardot, Salesforce, and Ad Studio.
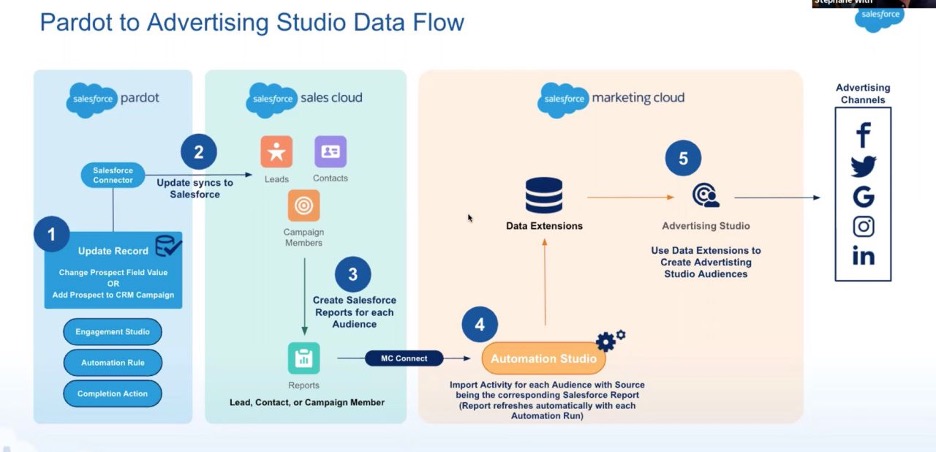
Image: Salesforce
For Enterprise users there’s even the capability to see and manage campaigns directly from Ad Studio, saving the time and effort of switching between multiple platforms.
Audience criteria
Each of the advertising platforms available has different criteria used to match contacts and some have the ability to match more data points than others. For example, Facebook (and Instagram) use the attributes email address, phone number, mobile advertiser ID, and Facebook App User ID, whereas LinkedIn uses solely the contact’s email address.
Naturally, the better your match rate, the bigger your audience size and the more effective your campaign could be. Knowing your match rate upfront is key to having a sound social ads strategy.
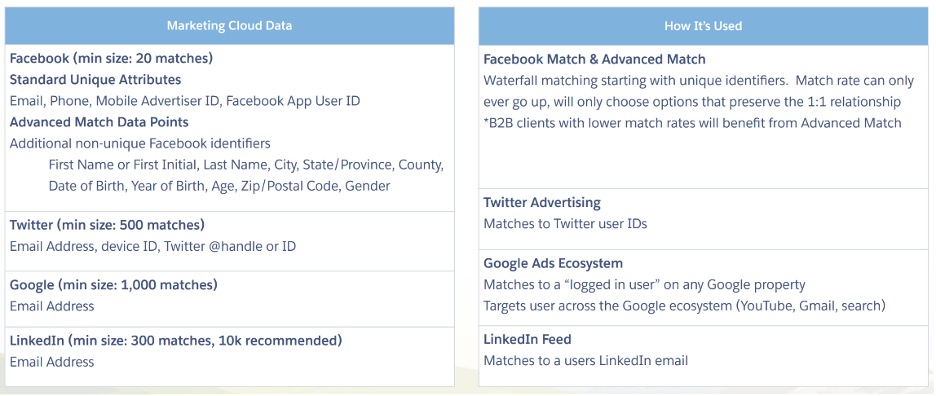
Image: Salesforce
As you can see above, platforms also have minimum match sizes and this is largely for privacy reasons. If a user has provided a different email address to Pardot than they use for their social account login, they will not be matched.
How to connect Pardot and Ad Studio
Requirements
Connecting Pardot and Ad Studio involves tasks in Salesforce, Pardot, and Marketing Cloud. Unfortunately, it’s not a simple ‘plug and play’ solution and may require a Salesforce Partner, especially if you’re less than advanced in the platform.
Happy to go it alone? In order to make the changes, you’ll need to meet the following requirements:
- Permission to view, add, and edit campaign objects in Salesforce.
- Marketing user permissions in Pardot.
- A verified Salesforce-Pardot connector.
- Access to Advertising Studio or full access to Marketing Cloud.
- Marketing Cloud Connect enabled.
- A Marketing Cloud File Transfer Protocol (FTP) account and be an FTP user.
- A third-party social account connected for advertising.
If you don’t meet all of these requirements, you may need to work with other Salesforce admins and Pardot/Marketing Cloud users to complete all of the following tasks. We recommend you complete the tasks in order because those within Salesforce and Pardot must be done before you’ll be able to finalise the setup in Marketing Cloud.
Salesforce tasks
Create a Salesforce campaign
- Create a new Salesforce campaign by going to the ‘Campaigns’ tab and hitting ‘New’.
- Select a record type and hit ‘Next’ to name your campaign.
- Set the status to ‘In Progress’ and make the type ‘Social Media’. Leave the dates blank.
- Choose ‘Active’ and hit ‘Save’.
Now you’ve created a Salesforce campaign, the next step is to build a Salesforce report.
Build a Salesforce report
- On the ‘Reports’ tab select ‘New Report’.
- Choose ‘Campaign with Campaign Members’ for the report type and hit continue.
- Click the edit pencil icon to rename the report.
- On the Outline tab, select ‘Email’ as a column for your report.
- Add any other columns that are relevant i.e. any points you want to match for targeting.
- Select the ‘Filters’ tab and apply these filters:
- Show me: My active campaigns
- Campaign Name equals the name of the campaign you created in the previous section.
- Add any other relevant filters. Salesforce recommends you apply a date filter such as Member Status Update Date to limit the report to campaign members from a specific time frame.
- Click ‘Save & Run’.
Now, for the Pardot tasks.
Pardot tasks
At this point, you need to decide how Pardot prospects are synced to the campaign you created in Salesforce. It’s possible to add prospects to Salesforce campaigns via:
- Completion actions
- Segmentation rules
- Automation rules
- Page actions
- Engagement Studio program actions
The method you choose will be dependent on your Pardot setup.
Let’s say you want to include all new subscribers in your LinkedIn advertising campaign. When a user successfully subscribes by submitting a form, the Automation Rule ‘Prospect custom field’ is ‘Single opt-in’ is used, with the ‘Action’ to add to your chosen CRM campaign as ‘Active’.

You’ll then need to set up a Completion Action to ‘Add to CRM campaign’, selecting the audience to add the prospect to, with status ‘Active’.
Once both the Salesforce tasks and this task are complete, you can move on to the Marketing Cloud or Advertising Studio tasks.
Marketing Cloud tasks
There are three parts to the Marketing Cloud configuration. First, you need to create a Data Import in Email Studio. This will transfer your Salesforce report data into Marketing Cloud.
Create a Data Import in Email Studio
- In Email Studio, hover over Interactions and select ‘Import’.
- Click ‘Create’ and name your data import, filling out the required fields.
- For ‘File Location’, choose ‘Salesforce Objects & Reports’.
- Hit ‘Report’ and then ‘Select’.
- Check the box for your newly created Salesforce report and click ‘OK’.
- In the ‘Customize DataExtension Generation’ section under ‘Included’, select all fields you want to sync from Salesforce. In the ‘Key’ column, choose one field you want to use as an identifier for prospects in your Advertising Audience, such as email.
- Click ‘Save Config’ to go back to the New Import screen and then hit ‘Save’.
Next, you need to create an Automation in Automation Studio. This will automatically sync your Salesforce report with Marketing Cloud.
Create an Automation in Automation Studio
- Head to Automation Studio and choose ‘New Automation’.
- Click ‘Untitled Automation’ and enter a name, then hit ‘Done’.
- Click and drag the ‘Schedule’ option into your workflow under ‘Starting Source’.
- Hit ‘Configure’ to set the data sync frequency - daily is usually best.
- Click ‘Done’.
- Select ‘Import File’ and drag it into the workflow under ‘Step 1’.
- Click ‘Choose’ and select the data import for your Salesforce report you created in Email Studio, then click ‘Done’.
- Hit ‘Save’ and then test your automation by clicking ‘Run Once’.
- Under ‘Schedule’ click ‘Active’ and then select ‘Activate’.
You’re almost done! The last task is to create an Audience in Advertising Studio, based on your Salesforce report Data Extension.
Create an Audience in Advertising Studio
- Go to Advertising Studio and then Advertising Audiences.
- Click ‘Create Audience’.
- Enter a name for the audience and choose an ad network for the Destination.
- Select an ad account.
- Hit ‘Configure’ and on the configuration page select ‘Data Extension’.
- Under ‘Synchronised Data Extensions’, select the DE you created for your Salesforce report.
- Choose ‘Save’.
The setup is now complete and Pardot and Advertising Studio are connected! When new prospects enter Pardot and are added to your Salesforce campaign, the Advertising Audience will automatically update based on the sync frequency you set.
Hopefully, this guide has helped you successfully connect your Pardot and Ad Studio accounts but if you have questions or find yourself with errors, feel free to contact us about flexible support packages, including ongoing retainers or one-off projects.

Anton Minnion
A data scientist and engineer, Anton has extensive experience in successfully delivering martech and salestech solutions for a variety of clients, both big and small, and across 25 countries. With a scary amount of knowledge in the development space, his focus at MarCloud is on innovating technical solutions for clients but also creating brand new apps and products for Salesforce platforms, to solve common business challenges.
More by Anton MinnionFeatured resource
Salesforce Marketing Tools
With the eBook ‘A Guide to Salesforce Marketing Tools’ in your arsenal, you’ll have a go-to, comprehensive, expert guide to understanding and selecting your perfect Salesforce marketing platform(s), be it Marketing Cloud Account Engagement (Pardot) or Engagement, and the products available to each.
Download now