This blog was written before Pardot was renamed to Marketing Cloud Account Engagement. You can read more about the name change and what it means here.
Pardot released their Automated Resubscribe’ feature back in August 2019, and in an ideal world, you will have eagerly set this feature up straight away. Since then, perhaps all you’ve really wanted is the ability to customise the prompt that appears on your Pardot resubscribe forms.
No… this feature slipped under the radar for you?
No problem, this post has you covered!
I’ll explain how to use the Pardot resubscribe feature and how this further enhancement has given us even more control over the resubscribe experience.
What is the Automated Resubscribe feature?
The Pardot Automated Resubscribe prompt gives prospects who’ve previously opted out of receiving your marketing emails the opportunity to opt back in.
For example, let's say one of your prospects, Daniel, previously unsubscribed, yet today he views a form on your Pardot landing page.
He inputs his opted-out email address just before submitting the form. With Pardot’s Automatic Resubscribe feature, a prompt appears on his screen. He now has the choice to send himself your resubscribe autoresponder email with one click of a button.
Within the email there is a link to resubscribe. By clicking this link, Daniel has opts back in and can receive your marketing emails once again!

This functionality in Pardot really simplifies workflows for marketers, as it makes it super easy for unsubscribed prospects to opt back in - themselves!

How to set up Automated Resubscribe
The Automated Resubscribe feature is fairly straightforward to set up, but in order to have this functionality available you must first have Pardot’s Handlebars Merge Language (HML) enabled on your account.
The first step is to configure a resubscribe email template.
Pardot provides a ready-made resubscribe layout or you can add the resubscribe merge field to any email template.
If you decide to use your own email template, remember this email will be similar to an autoresponder email. Within this email, we need to include the resubscribe link and ask if the prospect is happy to resubscribe.
For example If you are happy to receive emails from us, click here (link) to opt back in’.
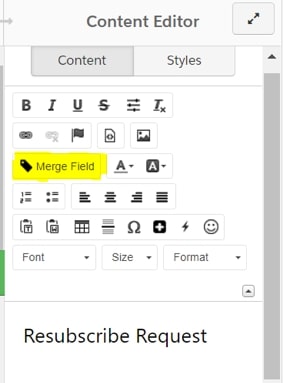
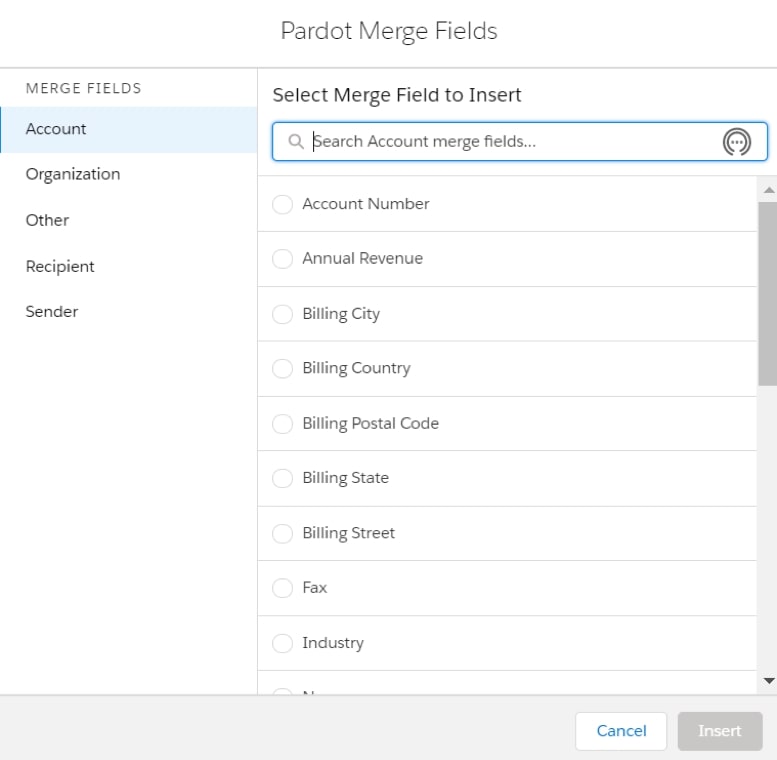
The simplest way to add the resubscribe link is via the Merge Field Picker’.
This innovative feature makes it easier to find what we’re looking for. Click the Merge Field button within the Editor tab of the email template, and thanks to HML, the merge field picker appears. Navigate and browse by category or simply use the search box.
Once you’ve created your email template, navigate to your Account Settings > Edit.
Towards the bottom of the page you’ll see the Prospect Resubscribe’ tab.

Note: this section can only be viewed in settings once you’ve opened the edit tab.
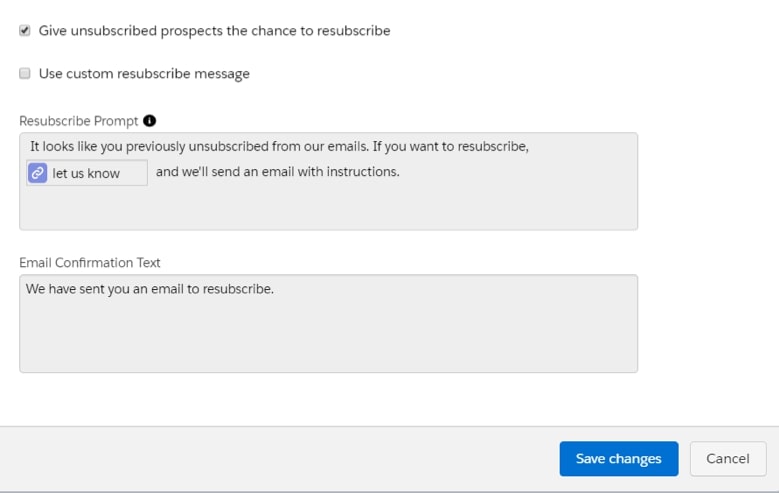
Simply tick the checkbox Set an email template to use to resubscribe’. This will allow unsubscribed prospects the chance to resubscribe when they complete any of your forms.
Next, choose the email template you created from the dropdown.

When setting this up, be sure to write some engaging copy to replace the form re-opt in message. The default is It looks like you previously unsubscribed from our emails. If you want to resubscribe, let us know and we'll send an email with info.’ but this should be amended to be more on-brand.
How to customise the resubscribe prompt message
Thanks to Pardot’s January 2020 release, we can now customise the email resubscribe messages that appear on forms for opted out prospects.
This feature enables us to edit the default form message on a per form basis or for all forms. Within this new feature, we can now translate the prospect resubscribe prompt if required.
Considerations for using resubscribe
- HML must be enabled for this functionality to be accessible. If you are still unsure about making the move from PML to HML, head to our blog Why You Should Use Handlebars Merge Language (HML) for Pardot’ for more information.
- If the Overwrite Prospect Opted Out field setting is disabled on your account, and a prospect opts back in via this method, it will show on their record in Pardot but not in Salesforce.
- When the unsubscribed prospect clicks the link in the email to opt back in, they will visit the same page that they would see by clicking the resubscribe button on your preference page.
- Once you’ve activated Prospect Resubscribe, it is added to all your forms within Pardot. If resubscribe messaging isn’t needed for a particular form, the marketing user can disable it.
Pardots Resubscribe prompt is a terrific feature to utilise! If you need help with any of this, we’re happy to chat with you about implementation, support and training! Just send us a message and we’ll be in touch.