This blog was written before Pardot was renamed to Marketing Cloud Account Engagement. You can read more about the name change and what it means here.
This is a guest post written by Lindsey Mark, Global Cloud Solution Alliances Sr. Manager at Salesforce, responsible for Pardot Consulting Partner Enablement. She lives in Indianapolis, IN and has been working at Salesforce with the Pardot business since 2017.
We’re all very excited to enable the new Lightning Landing Page Experience and the setup wizard makes most of the configuration a breeze. There are, however, a few configuration items which will help orient and onboard your users to the new Lightning Content Builder Experience. This post will outline Pardot Lightning App administration tasks and provide you with an action plan for landing page configuration after the content setup wizard steps are completed.
Following best practices is key to a successful Content Builder rollout. Consider auditing your Pardot instance before beginning the process of enabling the new Lightning Content Builders. Many partners like MarCloud, offer account audits or health checks to ensure you’re set up properly. Contact them or check out the AppExchange for skilled Salesforce Pardot partners in your region.
A majority of the following configuration items require Salesforce Admin or Marketing setup admin permissions. If you’re not a Salesforce or Marketing Setup Administrator please connect with your Salesforce Admin to complete these steps.

1. Add the Landing Page object to the App
When onboarding new users it’s important to make the new Pardot Lightning Builder easy to find within the Pardot Lightning App.
While it’s possible to create Lightning Builder landing pages from the campaign object, it is much easier for users to navigate to the Landing Page object home. Adding the landing page object to the Pardot Lightning App ensures that all users can view the new object from the app, rather than having everyone attempt to customise their app independently.
This task can only be performed by a Salesforce Administrator or a Salesforce Marketing Admin with “Customize Application” user permissions.

Optional: If you’ve not yet configured the Lightning Email Builder, consider also adding Pardot Email and Email Templates to Selected Items.
Before beginning this process, discuss needed tabs and the ideal order with your key marketing stakeholders, with the most used tabs listed first. They may want to add the campaign, Pardot Email, Email Template object tabs in the Pardot Lightning App. After making the change, perform a final test with your marketing team to verify the tab order is optimal for the average user’s screen size.
- Navigate to Salesforce Setup > Apps > App Manager
- Navigate to the Pardot Lightning App and use the drop-down to “edit”
- Select “Navigation Items”
- Move “Landing Pages” from the Available Items list to the Selected Items.
- Reorder the items as desired
- Verify the tabs visible for all users
- Verify the tabs are in the preferred order for Marketing users
When completed, don’t forget to notify your Pardot Lightning App users that you’ve added and reordered the tabs and set a date to train them on the new functionality.
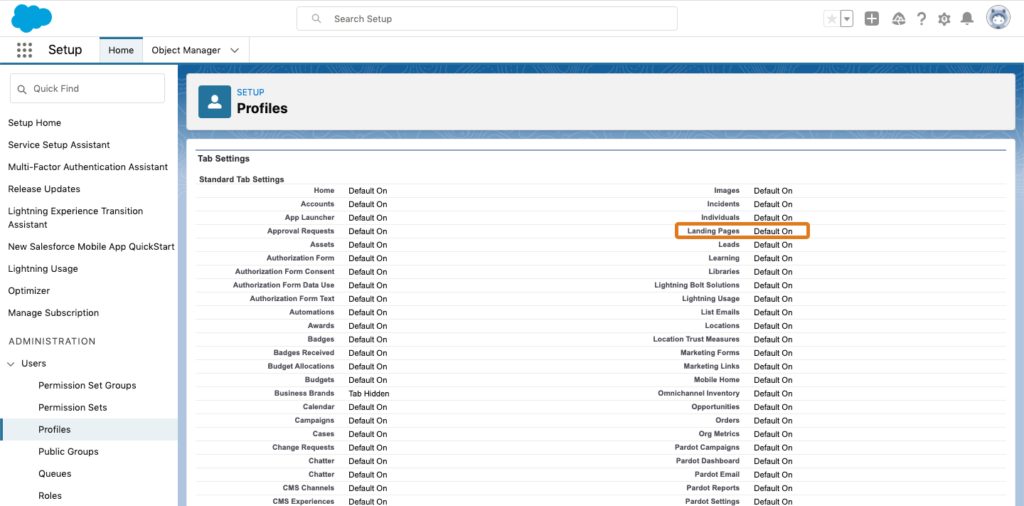
Please note that some Salesforce user profiles may not have visibility to the Landing Page, Email, Email Templates or Campaign objects from Tab Settings. Work with your Salesforce admin to verify that all Pardot users have permission to view the following objects; Landing Page, Campaign, Email Content, Email Templates.
2. Add the new fields to your Landing Page object
Make sure that users have the information they need to best use and adopt the new Lightning Landing Page Builder by auditing the page layout. This step is only required for Salesforce instances where the page layout for the landing page object has previously been edited.
Unsure if you need to take this step? Here’s a quick way to find out:
Adjustments to the Landing Page layouts need to occur, if users notice the Publication Details are missing when creating a new landing page.
Here’s a quick video tutorial on how to edit the Landing Page object to include the new fields.
3. Create list views
Similar to making the Landing Page object easy for users to find, it’s important to make individual landing page records easy to find with custom list views to help teams differentiate between landing pages.
The following video shows you how to create and filter landing page list views. Don’t forget to create customised list views for both Marketing and Sales users and notify them of these new views.
If users are not familiar with Salesforce UI, you may also want to remind them of how to pin the list view they’re most likely to use so it doesn’t continue to default back to the most recently viewed. Use this Salesforce support video to train users how to use list views.
4. Administer list views
Once the list views are created make sure to update the selected fields to help the team quickly determine which user updated the landing pages along with other important supporting details.
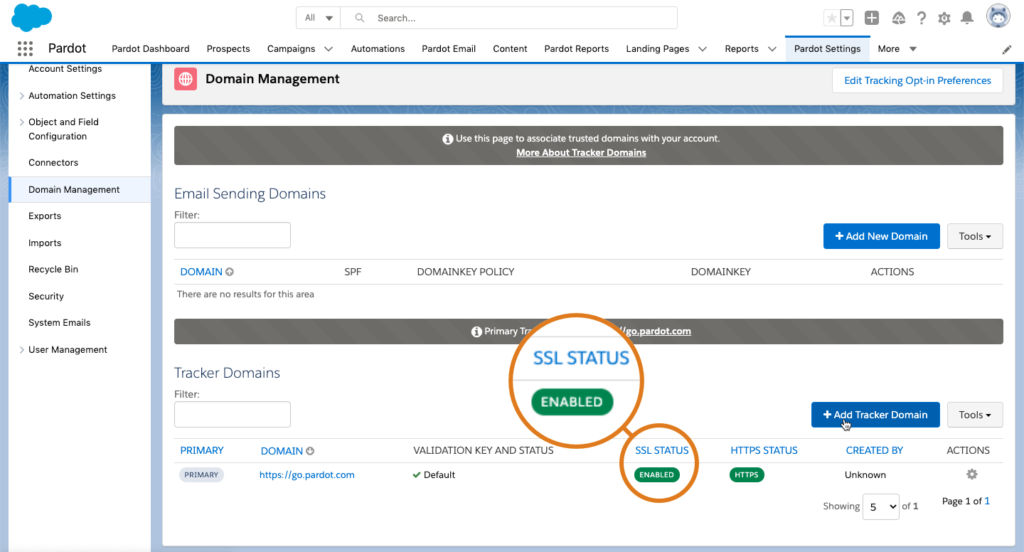
5. Audit hosted images to avoid mixed content errors
The previous four steps covered administrative tasks to facilitate the use of the Landing Page Builder for Salesforce users. Next, we’re going to make sure it’s a good experience for people viewing your landing pages. The last thing you want to happen is for customers to see mixed content errors when trying to view your snazzy new landing pages.
To avoid browsers telling your customers your website is unsafe to navigate to, check to make sure that you’ve enabled SSL on your company website and in Pardot. Finally, make sure any locations you plan to use to externally host images for landing pages are using https not http in the url.
Chrome began requiring SSL on all websites as of February of 2020, so this requirement isn’t new, but is worth mentioning just in case there are any non-ssl images out there you might potentially link to!
I hope these customisations help your Pardot Lightning App users better orient themselves to the new Landing Page Builder experience! To help you manage the admin process, you can access my Pardot Landing Page Builder Admin Checklist for a recap of all the prerequisites and configurations required.