This blog was written before Pardot was renamed to Marketing Cloud Account Engagement. You can read more about the name change and what it means here.
Firstly, if you aren’t using the Pardot Engagement Studio, then it’s definitely worth having a think about how you can start using it because you’ll be blown away by how innovative it can be.
The Engagement Studio was built to supersede the linear drip programs and allow for a new approach to lead nurturing. It enables you to build highly intelligent workflows using a user-friendly canvas that bears a resemblance to the New York subway map.
To fully utilise the benefits of a Pardot Engagement Studio, you must first grasp the basics of how it works.
Engagement Studio Basics
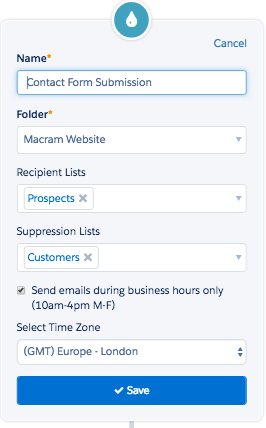
The first thing you’ll see when setting up a new engagement program is the settings. Here you’ll be able to set the standard options that you would normally expect, like attributing to a folder or adding recipient lists and suppression lists. However, there are a couple of interesting options that you’ll notice.
The first is a checkbox that limits email sends so that they only go out Monday-Friday between the hours of 10am-4pm and this is especially useful for campaigns targeting B2B contacts who work traditional hours. The second option, which ties in with the first, allows you to choose what time zone you would like the program to operate in.
This is powerful because you will be able to duplicate other Engagement studios and target prospects in different countries across the globe and still be confident that they’re receiving emails during their working day.
The canvas itself allows you to control four elements. Actions, Rules, Triggers and Pause duration. These four components allow you to create complex programs designed for personalised communications with your audience.
Q. What is the difference between rules and triggers?
A. The easiest way to remember this is to know that triggers listens out for engagement from the prospect and a rule checks the prospect record for a specific criteria or value in the system.
The table below summarises the options within the four elements.
| Actions | Rules | Triggers | Wait |
| Add to List | Assigned Salesforce Queue | Custom Redirect Click | X amount of Days |
| Add to Salesforce Campaign | Assigned User | Email Link Click | X amount of Weeks |
| Adjust Score | Assignment Status | Email Open | |
| Apply Tags | Grade | File Download | |
| Assign to Group | List | Form | |
| Assign to Salesforce Queue | Pardot Campaign | Form Handler Complete | |
| Assign to User | Prospect Custom Field | Landing Page | |
| Assign via Salesforce Active Assignment | Prospect Default Field | ||
| Change Prospect Field Value | Prospect Email Status | ||
| Create Salesforce Task | Prospect Tag | ||
| Notify User | Salesforce Campaign | ||
| Remove from List | Salesforce Campaign Status | ||
| Remove Tags | Salesforce Status | ||
| Send Email | Score |
How and when to use the Engagement Studio
If you haven’t yet built an Engagement Studio and need inspiration for your first automated program, here are some ideas to help get you started.
-
Lifecycle stage
Is your pipeline looking a like it could do with a boost? Start automating communications to your prospects and allow them to flow through the customer journey much easier.
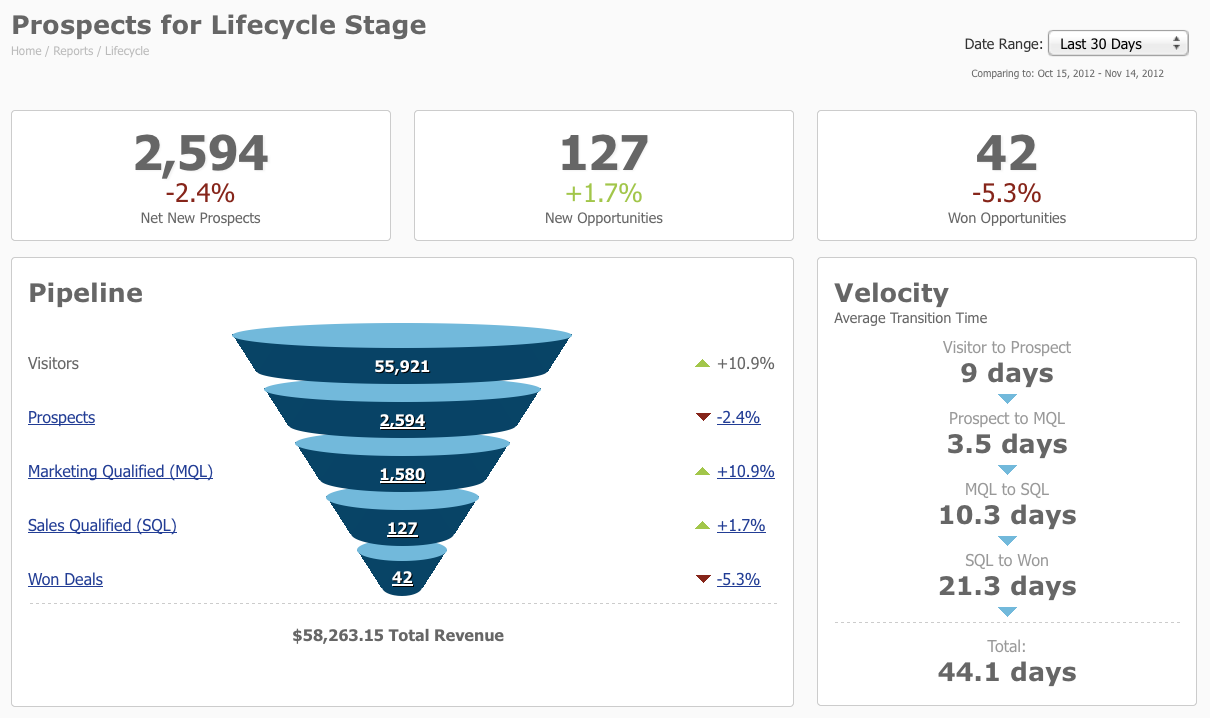
Engagement Studio stages based on lifecycle:
Prospect to MQL: A program that focuses on lead distribution. Once a prospect is assigned to a user, they acquire MQL status.
MQL to SQL: Focus on generating opportunities in Salesforce. Once an opportunity is associated to a MQL, they become a SQL.
SQL to won deal: Arguably the most fragile point in the customer journey. Use triggers, notifications and Salesforce tasks to ensure sales have the best chance of closing these deals.
-
Upsell & Brand Evangelism
Listen out for opportunities with the Engagement Studio and give customers a reason to love you. Send them relevant offers and content at exactly the right time by using triggers and automate notifications to account managers to check in when they’re inactive or looking for something specific.
-
Customer Retention
Utilise the date field in your CRM to notify you or send an email when a customer contract is up for renewal and be sure to slowly nurture your customers who are due to leave soon. Much like how phone companies start to call you towards the end of your phone contract, they do so because it works. Allow your customers to love you with an automated customer retention Engagement Studio.
-
Slow nurture campaign
Are prospects not converting when you communicate with them regularly? Do you have prospects who want a call back in 6-12 months? Do you have a long sales cycle? If so, it’s definitely worth setting up a slow nurture Engagement Studio. This type of program looks after the prospects who need more time to convert and can be drip fed information so you are always front of mind when it comes to the final buying decision.
-
Customer onboarding
When a new customer signs up, you can get the ball rolling immediately with step by step emails for the new customer that guide them through the onboarding process, notification emails for sales when they need to call and have full visibility on those that become inactive after a certain period of time.
-
Event registration
For all upcoming webinars and events, why not create an Engagement Studio to promote attendance and send different emails to those who attended vs those that did not attend.
Testing your Engagement Studio
Sending emails automatically based on logic can be scary. In fact, sending irrelevant or factually incorrect emails is one of the biggest fears a marketer has.
Fortunately, testing is a big part of the Pardot Engagement Studio. The testing canvas allows you to run through the program logic and make real-time decisions that shows where the prospect could be taken. You’ll be able to test every possible journey and find any gaps or improvements to your program by using this functionality.
Reporting
Once a program has started, the reporting tab will become available to you which shows high level statistics. Feel free to click into each of the steps to show the report card which shows more information about the stage. When your program becomes more advanced and you start to swap out different emails, you’ll be able to see a split report which compares the performance of each email, kind of like a delayed A/B test.
If you’re in a rush, you can export the Engagement Studio program stats by clicking Tools’ in the top right of the reporting screen.
Top Tip: When looking at the program reporting stats, notice that unsubscribed prospects will still flow through the program steps even if they don’t receive any emails.

Tom Ryan
Founder & CEO of MarCloud, Tom has been on both sides of the fence, client-side and agency, working with Salesforce platforms for the best part of a decade. He's a Salesforce Marketing Champion and certified consultant who loves to co-host webinars and pen original guides and articles. A regular contributor to online business and marketing publications, he's passionate about marketing automation and, along with the team, is rapidly making MarCloud the go-to place for Marketing Cloud and Salesforce expertise. He unapologetically uses the terms Pardot, Account Engagement and MCAE interchangeably.
More by Tom RyanFeatured resource
Mastering Pardot Engagement Studio
Want to become a master user of Engagement Studio? We’ve saved you the blood, sweat and tears of learning how to make the most of Engagement Studio so you can jump right in and start building logical, effective engagement programs faster.
Download now