Any Pardot (now called ‘Account Engagement’) implementation is a challenging project, but it’s another for your marketing and sales teams to feel comfortable using your new platform. In this blog we explore every factor that could act as a blocker when getting started with Pardot.
Note: In this blog we use the original platform name ‘Pardot’ but in some orgs you may see the new name ‘Account Engagement’. For more about the name change, read this blog.
Firstly, Pardot allows you to customise your marketing efforts to fit your company and customer needs, but only if you’ve unlocked these features from the outset. This is why it is important to ensure everything is setup correctly, before making use of the system.
The main problems we encounter with clients that prevent users from getting started are:
- Setting up and syncing users incorrectly
- App visibility and permission issues
User settings
Creating a User in Salesforce
- Users in Salesforce have specific identifying details. You can set up a new user in Salesforce by heading to Setup > Users > Users.
- Depending on how many users you want to add, Select New User (single) or Add Multiple Users (up to 10).
- Select the user license - this will decide the Salesforce accessibility for each user.
- Select a profile for the user and then save.
Next, within Salesforce Setup go to Account Engagement > Business Unit Setup and then select Manage Users.
This will open the user assignment window, where you can add your users under either the ‘Marketing’ user bracket or the ‘Sales’ user. Users under ‘Marketing’ inherit the Pardot role mapped to their profile in the User Sync settings. Marketing users have control over prospect data and marketing modules, including creating lists, forms, landing pages, and sending list emails.
Users under ‘Sales’ will inherit the Sales Role. The Sales User role has limited access to Pardot features and data. For example, Sales users only have access to prospect management functionality. Sales users can send one-to-one emails to prospects, but can’t send list emails. They can view, edit, and export only the prospects assigned to them.
Running a User Sync
To connect Salesforce and Pardot users, enable the Salesforce User Sync. This means that all users will be managed in Salesforce, and all records in Salesforce and Pardot will be updated simultaneously to become ‘synced’ users. A user will be created in either Pardot or Salesforce so you don’t have to create a record in both and connect the two.
Access and visibility issues
Can’t see Pardot in Lightning App
Often accounts can stumble across issues where some of their users are unable to see the Pardot Lightning App as expected within their CRM.
If this is an issue that you come across there are a few steps you can take:
- Firstly, check that the required user has the correct permission set applied to them. In order to check this and apply the permissions:
- From Setup, in the Quick Find box, enter Permission Sets, then select Account Engagement User, Sales Cloud User, Service Cloud User, or CRM User from the list. Alternatively, access directly the user who doesn’t have access and amend their Permission Sets.
- Click Manage Assignments.
- Click Add Assignments and choose all users who need access.
Usually, this step will provide the necessary access for that user. However, if they are still unable to see the Pardot App, it may be that the User’s profile has not been added to the App itself. To make the Lightning App available to profiles:
2. Within the Salesforce Setup window, enter ‘App Manager’ in the Quick Find box. This will bring up a list of the apps linked to the account. Find ‘Pardot Lightning App’ (or ‘Account Engagement Lightning App’ for those whose accounts have been updated already). From the dropdown arrow select ‘Edit’.
3. Click User Profiles, and then select all profiles that need access to the app.
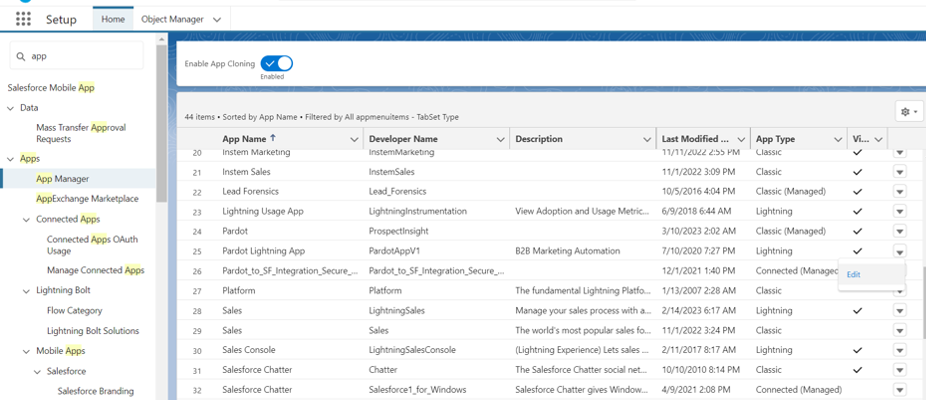
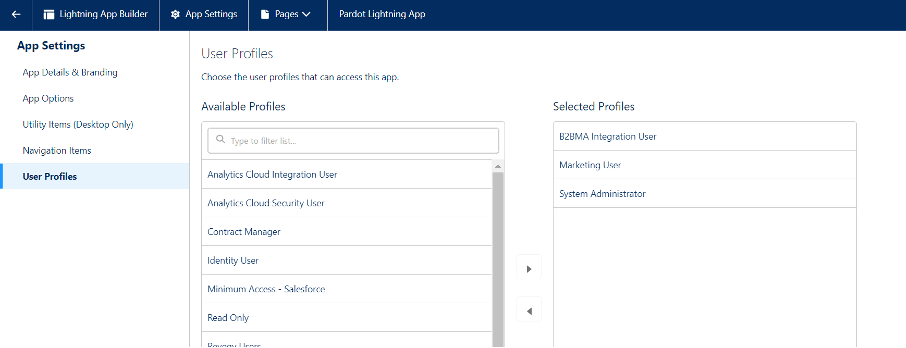
After the app is enabled, it appears in the App Launcher for all users with a Sales Cloud, Service Cloud, or CRM user seat who have the app permission assigned.
The Pardot Lightning App mirrors the Salesforce Lightning interface, allowing you to access the app without needing to leave Salesforce, which is something Pardot Classic didn’t offer. Use the App Launcher (waffle icon, top left) to navigate to the Pardot app/other apps you have access to.
Unable to access certain features
Followed all the necessary steps, but still certain users are still having visibility issues? Well not to worry, this could be solved as quickly as toggling a default setting on!
Some users’ profiles may have different settings applied, to prevent them from being able to access everything, which is great in terms of privacy of certain elements.
However, you can also run into the hurdle of not knowing why certain users can’t see some elements that others can. To check and amend this, head to the user having problems, and then click the link to their profile. From here you have access to amend feature visibility, for example, the ability to see campaigns, emails, reports, landing pages, leads, and so on. Simply change the necessary tab to ‘Default On’.


Now your users have the necessary access to the Lightning App, you can begin taking advantage of all its great features for timely, tailored, and effective marketing - or at least, you can begin learning how to use them!
Start your team off on the right foot with on-demand training ideal for onboarding beginners. Pick a course from the Marketing Cloud Training Academy and work through the pitstops at your own pace, with the assistance of live Q&A sessions and a community of users via a private group.

Hannah Telford
Hannah has a background in B2B marketing, with a focus on delivering automated marketing campaigns through Pardot. Combining both her IT skills and marketing knowledge, she strives to support customers with powerful and effective solutions for Marketing Cloud.
More by Hannah TelfordFeatured resource
Pardot Implementation Checklist
Starting out with Marketing Cloud Account Engagement, formerly known as Pardot, is no easy feat. Set yourself up for marketing automation success with this step-by-step checklist for implementing Account Engagement (aka Pardot). Work through the stages and get in touch if you need support!
Download now