Lead Grading in Account Engagement (formerly Pardot) helps marketing and sales teams prioritise high-quality inbound leads. As Pardot lead grading is a measure of customer fit, this feature ensures your sales reps only work leads that fit a typical buyer profile, so conversations can be smooth and relevant, with no time wasted on those leads unlikely to bring in revenue.
In case this is the first time you’re learning about Pardot Grading, in a nutshell, a grade is used to determine how well a prospect fits your company’s ideal prospect profile using explicit criteria and Automation Rules.
Where behaviour by customers and prospects is what drives lead scores, grading needs no activity from the prospect. Instead, the personal and company data you already hold determines each grade. This data can include location, industry, job title, and other information that helps you qualify and rank prospects.
Prospects will be graded immediately using the data fields completed, although the grade can also change over time as you gather extra data.
Ultimately, the higher the letter grade, the more interested that prospect will likely be, giving the green light for your sales team to reach out.
Swot up on Pardot Lead Scoring and Grading with this free B2B Marketer’s Handbook.
The question is, how do you plan and build grading profiles in Pardot/Account Engagement?
Many users get hung up on building the perfect grading framework, when really it can be quite simple to get started. Here’s how to expedite the process for immediate improvements to your lead flow.
3 easy steps towards grading
1. Establish your buyer persona(s)
Firstly, it’s important to be clear about exactly who your typical buyer is. It’s essential to discuss your ideal customer with the sales team, to ensure you’re on the same page, and to determine which pieces of data should be used to qualify a prospect.
Using a mixture of anecdotal insights from sales, marketing, and maybe even customer service teams, as well as quantitative data about your current customers exported from your Salesforce account, you can agree on the typical attributes of an ideal customer. Pull this information into a documented buyer persona, creating multiple if you have multiple buyer types.
Once you have created your buyer persona or personas, navigate in the Account Engagement Lightning App to Prospects > Segmentation > Profiles, where you can input this information using the relevant criteria. When it comes to adding the criteria, each profile can have different default and custom fields associated with it, allowing you to grade prospects in a way that is unique to each one.
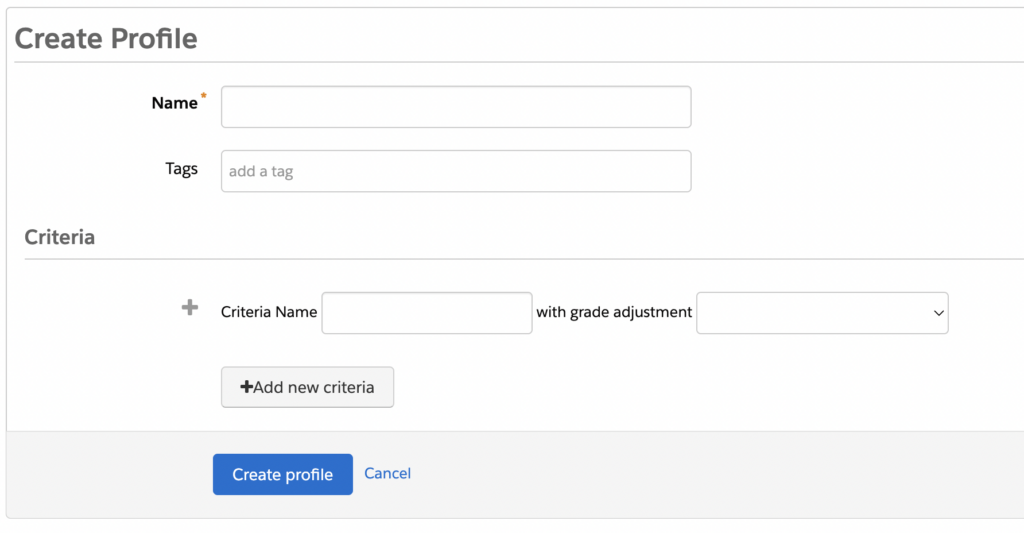
You can start with a single profile, or if you have clear and distinct buyer personas you may wish to be ambitious and have more than one Grading Profile. There is no harm in starting small and building or adapting from there after testing and learning.
2. Check your data points
Let’s look at deciding what specific criteria in Pardot is best to use for your Grading Profile. In order to have an effective grading system, you need to use relative data points that exist within fields in your Account Engagement/Salesforce instance.
This data could exist in a range of formats - free text, dropdown values, numbers - but importantly, the data needs to exist in a field in Account Engagement, and you need to have logic around how to reference it.
For example, if you’re looking for prospects with a job title of ‘Operations Manager’, you’ll need to specify this explicitly in your Grading Profile. This means prospects with a similar job title of ‘Head of Operations’ or ‘Ops Manager’ will not match your criteria. Think about the way data is captured, validated, and referenced to ensure this works cleanly.
If you don’t have the relative values you need for grading, check out our blog post on building your data collection strategy around Account Engagement Grading.
3. Setup Automation Rules
Grading automation
Lead grades automatically adjust via Automation Rules you set up based on the data you hold about a prospect. This data can be about the person, for example, job title. However, the data can also be about the company – industry, the number of employees, and location are frequently used criteria in lead grading.
The system is set out in thirds e.g. 1/3 to represent how much the prospect should increase or decrease. When a lead grade value changes in Account Engagement, it does this in one of three ways:
- by a whole letter (D > C)
- by 2/3 of a letter (D > C-)
- by 1/3 of a letter (D > D+)
Let’s look at an example Automation Rule and how the criteria matches the prospect to the relevant Grading Profile:
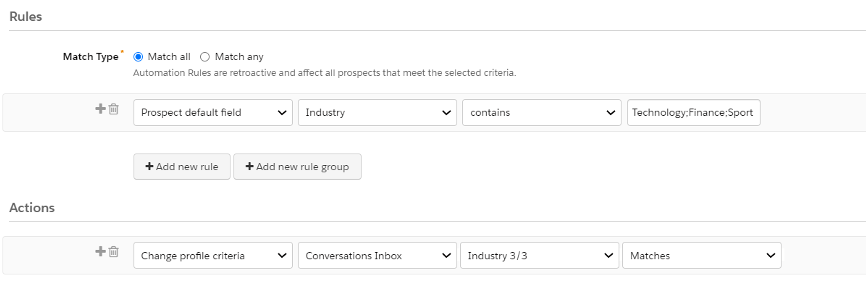
In this example, you can see that prospects with the ‘Industry’ of ‘Technology’, ‘Finance’, or ‘Sport’ would match the rule, and the action will change a particular profile criteria by 3/3, meaning it would shift them up a full grade (from C to B, for example).
The starting point for setting this up is to review your prospect profiles. Make sure you add any criteria for your profile that you’re planning to grade your prospects on, as data fields.
TIP: It’s important to note that the default grade for a prospect in Account Engagement is always D, so it will take at least three criteria in the Grading Profile to turn a D into an A.
Combined scoring and grading automation
Lead scoring and grading used in tandem enables sales teams to prioritise not only those who are the best customer fit, but those showing real interest in the brand too. Both the score and grade of a prospect will help qualify the prospect as ready for sales contact. We call these types of leads ‘marketing-qualified’ or MQLs.
The key takeaway is that when a prospect reaches a certain ‘threshold’ based on their score and grade, we can assign them to a salesperson for action.
In summary:
Scoring - the prospect’s buying intent based on their engagement with different marketing assets tells us how interested the prospect is.
Grading - the prospect’s likelihood to become a paying customer based on the information they’ve disclosed and how well it matches your buyer personas, such as industry, job title, size of company etc. Grading tells us how interested you should be in a prospect.
Using those two metrics, you can set out lead assignment criteria in Pardot that says:
‘When a prospect reaches at least X Score, and is at least Y Grade, they should be assigned to X sales team member, or added to a Queue.’
Best practices for Pardot lead grading
- Keep things simple. Selecting four or five criteria, preferably dropdown, checkbox, or number fields, will make it easier for prospects to match the criteria and for sales to understand why they have been given a specific grade.
- Involve the sales team. The most important thing you can do when setting up your Pardot Grading model is to get your sales team involved. Start by sitting down with your sales counterpart and addressing the following questions: Who are we selling to? Do these companies need to be a certain size or in a certain location? Who, within a company, is qualified to buy our product? What actions on our website best indicate an interest in our product? What actions indicate intent to buy/sales-readiness?
- Define your target audience. Doing this is essential for accurate grading. It is important to have a complete picture of your ideal prospects.
- Only use the data you collect. There’s no point using Job Title as a grading factor if you don’t receive that data, make sure that it is a field on forms.
- Improve your data over time. If you don’t currently have a field value for a prospect, it doesn’t mean you can’t acquire it. Use Progressive Profiling on forms to fill in the blanks about your customers and prospects.
To become a specialist in Pardot lead grading, learn from the experts in our Pardot Specialist on-demand course. You’ll upskill in lead generation, campaigns, Pardot and Salesforce administration, and much more. See the full course details in the Marketing Cloud Academy.

Hannah Telford
Hannah has a background in B2B marketing, with a focus on delivering automated marketing campaigns through Pardot. Combining both her IT skills and marketing knowledge, she strives to support customers with powerful and effective solutions for Marketing Cloud.
More by Hannah TelfordFeatured resource
Pardot Scoring & Grading That Works
This handbook gives a straightforward explanation of Pardot grading and scoring. It outlines default versus custom models and provides a basic understanding of lead qualification. If you’ve ever wondered what the difference is between grading and scoring, we cover it.
Download now

