This blog was written before Pardot was renamed to Marketing Cloud Account Engagement. You can read more about the name change and what it means here.
There are a handful of reasons we may not be able to email prospects in Pardot. The three most common are when a prospect is marked with either Opted Out’, Do Not Email’, or the dreaded Pardot Hard Bounced’.
When we send a marketing email from Pardot there is always a risk prospects may unsubscribe and therefore be classed as Email Opt Out’. If this is the case, they will be suppressed from receiving our email content. On the other hand, Do Not Email’ prospects are those that have been suppressed from receiving emails despite being on a recipient list.
It’s also key to note that if an email is sent from Pardot which has less than 90% deliverability rate, your account will be placed under surveillance as this is an indicator of potential reputation damage! If the email delivery rate is below 90% three times, Pardot will reach out and potentially suspend future email sends.
Now, this can sound confusing (don’t worry you're not alone), but the following blog has been written to help clear things up.

Opted Out vs Do Not Email vs Hard Bounced
Opted Out
Opting out’ of marketing communications is completely controlled by the prospect. This can be done a number of ways including:
- Clicking an unsubscribe link in a Pardot email or via the email preference page.
- Reporting an email as spam.
- Being manually imported as Opted Out’.
- A user has manually opted out the prospect in Pardot.
Despite being suppressed from most emails from Pardot, Autoresponders and Operational Emails are exempt.
Some of you may have heard that when prospects Opt Out’, this is considered a negative metric… but we are here to tell you that this is a myth and explain why.
The reason we have the unsubscribe option is to filter out recipients who do not want to receive our emails. This is not a bad thing! In fact, once we refine the prospects that want to engage with our brand, we will then only be sending relevant content and receive better reporting metrics - so it’s a win-win!
As a result, we want to make the unsubscribe button as easily accessible as possible. By making it easy to spot (our best advice is the header), it reduces the risk of our emails being marked as “spam” in the future.
Top Tip: If you would like to prompt prospects to opt back into receiving marketing communications after previously opting out, Pardot now has an Automated Resubscribe’ feature. This useful feature gives the user a choice to send themself a resubscribe autoresponder email after filling in a form on the website.
Read more about How to Set up the Pardot Resubscribe Process.
Do Not Email
Alternatively, when a prospect has been marked as Do Not Email’, they have been suppressed from ALL email types in Pardot. As a result, they will not receive future emails through Pardot, this includes autoresponders or operational emails!
Prospects can be marked as Do Not Email’ if their email address has:
- Hard bounced once or had five soft bounces
- Has been imported as “opted out”
- Has been opted out in Salesforce
- Has been manually opted out

Now we have established the difference between Do Not Email and Opted Out, we can delve into Prospects that have Hard Bounced’ and why this may be an issue in the future for Do Not Email’ prospects.
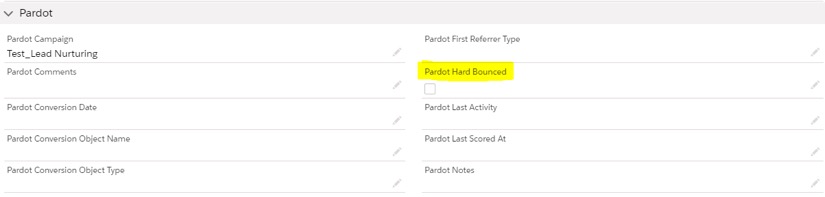
So, what does Pardot Hard Bounced’ mean?
When a recipient is unknown, the domain name does not exist or the email is suspected as spam by the email server, it is classed as invalid’. As a result, the email will permanently bounce back and Pardot will suppress the prospect from future marketing communications, automatically checking the Do Not Email’ box.
When an email has hard bounced, the Hard Bounced’ field is checked and will sync over to the Salesforce corresponding record.


The Hard Bounce field can not be manually unselected on a prospect record in Pardot, but the Do Not Email checkbox can be.
The problem (you may have encountered or are yet too…)
If you have enabled the Overwrite Prospect Opted Out’ field setting, the opt-out field will be reverted to whichever field was updated last - Salesforce or Pardot.
As a result of this field setting being enabled, if both Do Not Email’ and Opted Out’ are selected on a prospect’s record, the prospect can be opted back in through either Salesforce or Pardot and will update their record upon sync.
The only exception to this is if a prospect has been identified as a Hard Bounce’ by Pardot.
A common misconception is that you can change the email address and simply unchecking the Do Not Email’ box on hard bounced prospects to rectify the issue. However, after saving it will revert back to hard bounced.

There is an option in Salesforce to edit the unbounce, however, because Pardot is the master of records for the hard bounce field, this won’t actually do anything as Pardot will override your changes.
The below table from Salesforce illustrates this:
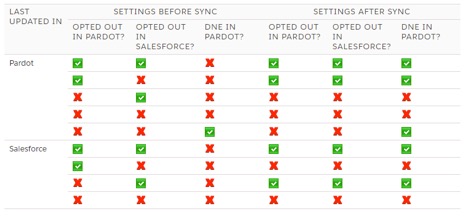
This blog is here to give you some workarounds to resolve this problem.
The first two options need a manual effort on your side:
- Click “Remove Do Not Email from all Records with this Email” on each Prospect Record.
- Uncheck Do Not Email on each Prospect Record.
In order to uncheck the Hard Bounce’ field in Pardot on mass and remove them from the Do Not Email list, we will need to change the prospect’s email address through an import (this will be temporary) and then revert back to the email address desired through a second import.
By doing this, the system will automatically remove Do Not Email’ flags and the prospect will be mailable once again.
To do this, please see the steps below:
1. First, export the list of hard bounced prospects we need to opt back in
You’ll need a list - either one you already have following an email sent, or you will need to create a dynamic list with criteria for the hard bounce.
1a. To create a dynamic list:
- Navigate to Marketing > Segmentation > Lists.
- Click +Add List.
- Ensure to check the Dynamic List checkbox and click next.
- Select the Match Type:
- Match All – All aspects of the rule must be satisfied in order to take the action(s)
- Match Any – Only one aspect of the rule must be satisfied in order to take the action(s).
- Add or Remove Rules by click the plus or trash can icons.
E.g. E.g. “Prospect email status: Prospect's email status is Do Not Email”
“Prospect default field: ‘Opted Out' isn't ‘1'”
- Click Save List to create the dynamic list
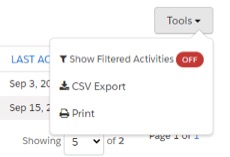
1b. To export your list:
Click into your list > Click on the Tools dropdown and select CSV export.
It is really important that the export includes the Prospects email address, CRM Lead FID and/or CRM Contact FID. This will become clearer in step 3.
2. Add a formula to the exported spreadsheet
Open the exported spreadsheet, add a column called “New Email” and add the formula:
=CONCATENATE ([cell where you have email],”.test”)
For example: =CONCATENATE(A2),”.test”
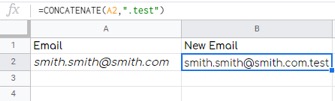
Top Tip: Remember, when importing a CSV file it must not include formulas. Therefore, once you have added the formula, copy column B, and paste it keeping just the values into column C to remove the formula.
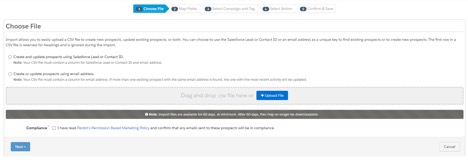
3. Import the updated CSV to Pardot and overwrite the Prospect’s Email field
When importing, the page will give you an option to Create and update prospects using Salesforce Lead or Contact ID’ - this will need to be checked in order to map to the lead and contact records.
Once you’ve uploaded the file and clicked next, you will progress to the field mapping step, you will need to map your “New Email” field (.test) to “Email”.
There will be a checkbox item advising that this import will overwrite the existing data, make sure this is ticked.
Remember, we will not be importing the original “Email” field at this stage but do keep this column in the spreadsheet.
4. Tag prospects with HardBouncetag’ during import.
When importing the list, it’s a great idea to tag prospects with “hardbounce”. This is key as it will not only highlight them but once they have left the dynamic list we will still be able to easily find them by using filters.
If you have used a dynamic list to segment your prospects who have hard bounced, please be aware that they should all have .test’ at the end of their email and will now be removed from the dynamic list. This is because they are no longer meeting the criteria. This is why we really recommend tagging them during import.
5. Re-import the CSV to Pardot to correct the prospect’s Email field
This time, you import the spreadsheet again but instead, you will map the “Email” field to “Email”.
This will overwrite the existing data (this will be the one previously imported with the .test records) and do not import New Email’ from the CSV file.
6. Check your import
To ensure no prospect has been missed, pull a dynamic list with the criteria:
Prospect default field | email | ends with .test’
AND
Prospect tag| is | hardbouncetag’
The dynamic list will automatically segment your prospects, based on matching a set of rule-based criteria, in this case, the email ending with .test.
Dynamic lists are really handy as they save valuable time and reduce human error.
Ideally, this list should pull no prospects into it.
Next, have another dynamic list checking if the prospect has the hardbouncetag and is Do Not Email’ - this list should ideally match no prospects.

7. Remove “hardbounce” tag
Navigate to Prospect > Prospect List
We will then use the filters to search for mailable prospects who have the hard bounce tag.
Scroll down to the bottom of the table and use the actions at bottom of the table:
Select “Remove Tags” from the dropdown > Add the name of the tag to the text field > Click Go.


After you have completed these steps, the prospects should now be mailable with the “Do Not Email” field unchecked and no hard bounce tag!
Although we hope you don’t experience any deliverability issues, we understand sometimes things happen with Pardot. We hope that this workaround provides you with some reassurance that things can always be fixed.
If this post has raised questions for you or your need for our expertise – we’re here to help. Feel free to send us a message about our support and consulting options.
You can also explore more tips and tricks to managing Pardot email with our free Expert's Guide to Great Pardot Email Marketing eBook!