This blog was written before Pardot was renamed to Marketing Cloud Account Engagement. You can read more about the name change and what it means here.
This blog is co-authored by Lindsey Mark, Global Cloud Solution Alliances Sr. Manager at Salesforce.
The beauty of the Pardot Lightning Landing Page Builder is that it allows marketers to create landing pages in Pardot independently and with ease. The interface and functionality is designed to be fully intuitive and simple to use without the need for a demo or training.
Nevertheless, the Landing Page Builder is a brand new feature to Pardot, and therefore, it makes sense that users familiarise themselves with how it looks and works.
Even the most straightforward, user-friendly tools prompt questions from time to time, so the purpose of this blog is to show you the basics and pre-empt any questions you may have. We’ll also discuss best practices that will help you create the best landing pages possible.
If you’re reading this and wondering what this shiny new landing page tool even is, you can find all the details in our previous blog announcing the Lightning Landing Page Builder. We also recommend you visit the below links to understand how to prepare and configure the Landing Page Builder:

Navigating the new Pardot Landing Page Builder
All of the new Lightning builders in Pardot look and feel similar, which means those already using the Lightning Email Builder will be able to navigate the tool even more easily.
Differentiating between builders
For example, in the top left-hand corner of the builder experience, you’ll see a label telling you which builder you’re currently using. Your drag-and-drop components sit on the left of the screen, with your canvas in the middle and styling and details in the right-hand column.

Image credit: Salesforce
Exiting the builder
For those that are new to Lightning builders, it may also be helpful to note the “back” button in the top-left is how to exit the builder and return to the Landing Page record home.
While the page doesn’t automatically save, it does remind the user that changes aren’t saved if they attempt to navigate away from a page where they’ve made changes.
Creating & editing landing pages in Pardot Lightning Builder
The first thing to know is that the drag-and-drop builder can’t be accessed in the same place that you create landing pages with the Classic Landing Page Experience.
To create new lightning landing pages, instead of going to Content > Landing Pages, you’ll need to go via the Landing Page’ object in your home navigation, or by going to Campaigns > Related and creating New’ from here.
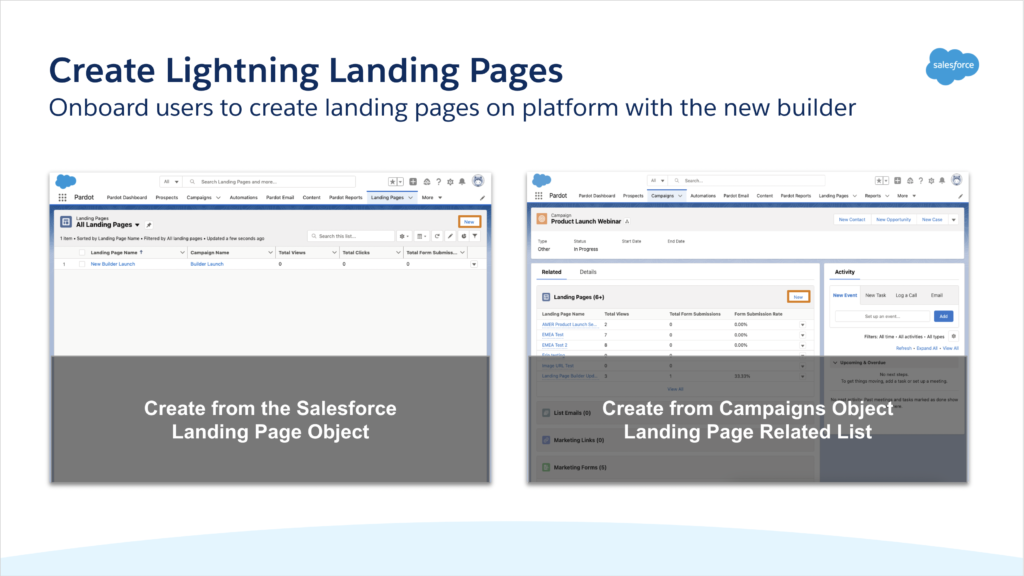
Image credit: Salesforce
Viewing Landing Page record details in Pardot
Once published, the landing page can be viewed in Pardot from the record home by clicking on the “View Pardot Record” button.
Only users with Pardot Marketing user permissions or above will be able to publish landing pages. Ensure you have onboarded all relevant users to the Pardot Lightning App with the right permissions. You can review all of the prerequisites for the Landing Page Builder and how to get prepared here.
How to create pages - a quick demo
To get up to speed quickly and understand what’s possible when building landing pages in the Lightning Experience, watch this handy how-to video from Salesforce:
Best practices for using the new builder
While the new drag-and-drop builder makes creating landing pages in Pardot much simpler (among other benefits). Users still need to be trained to follow best practices and keep a few considerations in mind when using the new builder.
This functionality is currently under active product development and some of the following may become new features. If you have any feedback for the Pardot product team, please make sure to search the idea exchange to up-vote your top features. This list of best practices is up-to-date as of the Winter 22 release.
Here are our top nine best practices to follow when using the Lightning Page Builder:
1. Save changes regularly
Train users to save their work using the “Save” button in the upper right corner of the builder. There is no auto-save functionality so if your computer or browser crashes changes may be lost.
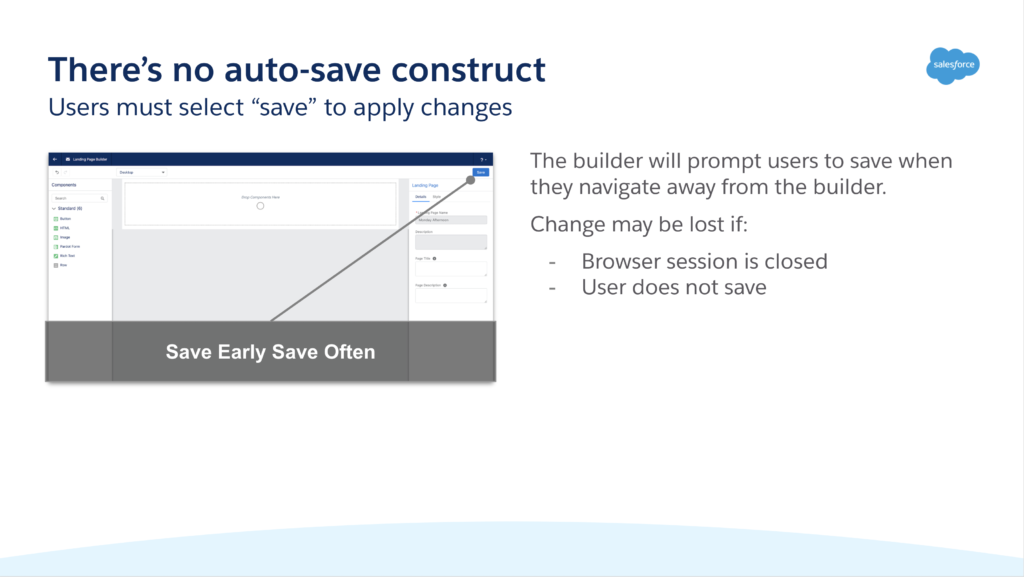
Image credit: Salesforce
2. Warn users that deleting Landing Pages is FOREVER
Caution users on the differences between unpublishing and deleting a landing page. Users that accidentally delete a landing page rather than unpublishing it, will learn the hard way that there’s no recycle bin for these records.
Unpublishing removes the page from the web and redirects users to the website specified in your Pardot Settings.
Deleting the page makes it completely unavailable for editing or publishing, forever.
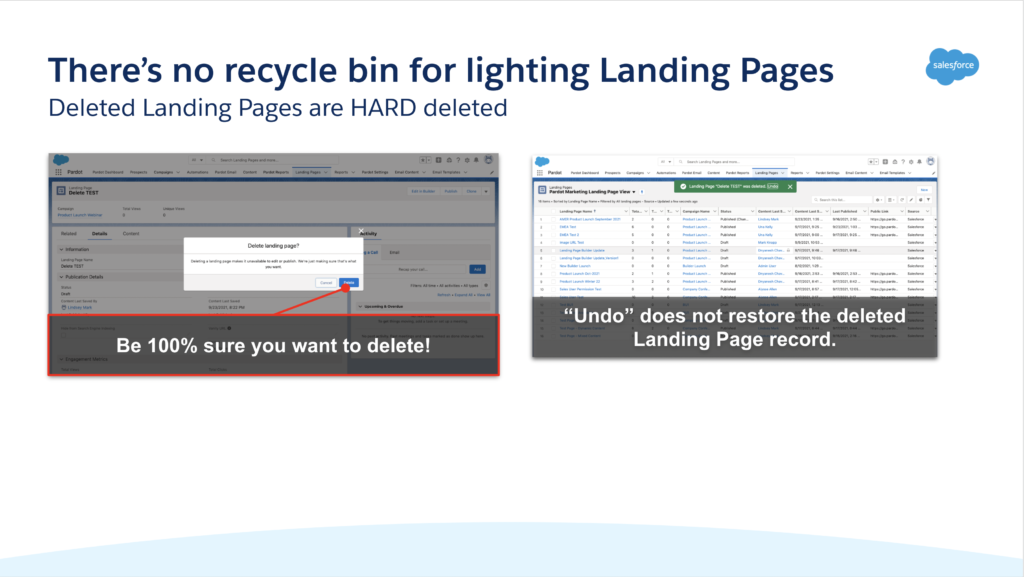
Image credit: Salesforce
Luckily, published landing pages can’t be deleted. A user must unpublish the page so that it is in the “draft” status, prior to deleting.
3. Embed custom code & dynamic content using forms
The builder has a known limitation around active content, however, custom code can be rendered from forms by using the “source” button available in select areas of a form.
This is particularly helpful to embed advertising tracking pixels to track landing page (form) conversions from paid ads. This method is also great for manually embedding dynamic content for personalisation.

Image credit: Salesforce
Source code button is available in forms from:
- Look & Feel
- Completion Actions
- Thank You Content
- Thank You Code
4. Understand the responsive builder functionality
Users excited for responsive scaling might find this pixel guide helpful for finding the right balance with optimising images for the web.
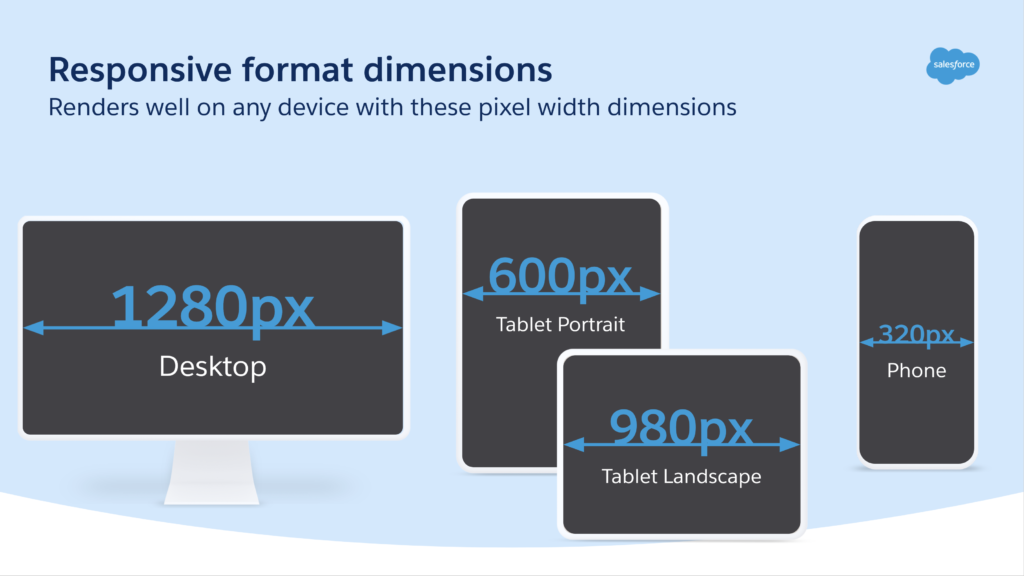
Image credit: Salesforce
This is specifically relevant for customers targeting prospects in regions with less access to high-speed internet.
Previewing in these dimensions is quick and easy using the device drop-down in the builder.
While onboarding users to web-friendly images, it would also make sense to remind them of the importance of file naming and alternative text for better user accessibility.
5. Open the Public Link from Pardot or Copy & Paste URL
The published landing page URL is not currently hyperlinked from the Landing Page record home. This is something that will likely be resolved in future releases (#safeharbor), for now, users can copy & paste the URL or click the “View Online” button from the Pardot record page.
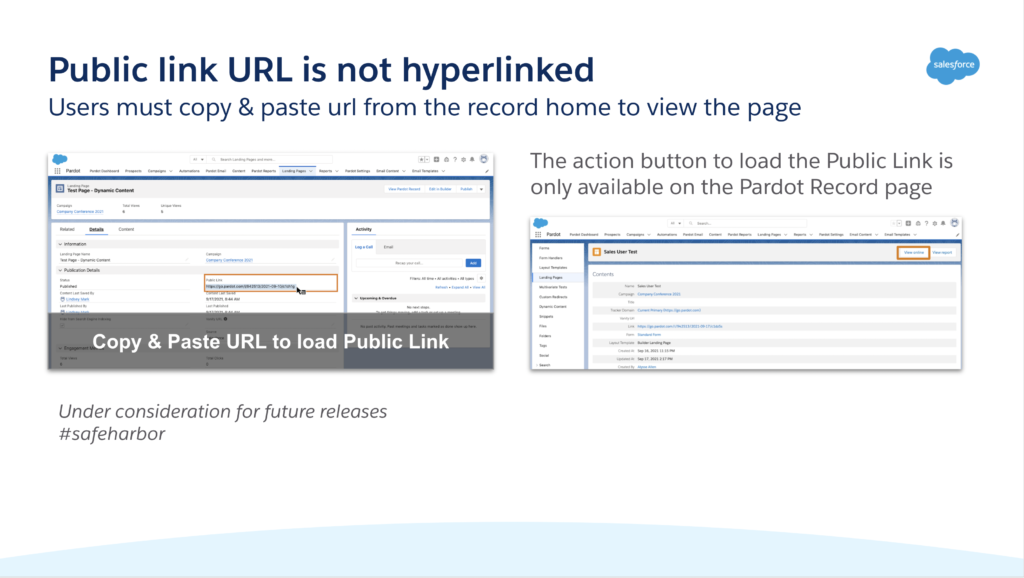
Image credit: Salesforce
6. Orient Users to Landing Page Actions & Statuses
With the new Landing Page Builder, there are a number of new fields and actions users can take. It’s important to orient users to how some of these new fields function so they can understand the status of the landing page and the impacts of publishing on publication details.
Actions & Statuses
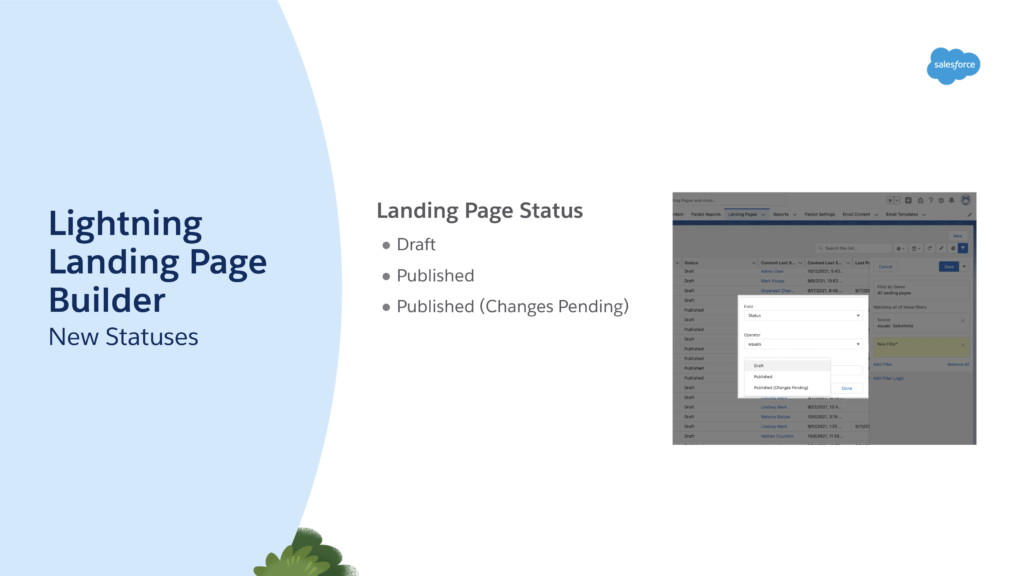
Image credit: Salesforce
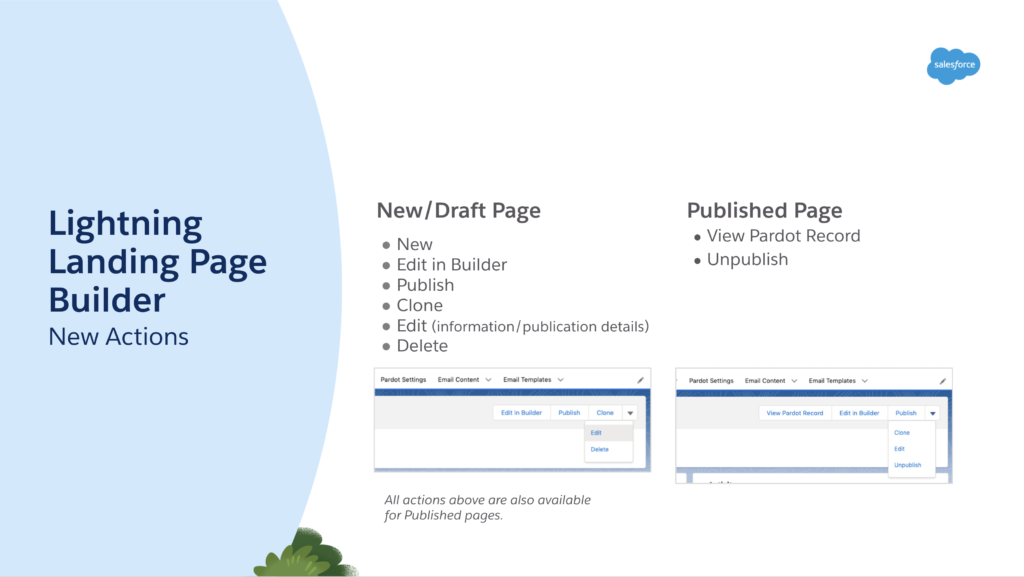
Image credit: Salesforce
- New (action) / Draft (status) - creates a landing page record aligned to a specific connected campaign. The record requires a name and campaign association.
- The hide search engine indexing’ and vanity url’ options are optional.
- Once created the landing page is in “draft” status.
- Draft (status) - When a landing page record is created in Salesforce with the new experience, it starts in Draft status. At this time, there is no corresponding landing page record in Pardot.
- Edit in Builder (action) - opens the landing page in the drag-and-drop Lightning Builder to create a responsive landing page.
- Clone (action) - creates a copy of an existing landing page and the details to create a new landing page.
- Cloned records have their own separate publication details and engagement metrics.
- Note: it’s possible to clone a landing page record’s name, however, users will be prevented from publishing landing pages without unique names into the same Pardot Business Unit. We recommend updating the name of the landing page during the cloning process.
- Publish (action) / Published (status) - The first time the landing page record is Published in Salesforce, a “public link” is created, a new landing page record is created in Pardot, and any updates from the builder are applied to the content preview.
- The record will be placed in the Uncategorized\Landing Pages folder in Pardot.
- “Last published” & “Content last Published by” will update to the user who took this action and the timestamp
- Unpublish (action) - Draft (status) - When a record is unpublished in Salesforce it becomes a “draft”. The public link is cleared and redirected to the website in Pardot Settings. The corresponding landing page record in Pardot is moved to the Pardot recycle bin.
- Users can not see or remove this record from the Pardot recycle bin.
- Publish (action) on a page reverted to draft - When a previously published record is published again after being set back to “draft” status, the record will be removed from the Pardot recycle bin.
- The “public link” for this landing page will reappear and remains the same.
- “Last published” & “Content last Published by” will update to the user who took this action and the timestamp.
- The engagement metrics remain on this record.
- Published (Changes Pending) - (status) - are published pages in which changes occurred in the builder or editable publication details (hide from search engine indexing or the vanity url). This status notifies the user that the page has been updated but that the changes have not been applied.
- To clear this status, select the “Publish” action button to sync changes to the public link.
- We recommend creating a flow to notify users or a list view to monitor pages without applied changes.
Publication Details
- Content Last Saved - Updates when any of the following fields are updated on the landing page:
- Content (saved in the builder)
- Hide From Search Engine (checkbox)
- Vanity Url
-
- Publishing does NOT update this field
- Content Last Published - Updates any time the landing page is successfully published.
- Unpublishing does not clear these values.
7. Tell users about which edits apply when concurrently editing
Multiple users can edit pages at the same time but you won’t be able to see other users’ activity nor saved versions. The user that saves first, wins!
Make sure you’re communicating well with your team to determine who will be responsible for making changes. This also applies to users who may have the builder open in separate browser sessions or tabs. Recommend that users carefully manage their tabs when they’re editing and saving landing pages
8. Always use images hosted from SSL enabled locations
To avoid mixed content errors from the builder, make sure any externally hosted images are using SSL. Luckily the builder will notify you of any non-https external links, preventing users from using mixed content. If you’ve not moved Pardot or your website over to SSL, we highly recommend doing so.
9. Encourage your technically included users to leverage HML
Users that are well-versed in using HML will likely appreciate that manually entered HML and conditional HML is supported on published landing pages. Just keep in mind this is for technically savvy marketers as there’s currently no HML picker in the builder.

Image credit: Salesforce
When testing the HML, please note that it only renders from a Published Landing Page, the Content preview will not resolve HML.
10. Pardot Business Units, Forms & Connected Campaigns
Having Connected Campaigns properly configured to individual Business Units is important for customers using Pardot Business Units. The campaign record will dictate which Pardot Business Unit the Landing Page is aligned to and, therefore, which forms it will have access to. We recommend adding the PBU name to the campaign naming schema to make this easier to differentiate for users.
Once the campaign is selected, the form picker will only display forms from the aligned Business Unit. This could be disorienting for a user who is searching for a form aligned to another Business Unit or attempting to clone a landing page into another Pardot Business Unit.
Landing Pages are able to be transferred between Pardot Business Units so long as they have no form selected. If you’d like to clone a landing page into another PBU, copy it then remove the form and select a connected campaign aligned to the Business Unit you’d like to copy the landing page into.
As we mentioned at the beginning of this post, the Lightning Landing Page Builder is designed to be incredibly intuitive and easy to use, regardless of how advanced your Pardot users are. The best way to orient yourself and onboard users, is to follow the steps required to get access and then explore the builder yourself. Enjoy!
If you do have questions or would like to enlist the help of a certified Pardot specialist to help you get setup, or manage landing page builds, you can contact the MarCloud team.