How to Automate Currency Conversion in Salesforce Using Flow
Managing exchange rates manually is one of those thankless tasks Salesforce Admins do every day. The good news is, there are options to avoid this!


8 mins
Managing exchange rates manually is one of those thankless tasks Salesforce Admins do every day. The good news is, there are options to avoid this!
8 mins
Firstly, many AppExchange options can automate the process and with Salesforce’s robust security, these are a fine choice. On the other hand, it’s possible to automate currency conversion in Salesforce with a simple out-of-the-box feature called ‘Schedule Triggered Flow’.
This removes the need for manual entry and frees up time for your Admin users to focus their attention on other parts of the system.
Before you proceed, it is recommended that you build this in a Sandbox environment to avoid the risk of corrupting anything in your existing Sales Cloud account, should you encounter issues.
In addition, there are a variety of things an Admin will need to know and think about before enabling ‘Multiple Currency’ and ‘Advance Currency Management’. It’s best you skill up on the below topics prior to starting:
By the end of this blog, you will be able to:
Create an outbound request using Names Credentials
Callout to an external API using a Scheduled Trigger Flow.
Bypass the character limit of Flow Formulas (3900)
Initiate an outbound HTTP Get Request, eliminating the need for code
Update DatedConversionRates for Multiple Currencies
Validate and test the data flow works as it should
Plus more…
To make it a bit easier to follow along, we’ll use an example use case:
Wilson is the new Sales Cloud Administrator at Campervan Excursions and has been given the task of automating the DatedConversionRates automatically. He has been asked to make sure they are updated at 00:01 am every day to ensure the sales team has the most up-to-date rates.
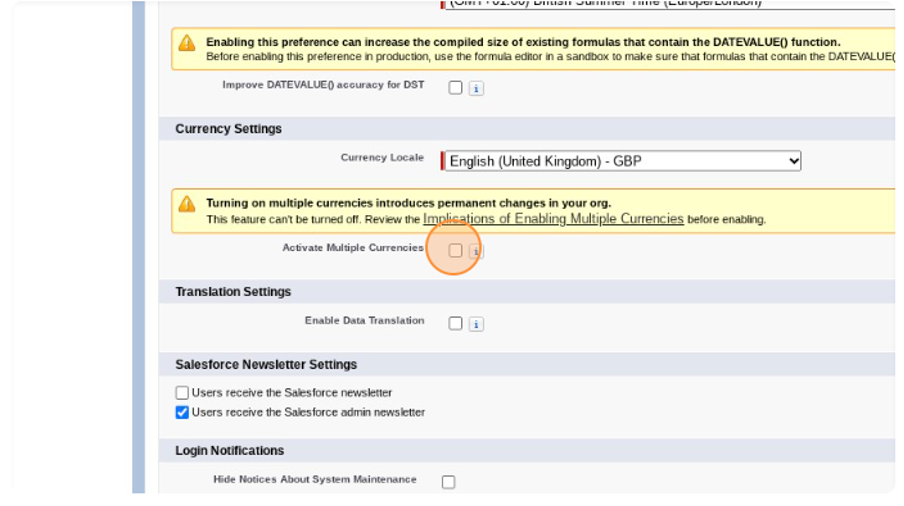
The first thing Wilson does is activate Multiple Currency from the Company Information Settings:
Click ‘Setup’
In the Quick Find Box, Enter ‘Company Information’
Click ‘Edit’
Scroll down to ‘Currency Setting’
Click ‘Activate Multiple Currencies’
Click ‘Save’
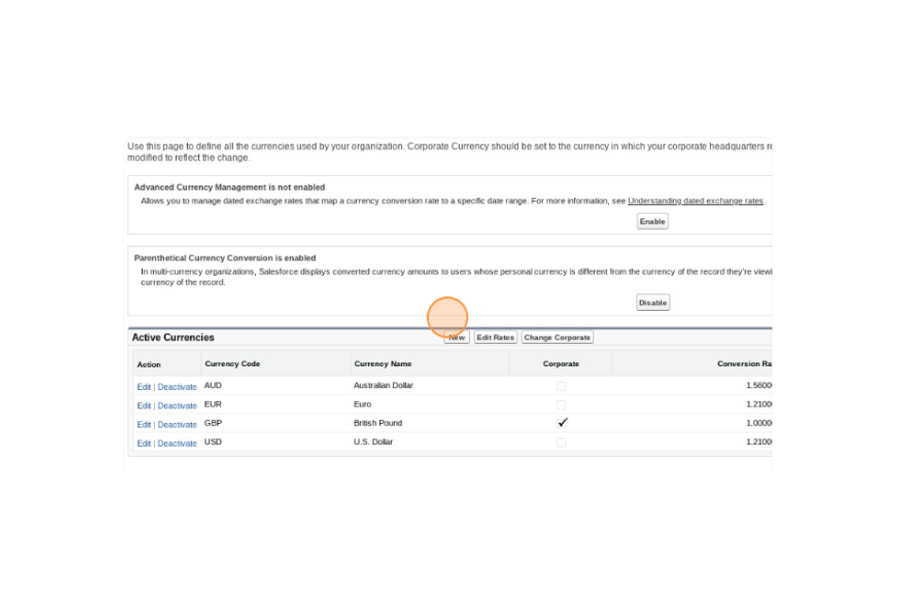
Next, Wilson needs to add the currencies his organisation uses to the list of ‘Active Currencies’ in Salesforce. Wilson will add EUR, AUD and USD and make sure his Corporate Currency is set to GBP.
Click ‘Setup’ (if not already there)
In the Quick Find Box, enter ‘Manage Currencies’
Click ‘New’
Add the currencies your organisation uses and the current exchange rate
Repeat for all currencies
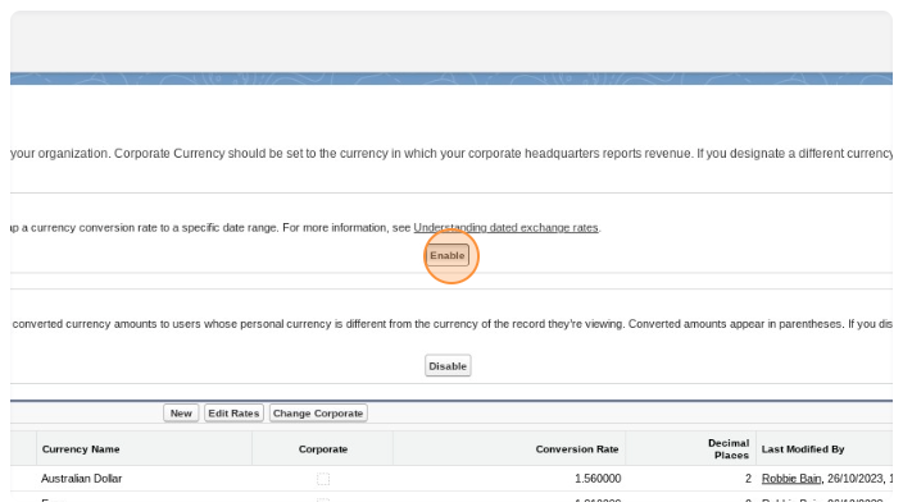
Now that he has activated Multiple Currencies, Wilson activates Advanced Multiple Currencies. The reason why will become apparent later on, when updating Dated Conversion Rates in the Scheduled Flow.
Click the ‘Enable’ button, read and accept the additional Info screen
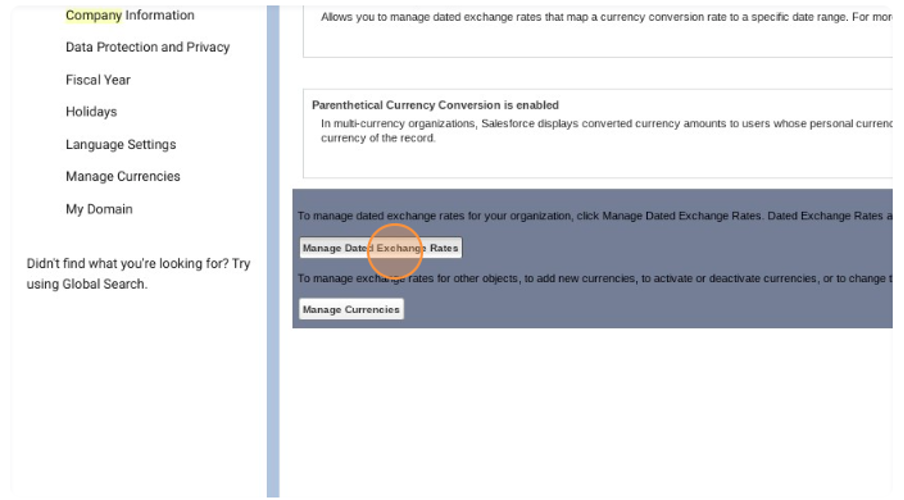
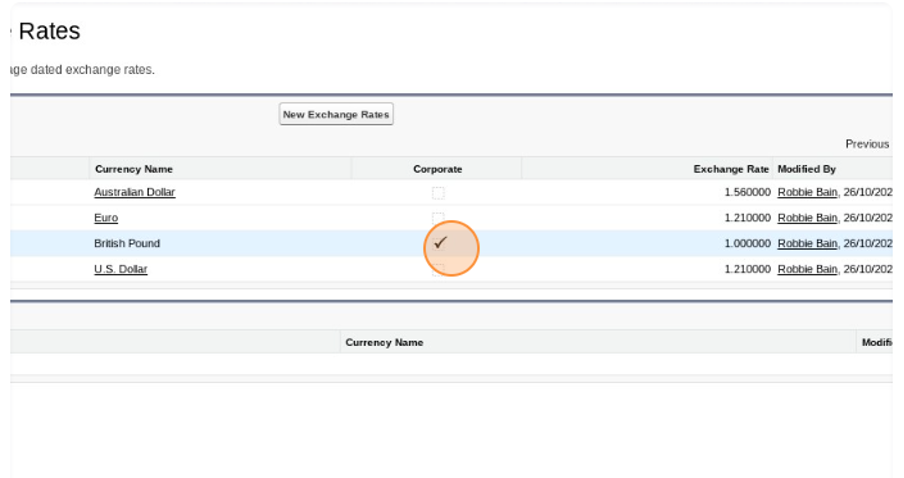
Click ‘Manage Dated Exchange Rates’ - here you can update the exchange rate manually but there is no need as we’ll be doing this via a Flow.
From this screen, you can also view which currency is set as your Corporate Currency.
There are a number of free Exchange API services available. Today Wilson will be using ‘Exchange Currency API’. Other options available are:
Exchange Currency API (tested - 300 API calls a month)
Free Currency API (5k API calls a month)
Fixer.io (1k calls a month)
You can also view this article by APILayer for other free services.
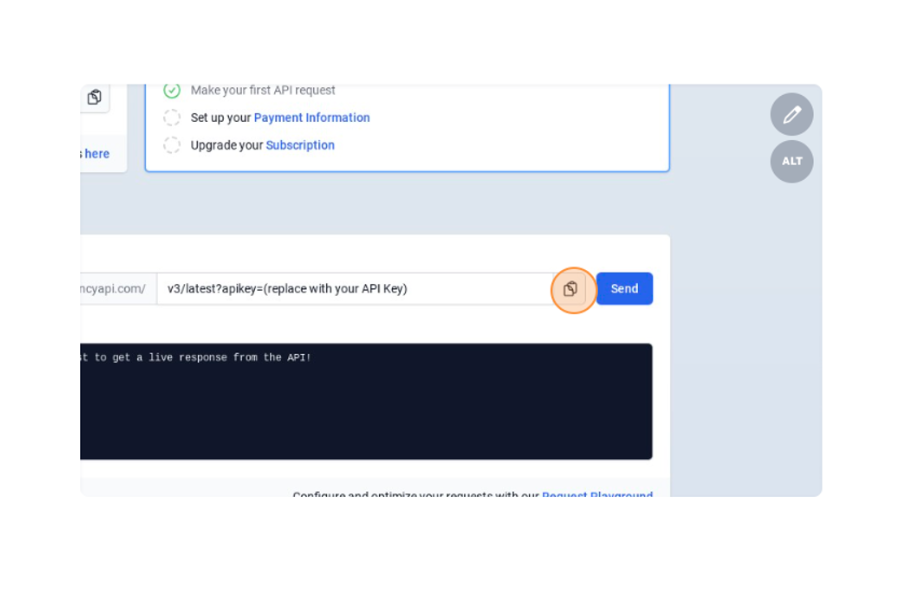
From the dashboard of currencyapi.com, copy your API key.
It should look something like this:
https://api.currencyapi.com/v3/latest?apikey=YOUR_API_KEY_GOES_HERE
Click ‘Setup’
In the Quick Find Box, Enter ‘Named Credential’
Click the down arrow next to ‘New’
Select ‘New Legacy’
Name the callout ‘currencyapi’
In the URL box enter the first part of your API URL: https://api.currencyapi.com
7. Leave the rest as is
8. Click ‘Save’
With the eBook ‘A Guide to Salesforce Marketing Tools’ in your arsenal, you’ll have a go-to, comprehensive, expert guide to understanding and selecting your perfect Salesforce marketing platform(s).
Click ‘Setup’
In the Quick Find box, type ‘Flows’
Select Flows, then click ‘New Flow’
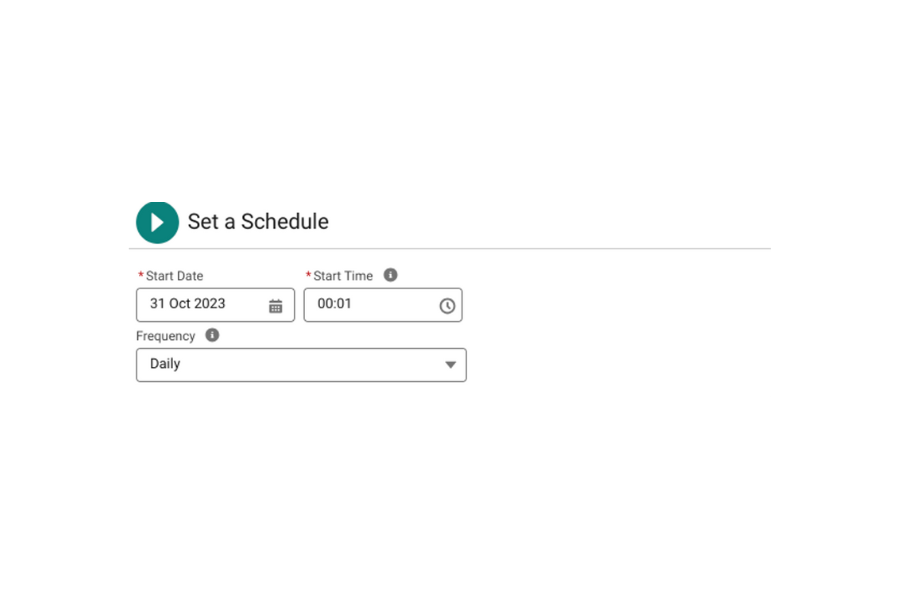
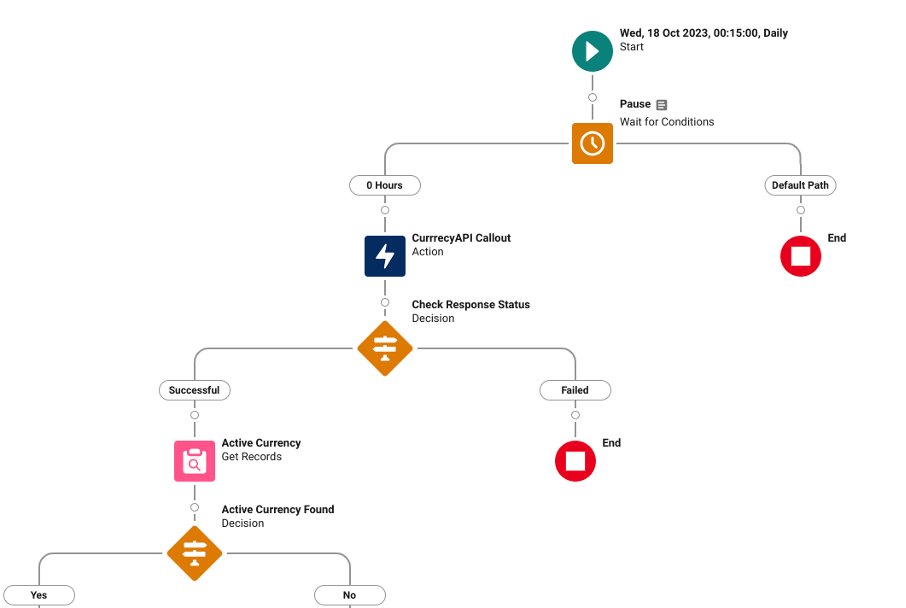
Select the Scheduled-Triggered Flow, click ‘Create’, and configure as you need. In this use case, Wilson configured as follows:
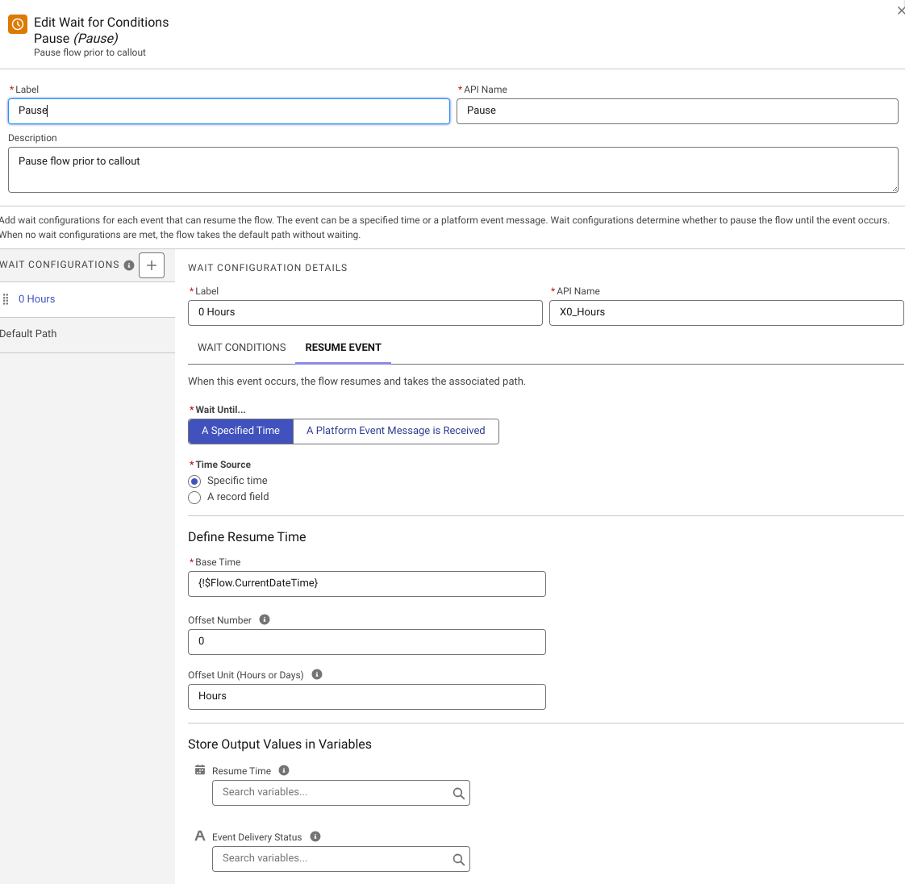
Click the + icon, and select ‘Wait for Condition’ element.
Enter ‘Pause’ in the Label field and the API name will auto-populate.
Click on ‘Wait Configuration Details’
Name the pause configuration ‘0 Hours’
Click ‘Resume Event’
Resume Event Conditions:
Wait Until: A Specified Time
Time Source: Specific Time
Base Time: {!$Flow.CurrentDateTime}
Offset Number: 0
Offset unit(Hours or Days): Hours
7. Click ‘Done’
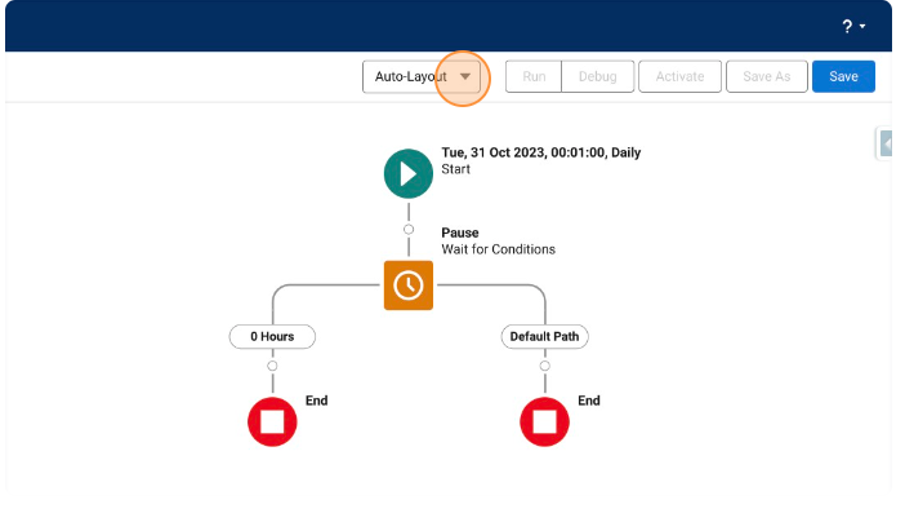
Switch to ‘Free-Form’ and back to ‘Auto-Layout’ so that your flow looks like this:
Click the + icon under ‘0 Hours’
Select ‘Action’ element
Click + Create HTTP Callout bottom left of the screen
Name the callout ‘currencyapi’
Select the ‘Named Credential’ from the dropdown you created earlier
Click ‘Next’
On the next screen, complete as follows:
Label name: Currencyapi
Method: GET
Url Path: /v3/latest
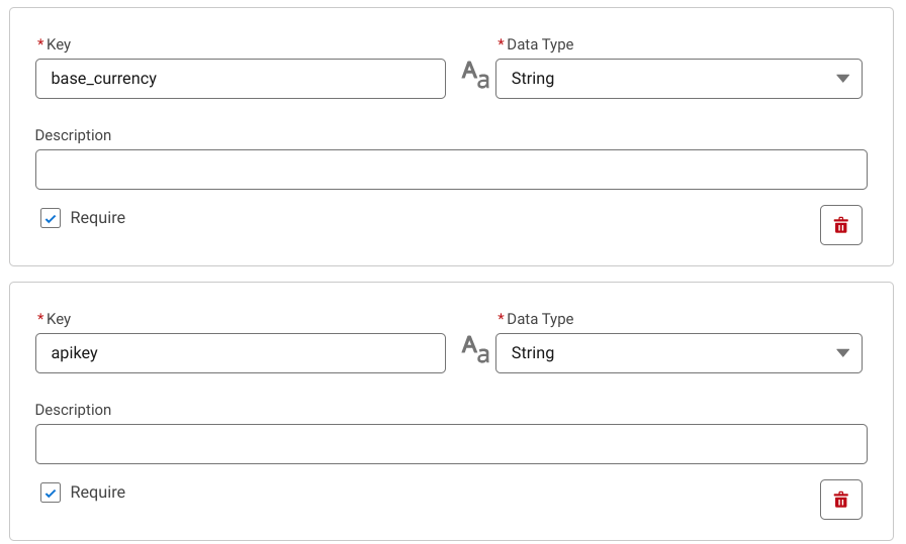
7. Add the following ‘Set Query Parameter Keys’
a) Click ‘Add Key’
Key: base_currency
Data Type: String
Required: True
b) Click ‘Add Key’
Key: apikey
Data Type: String
Required: True
You now need to add a sample JSON response.
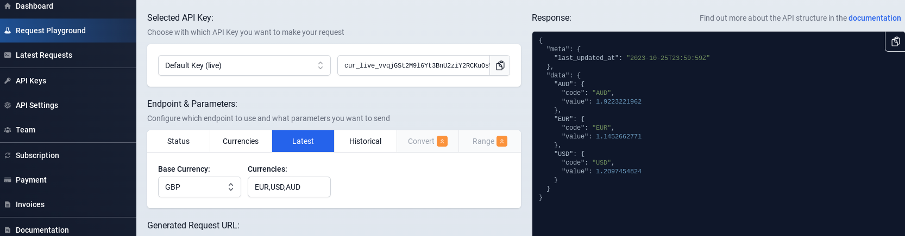
8. Navigate back to your currency API Dashboard
9. Click ‘Request Playground’
10. Set your conditions as per your currencies
11. Click ‘Send’
12. Copy ‘Response’
Now, move back to the flow and;
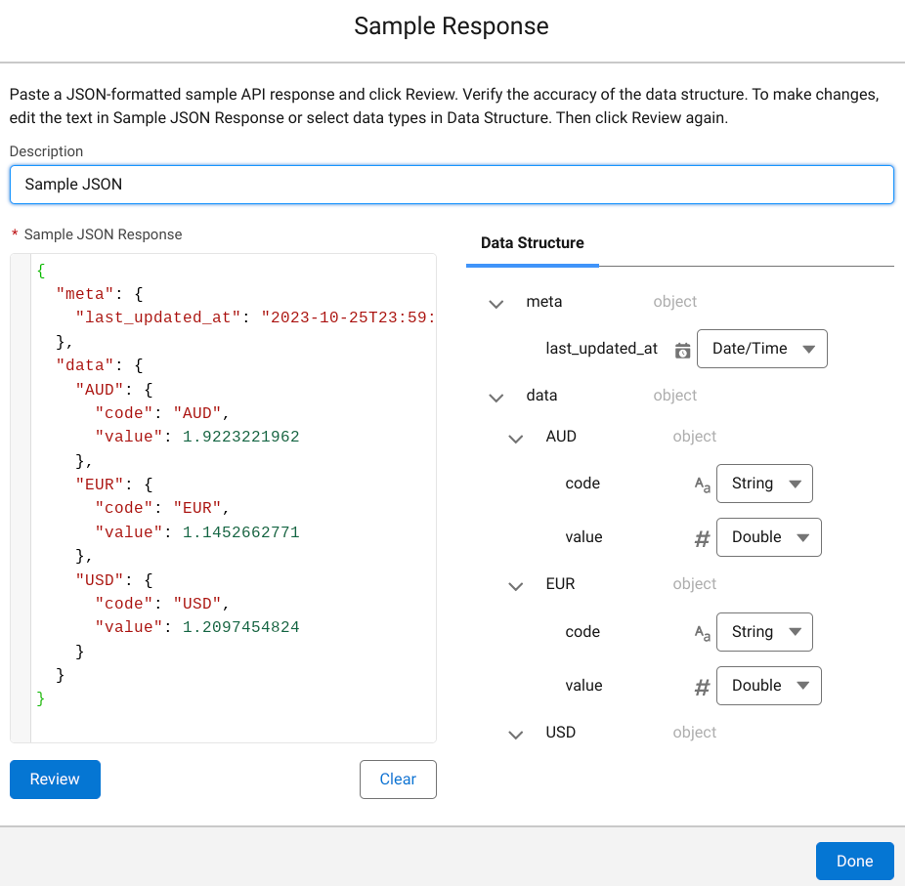
13. Click ‘New’ next to ‘Provide Sample Response’
14. Enter Description Name: Sample JSON
15. Paste: Sample Response from CurrencyAPI
16. Click: Review
17. Click ‘Done’
18. Click ‘Save’
Flow Builder creates the action and the External Service. A new Action window appears automatically.
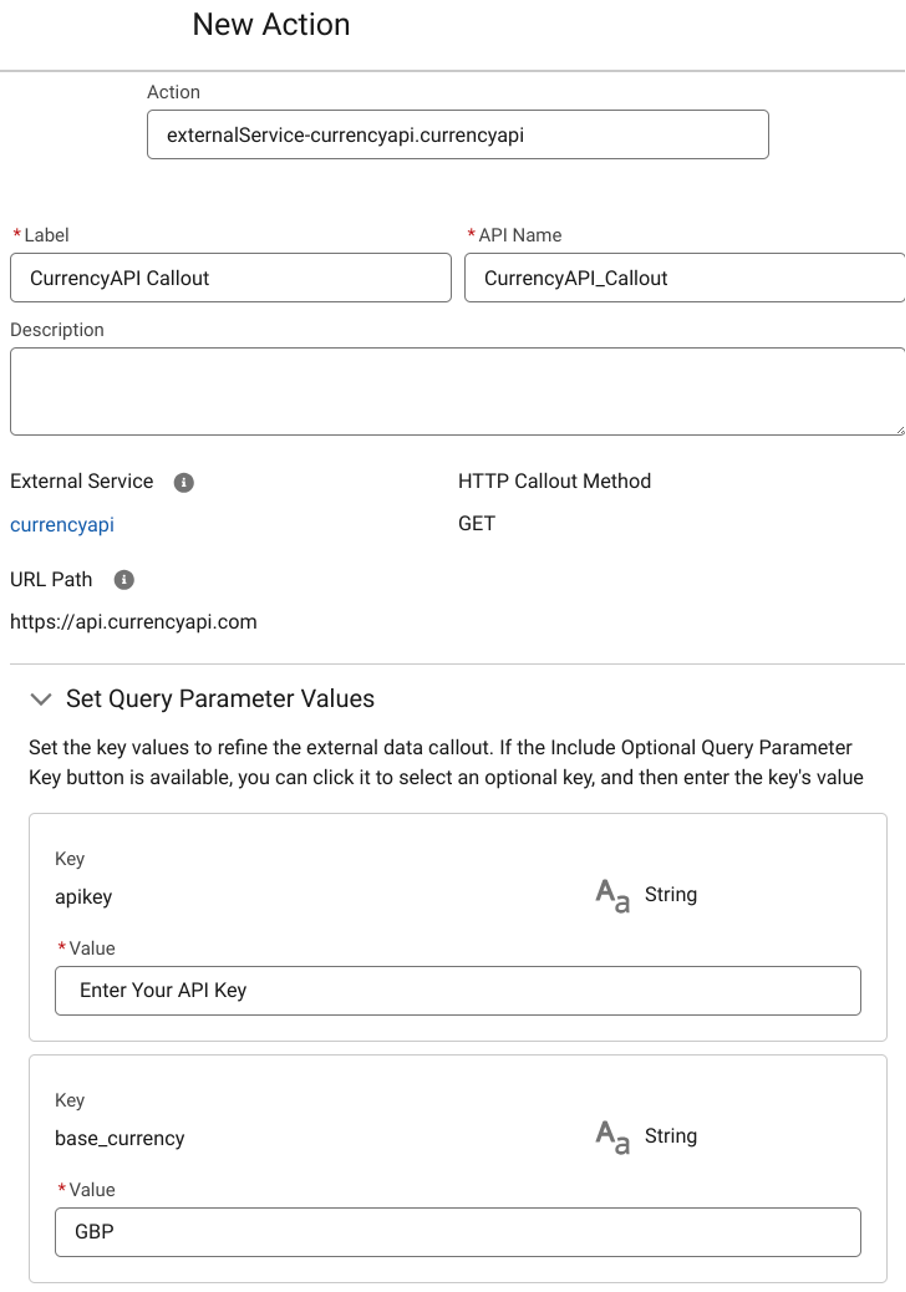
19. Label Name: Currency API Callout
20. Apikey: Enter your apikey (You can copy this from the currency API dashboard)
https://api.currencyapi.com/v3/latest?apikey=YOUR_API_KEY_GOES_HERE
21. Choose base currency: i.e. GBP
Note: At this stage, you can create a Constant Variable to store your API key and add the variable to your value. The data type of this constant is (Text).
22. Click ‘Done’
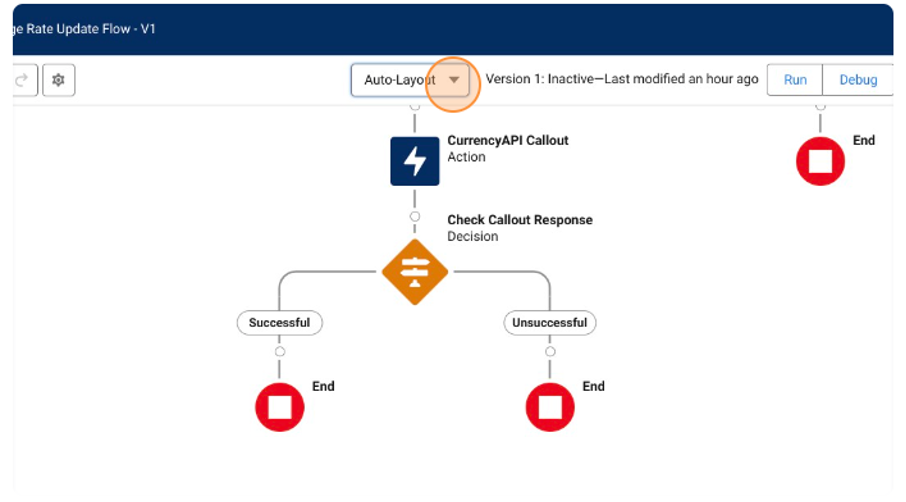
Click the + under your new Action (Currency API Callout)
Label Name: Check Callout Response (API Name will Auto Populate)
Under Outcome Details Label Name: Successful (API will name Auto Populate)
Conditions: All Conditions Are Met (and)
Resource: {!CurrencyAPI_Callout.responseCode}
Operator: Equals
Value: 200
Click Default and Named it: Unsuccessful
9. Click ‘Done’
10. Switch to ‘Free-Form’ and back to ‘Auto-Layout’ so that your flow looks like this:
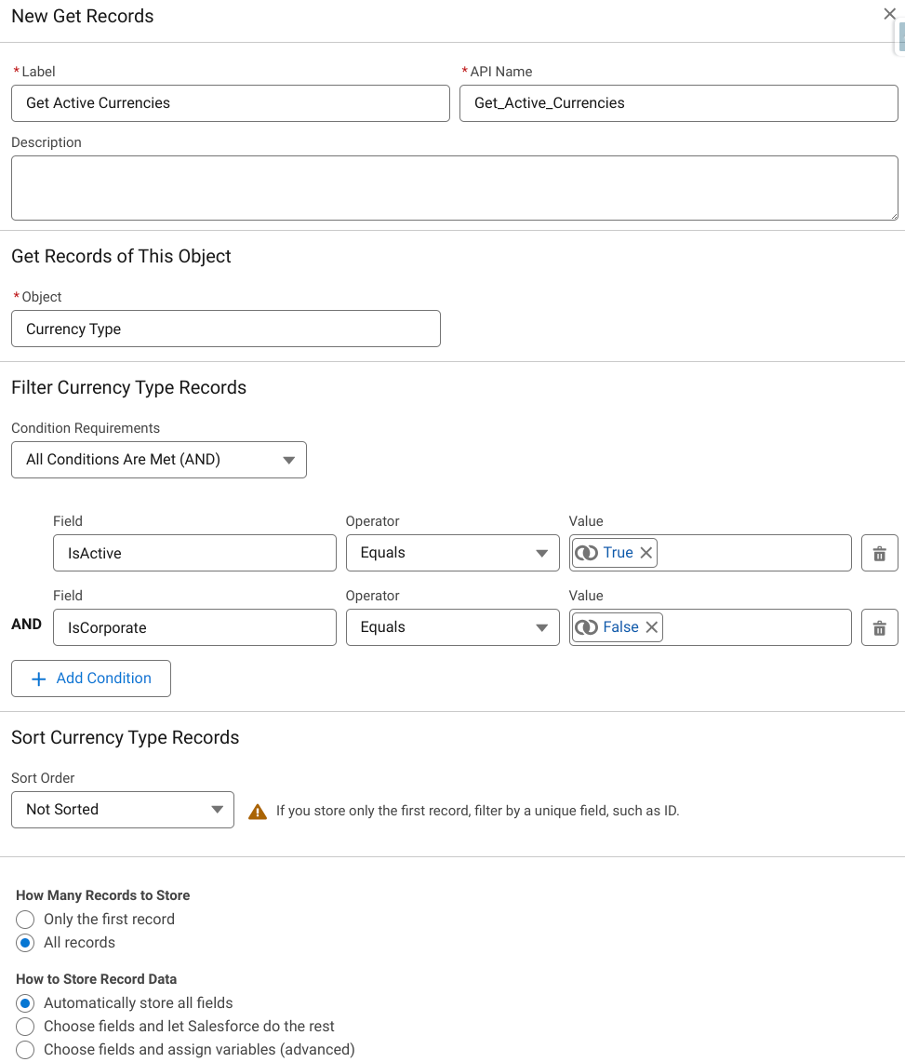
Click the + symbol under the successful line of your last decision Element
Select ‘Get Records’
Label Name: Get Active Currencies (API Name will Auto-populate)
Object: Currency Type
Condition Requirement: All Conditions Are Met (and)
Field: IsActive
Operator: Equals
Value: {!$GlobalConstant.True}
Click: ‘Add Condition’
Field: IsCoporate
Operator: Equals
Value: {!$GlobalConstant.False}
Sort Order: Not Sorted
How Many Records to Store: (Check) All Records
How to Store Record Data: (Check) Automatically Store all Fields
16. Click ‘Done’
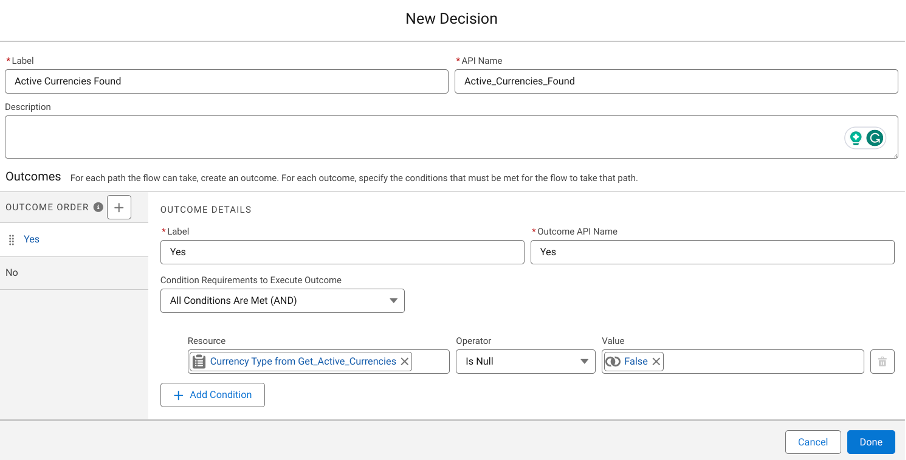
Click the + symbol under ‘Get Active Currencies’
Label Name: Active Currencies Found
First Outcome Details Label Name: Yes (API Name will auto-populate)
Condition Requirements: All Conditions Are Met (AND)
Resource: {!Active_Currency}
Operator: Is Null
Value: {!$GlobalConstant.False}
Default Outcome Label Name: No
9. Click ‘Done’
If everything is going well your flow should look like this:
It’s okay to take a break, we have covered a lot - but don’t forget to save your progress so far!
10. Click ‘Save’
11. Name your Flow: Update Exchange Rates
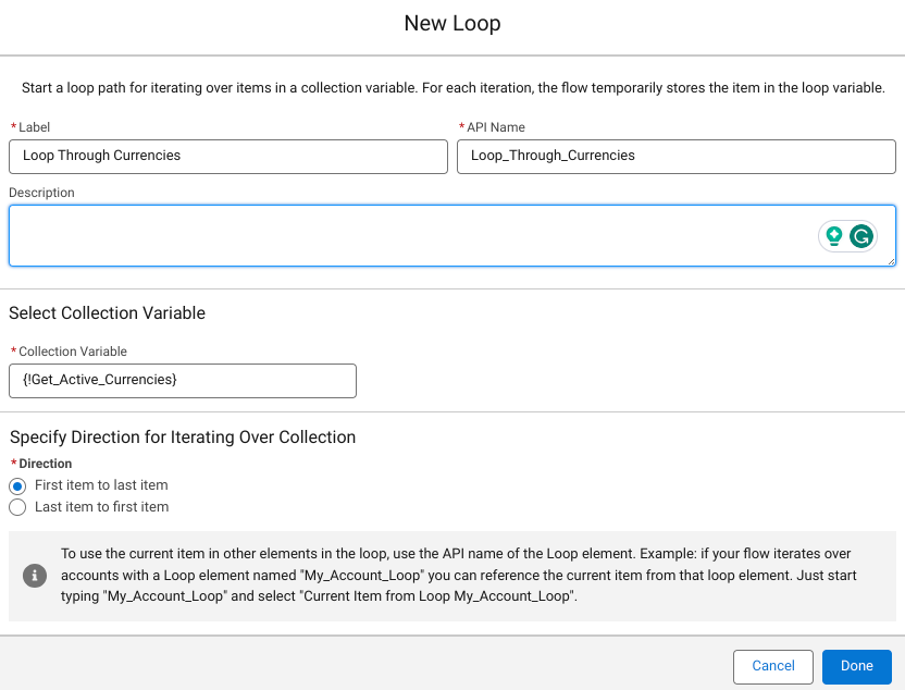
Under the Yes node: Click the + Symbol
Click: Add Loop Element
Label Name: Loop Through Currencies (API Name will auto-populate)
Collection Varaible: {!Get_Active_Currencies}
Direction: First item to last item
6. Click ‘Done’
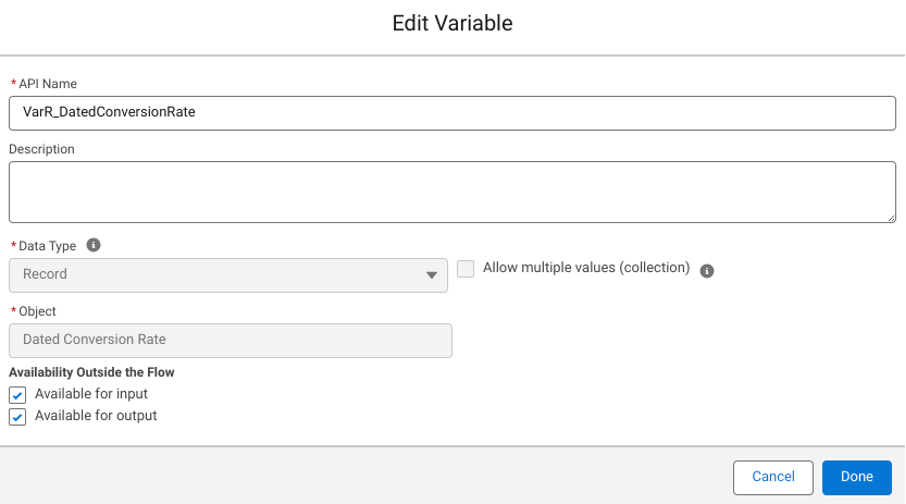
Click: Toolbox
Click: New Resource
Resource Type: Variable
API Name: VarR_DatedConversionRate
Data Type: Record
Object: Dated Conversion Rate
Check: Available for input and Available for output
8. Click ‘Done’
9. Click: New Resource
10. Resource Type: Variable
11. API Name: VarR_DatedConversionRates
12. Data Type: Record
13. Check: Allow Multiple Values (collection)
14. Object: Dated Conversion Rate
15. Check: Available for input and Available for output
Click: Toolbox
Click: New Resource
API Name: CurrencyExchangeRates
Data Type: Number
Decimal Places: 4
Paste the below formula:
If(ISPICKVAL({!Loop.IsoCode}, "AUD"), {!Currency_API_Callout.2XX.data.AUD.value},
If(ISPICKVAL({!Loop.IsoCode}, "USD"), {!Currency_API_Callout.2XX.data.USD.value},
If(ISPICKVAL({!Loop.IsoCode}, "EUR"), {!Currency_API_Callout.2XX.data.EUR.value}, 0.000)))
You will need to add additional formula lines for each currency and add a bracket ) to the end of the formula. As I only have three currencies in my Org and don’t plan on adding more, I have three lines of formula so I add three brackets ))) to the end.
It is highly recommended at this stage to add the most common currencies up to 3900 (Flow Limit). If you go over this limit you will need to create an additional Formula Variable and replace 0.000))) in the first formula with the API name of the second formula {!CurrencyExchangeRate2}))) which could look like this:
If(ISPICKVAL({!Loop.IsoCode}, "AUD"), {!Currency_API_Callout.2XX.data.AUD.value},
If(ISPICKVAL({!Loop.IsoCode}, "USD"), {!Currency_API_Callout.2XX.data.USD.value},
If(ISPICKVAL({!Loop.IsoCode}, "EUR"), {!Currency_API_Callout.2XX.data.EUR.value},
{!CurrencyExchangeRate2})))
And your second formula would look like this
If(ISPICKVAL({!Loop.IsoCode}, "AUD"), !Currency_API_Callout.2XX.data.AUD.value},
If(ISPICKVAL({!Loop.IsoCode}, "USD"), {!Currency_API_Callout.2XX.data.USD.value},
If(ISPICKVAL({!Loop.IsoCode}, "EUR"), {!Currency_API_Callout.2XX.data.EUR.value}, 0.000)))
And so on until each 3900 limit is reached per formula. An alternative approach would be to use APEX Class to overcome limits within flows.
Here is a formula for the 10 most-used currencies
If(ISPICKVAL({!Loop.IsoCode}, "USD"), {!Currency_API_Callout.2XX.data.USD.value},
If(ISPICKVAL({!Loop.IsoCode}, "EUR"), {!Currency_API_Callout.2XX.data.EUR.value},
If(ISPICKVAL({!Loop.IsoCode}, "JPY"), {!Currency_API_Callout.2XX.data.JPY.value},
If(ISPICKVAL({!Loop.IsoCode}, "GBP"), {!Currency_API_Callout.2XX.data.GBP.value},
If(ISPICKVAL({!Loop.IsoCode}, "AUD"), {!Currency_API_Callout.2XX.data.AUD.value},
If(ISPICKVAL({!Loop.IsoCode}, "CAD"), {!Currency_API_Callout.2XX.data.CAD.value},
If(ISPICKVAL({!Loop.IsoCode}, "CHF"), {!Currency_API_Callout.2XX.data.CHF.value},
If(ISPICKVAL({!Loop.IsoCode}, "CNH"), {!Currency_API_Callout.2XX.data.CNH.value},
If(ISPICKVAL({!Loop.IsoCode}, "HKD"), {!Currency_API_Callout.2XX.data.HKD.value},
If(ISPICKVAL({!Loop.IsoCode}, "NZD"), {!Currency_API_Callout.2XX.data.NZD.value}, 0.000))))))))))
Do not include your Corporate Currency and always ‘Check Syntax’ to make sure your formula works.
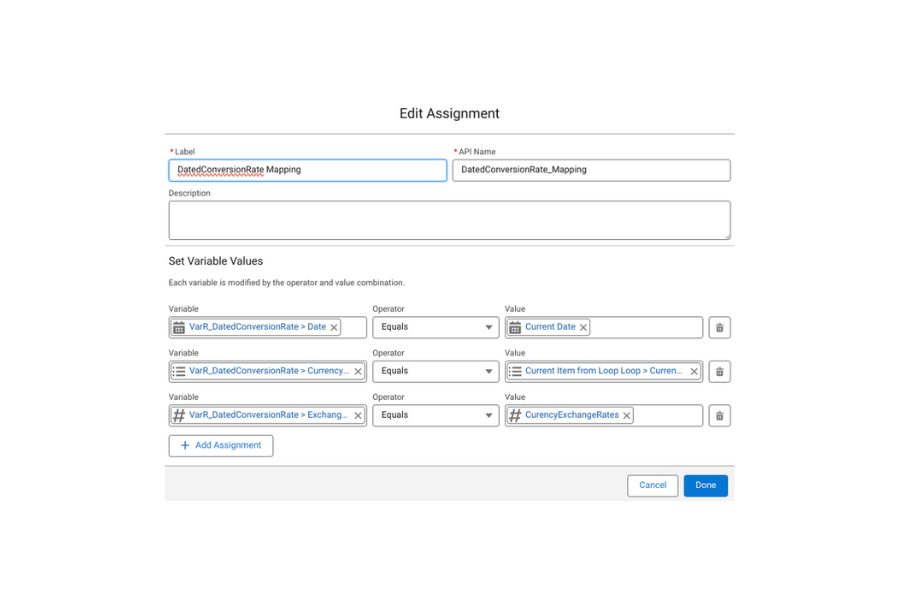
Label Name: DatedConversionRate Mapping
Set Variable Values:
Row 1:
Filed: {!VarR_DatedConversionRate.StartDate}
Operator: Equals
Value: {!$Flow.CurrentDate}
Row 2:
Filed: {!VarR_DatedConversionRate.IsoCode}
Operator: Equals
Value: {!Loop.IsoCode}
Row 3:
Filed: {!VarR_DatedConversionRate.ConversionRate}
Operator: Equals
Value: {!CurencyExchangeRates}
Click the + Symbol, below Dated ConversionRate Mapping Assignment
Label Name: Add to Collection (API name will auto-populate)
Set Variables
Row 1:
Filed: {!VarR_DatedConversionRates}
Operator: Add
Value: {!VarR_DatedConversionRate}
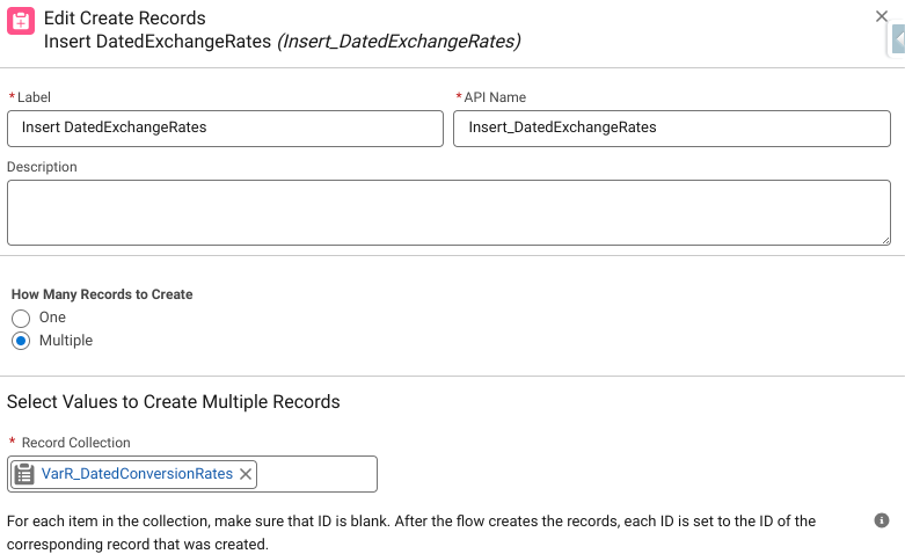
Click the + Symbol
Label Name: Insert DatedConversionRates
How Many Records to Create Checkbox: Multiple
Record Collection: {!VarR_DatedConversionRates}
5. Click ‘Done’
6. Click ‘Save’ to save the entire flow
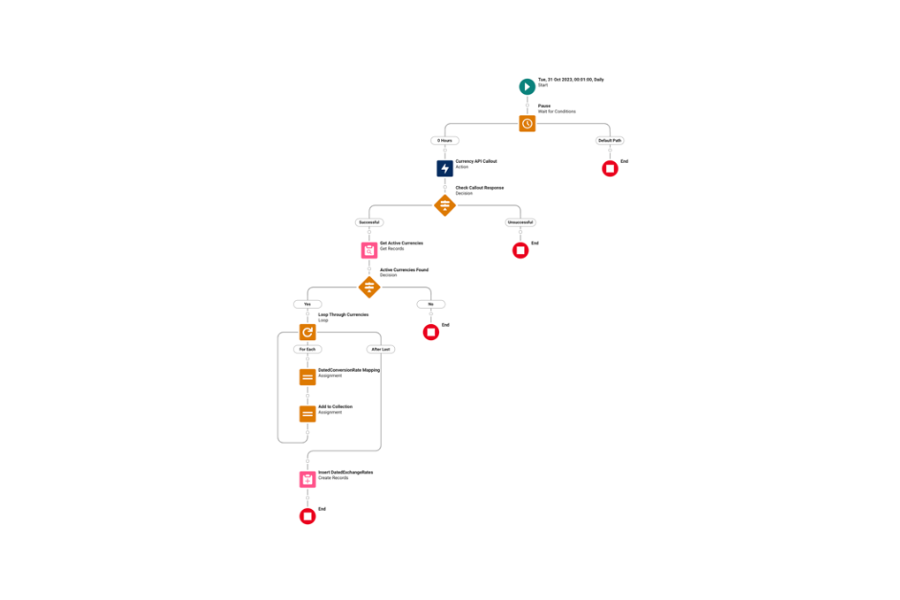
Now that Wilson has completed his flow, it will look like this:
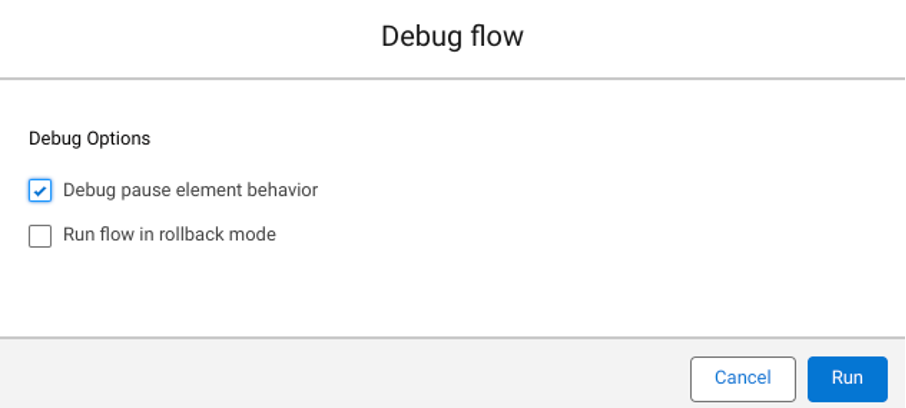
Before moving the flow to a production Org, it's time to Debug and test. It would be good at this point to note down the current rates of your currencies and set the running user for your process as an Admin from ‘Process Automation Settings’, if not already done.
Click: Debug
As you have built this flow in a sandbox, do not select the ‘Run flow in rollback mode’ checkbox. You want to check that the rates have been updated from the currency screen. If you are building in a Production Org (not recommended!), then you can click ‘Run flow in rollback mode’ to revert all records back to their original state.
2. Click ‘Run’
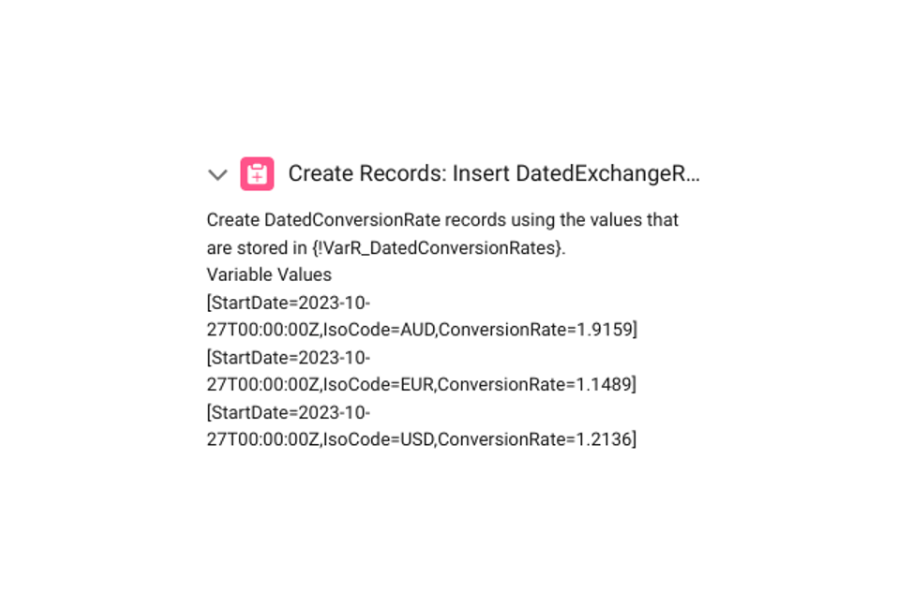
You will get a result like this:
And you’re done! You can now launch in your live Sales Cloud account.
There is only one small limitation with this flow: it only allows you to insert new currencies once a day and once this action has been completed you will get an error message stating that the flow has failed if you try to insert again. If you need to update multiple times per day, the AppExchange is a great place to find a solution, or use the update element at the end instead of the ‘Create Element’. You will need to Add IDs to the variables to accomplish this.
If you’ve reached the end of this post feeling overwhelmed by the technical setup required, feel free to reach out to MarCloud and we can discuss a flexible Sales Cloud support package for you.
With 28 years of experience in the British Army and a successful track record as a Salesforce Solution Engineer, Robbie brings a unique blend of leadership and technical expertise to the table. His ability to translate customer needs into innovative solutions, coupled with expertise in managing complex projects, makes him a valuable asset in driving customer success within the Salesforce ecosystem or as an administrator.
More by Robbie BainWith the eBook ‘A Guide to Salesforce Marketing Tools’ in your arsenal, you’ll have a go-to, comprehensive, expert guide to understanding and selecting your perfect Salesforce marketing platform(s), be it Marketing Cloud Account Engagement (Pardot) or Engagement, and the products available to each.
Download nowIt’s easy to assume your HubSpot lead scoring is functioning as it should, but if sales reps are pushing back on lead quality, or you’re struggling to prove marketing influence on pipeline, your scoring isn’t accurately surfacing leads worth pursuing.
Tom Ryan
7 mins
There’s a trend in the conversations we’re having with marketing leaders these days. Teams that have been using Salesforce Account Engagement (Pardot) or Marketing Cloud Engagement for years are looking at alternatives, and this typically leads them to two options. Either they stay within the Salesforce ecosystem by moving to Marketing Cloud Next (one of Salesforce’s ‘on core’ marketing platforms), or they switch to HubSpot.
Tom Ryan
8 mins
If you've been using Marketing Cloud Account Engagement (Pardot) for a few years, you'll know the product roadmap has stayed very, very still. Feature requests from years ago haven't arrived, leaving workarounds as permanent fixtures. Many marketers feel as though the platform they invested in isn't keeping up with what teams need it to do.
Tom Ryan
5 mins

MarCloud is a team of certified Pardot, Marketing Cloud, and Salesforce specialists. We help businesses to unlock the potential of marketing automation. Join 2,000+ professionals who receive actionable insights to boost their automation performance.
Sign up to the newsletterWith the eBook ‘A Guide to Salesforce Marketing Tools’ in your arsenal, you’ll have a go-to, comprehensive, expert guide to understanding and selecting your perfect Salesforce marketing platform(s).
Download now