This blog was written before Pardot was renamed to Marketing Cloud Account Engagement. You can read more about the name change and what it means here.
While there is some speculation whether Pardot Tags are a useful feature, we think that they are quite frankly, underrated.
You may immediately and solely associate tags with filtering… well you aren’t wrong.
Pardot Tags are labels you can assign to assets within your account, to help filter these quickly and efficiently and keep your account organised.
However, there are various other ways Tags can be used to our advantage and this blog is here to highlight them.
What are Pardot tags and how to use them:
Default Pardot Fields vs Custom Fields
Thank goodness for the Pardot Recycle Bin, am I right? Imagine you are data cleansing and find yourself missing a prospect… no need to panic! Almost all data (minus content files) can be found in the recycling bin once they have been deleted and either restored or permanently deleted from here.
Yet one of the main issues we have found here at MarCloud is the inability to track deleted prospects. This might sound counter-productive, but just hear us out.
Scenario: You are doing a mass data cleanse and delete a multitude of prospects in the hopes of minimising your prospect usage in Pardot, however, you want to identify these prospects if they are ever undeleted. We can use Tags to do this!
To tag prospects through table actions:
- Head to Prospect Table or List used to segment prospects > Select the prospects* > Scroll to the bottom of the page > click on the dropdown menu > Select Add Tag’ > Go
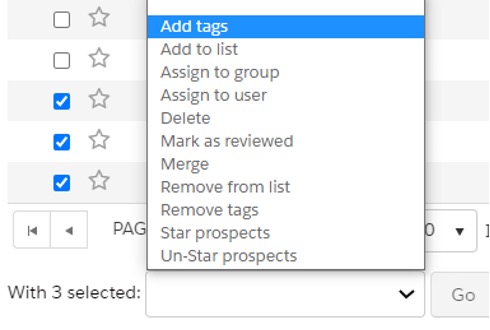 * If you are tagging all prospects, you may select the checkbox in the title compartment and a message will appear (see screenshot below), click on the link to choose all prospects on all pages.

Note: When creating a Tag, we recommend using a name that is unique i.e. Previously in Recycle Bin, so that they are identifiable along with any additional Tags they may have.
The next step is to create a dynamic list with the criteria to match with prospects that have this Tag, so that it is populated whenever a prospect is undeleted - voila!
Tags & Campaigns
Now, if we aren't using campaigns effectively, here are some additional steps to making your organisational journey a little easier.
Prospects may have a multitude of campaigns they have engaged with, some more so than others. So, how can we track this?
Tags.
By utilising Tags, we are able to view the most engaged campaigns for a singular prospect and therefore, track this in Pardot.
We are able to view the prospects that have this particular Tag and assess when they are deemed as a sales-qualified-lead, starting conversations regarding the engaged with campaigns for more personalised interaction!
Note: This will need to be done for each campaign for accurate tracking.
Click the image above to download our guide to organising Pardot like a pro
Tags & Reporting
We can also use Tags to identify specific performing categories within Pardot. For example, we may have multiple forms on our website designed for separate purposes, e.g. volunteers vs. clients.
In order to identify these prospects, we can use an automation rule to Tag the separate form completions. If we want to Tag all prospects that fill in the Contact Form, we can run an automation rule to match all prospects with this criteria to then apply the Tag “Contact Form Complete” > Run Rule.
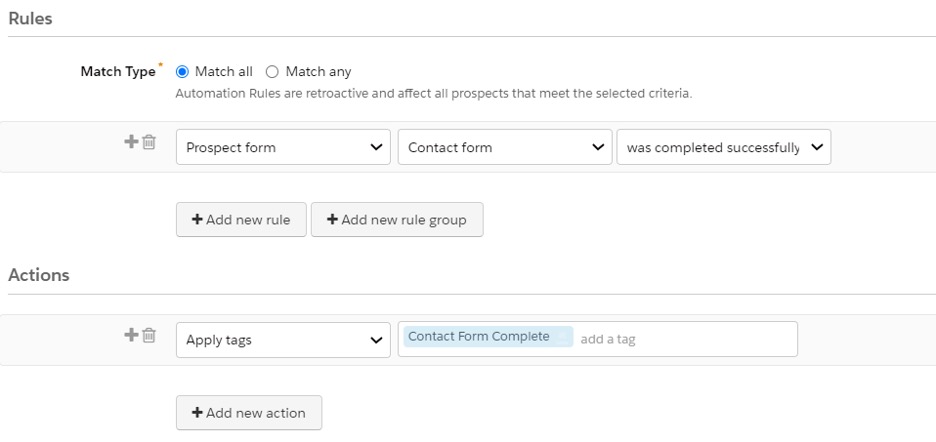
Alternatively, if we had a Volunteer form, the Tag may be named “Volunteer Form Complete”.
If we wanted to view how the Volunteer Form was performing, we could filter by Tag “Volunteer Form Complete”.
Access statistics by heading to Reports (Pardot Reports in Pardot Lightning) > Marketing Assets > Forms.

If you have the Pardot Plus, Advanced, and Premium Editions, or the add-on for Pardot Pro or Ultimate Editions, you may be using B2B Marketing Analytics. When you set up B2BMA, you are given several datasets, which is essentially an insight into different metrics you could report on. This is an incredible feature in itself for more granular reporting and we can use Tags to filter prospects or assets to further aid navigation.
If you would like to learn more about Where To Start With B2B Marketing Analytics Plus Dashboards, please visit this blog for more information.
Despite the improved use that Tags can offer for organising Pardot, we recommend not using too many as this may become confusing for a user. Alternatively, you may merge Tags by heading to:
- Marketing > Segmentation > Tags
- Select Tag > Click Merge Tags’
- Select the tag(s) you would like to merge this one with
- Press Merge Tags
Additionally, to delete Tags you may either:
- Click the gear icon next to the tag > Delete
- Click the tag name > Delete
- Select multiple tags from the table > Scroll and choose Delete tag’ > Go
Note: To Merge or Delete Tags in Pardot Lightning head to the Content tab > Tags
We hope this blog convinced you to not only use tags, but use them effectively. While there are many uses for Tags, we recommend aligning these with additional features, such as a strong Folder Structure, in order to maximise organisation.
Tags are just one way to help keep your Pardot account tidy - download our free eBook for more tips on how to organise your Pardot account like a pro! If you have any questions or additional ways of using Pardot Tags that you’d like to share, please reach out to the team here at MarCloud Consulting!

Hollie Fitzpatrick
Hollie joined the MarCloud team with extensive B2B marketing experience. With a keen interest in marketing technologies, they strive to find the best solution to increase the efficiency and quality of marketing campaigns through rigorous testing and data analysis. A certified Pardot consultant, Hollie spends her days at MarCloud being fully solutions-focused.
More by Hollie FitzpatrickFeatured resource
How to Measure ROI Using Pardot
Proving ROI is the holy grail for marketers. In our ‘How to Measure ROI Using Pardot’ eBook, you’ll find a detailed list of all the steps you need to take to fully track and report on marketing attribution and return on investment. If you can make it through the guide with every single checkbox ticked, you can consider yourself a true expert!
Download now
