At MarCloud Consulting, we are seeing more and more clients aiming to bridge the gap between Sales and Marketing and we are loving it. This is why we encourage everyone to enable Salesforce Engagement History.
By setting up Engagement History Dashboards, we are able to show campaign performance over time, see how prospects have interacted with a Campaign – and the assets associated with that Campaign. Meaning, sales users who do not access Pardot can see how the Pardot emails, landing pages, and files associated with that Campaign have performed.
All of this massively enhances reporting on those tangible business outcomes!
One of my favourite features of Engagement History is being able to drill down into important metrics. We can see straight from Salesforce just how prospects have interacted with our Campaign and which Pardot email generated the most engagement.
There are many more benefits though…

How To Enable & Use Salesforce Engagement History:
Benefits of using Salesforce Engagement History
Assuming you’ve set up Connected Campaigns (if not head to our blog here), Salesforce will now store all engagement of your Pardot assets on that particular Campaign’s page. This means, all the link clicks, email opens, form submissions, etc. on the Salesforce Campaign, visible to your Sales users.
We can use this to create more advanced Salesforce reports on engagement metrics and dashboards to represent just how well our marketing campaigns are performing - which in turn will allow us to improve campaign management.
Not only is this data visually pleasing, but by seeing these metrics populating on the campaign page, we can determine which marketing assets are most effective.
I hope this all sounds great so far! But I bet you’re wondering, how this will affect Salesforce storage limits?
Well, Salesforce says, Assets associated with connected campaigns are stored as records in Salesforce and apply to storage limits. Engagement activities on these assets remain in Pardot, and don’t count toward Salesforce storage limits.’
Bit confusing?
The key point to remember here is the asset lives in Pardot, so whilst the record will count towards our Salesforce storage limit, the engagement activities associated with that asset will not as they remain in Pardot and therefore only affect Pardot’s storage limit.
Engagement History Metrics to enhance reporting
Once Engagement History is enabled correctly, you will have a number of new features in the account. This includes being able to create a separate tab on your page layouts specifically for Engagement; which will also include the data to show engagement overtime.
As it's completely customisable, you could have the Engagement History dashboard directly on the campaign layout in a separate tab and specific hierarchy fields on the Parent Campaign.
Here is how the features will look:
Engagement Metrics Lightning Component
This allows us to see a high-level overview of the metrics rolled up. On the example image below from Salesforce, you can see we have the option to toggle between including child Campaigns, which is why having a structured Campaign hierarchy is vital.
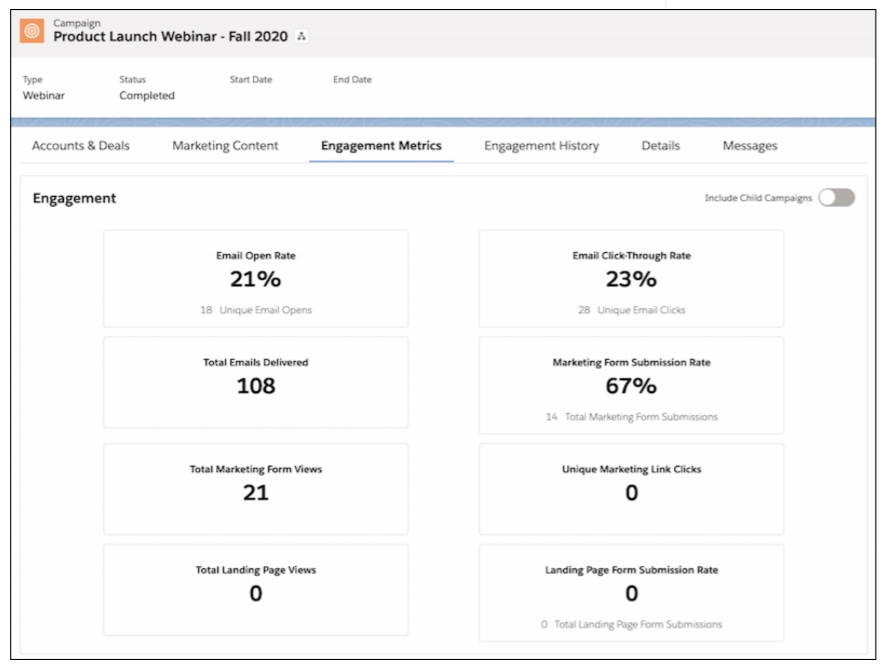
Image source: Salesforce
Engagement History Dashboard
The Engagement History Dashboard features a graph and table to show campaign performance over time. It allows us to see valuable metrics on who the prospects were that interacted with the assets.
We can see exactly what the last asset was and where they opened the email or even clicked the link in the email. My favourite feature is that you can easily open the Salesforce record for the lead or contact directly from this table too!
As you can see from the Salesforce image below, this is so beneficial, and I’m sure you are thinking of some of your users who will LOVE this. However your edition determines the amount of user licences you have to assign. This means if you have Growth, you have 5 user licenses, for Plus editions you will have 10 and for Advanced, your edition includes 20.
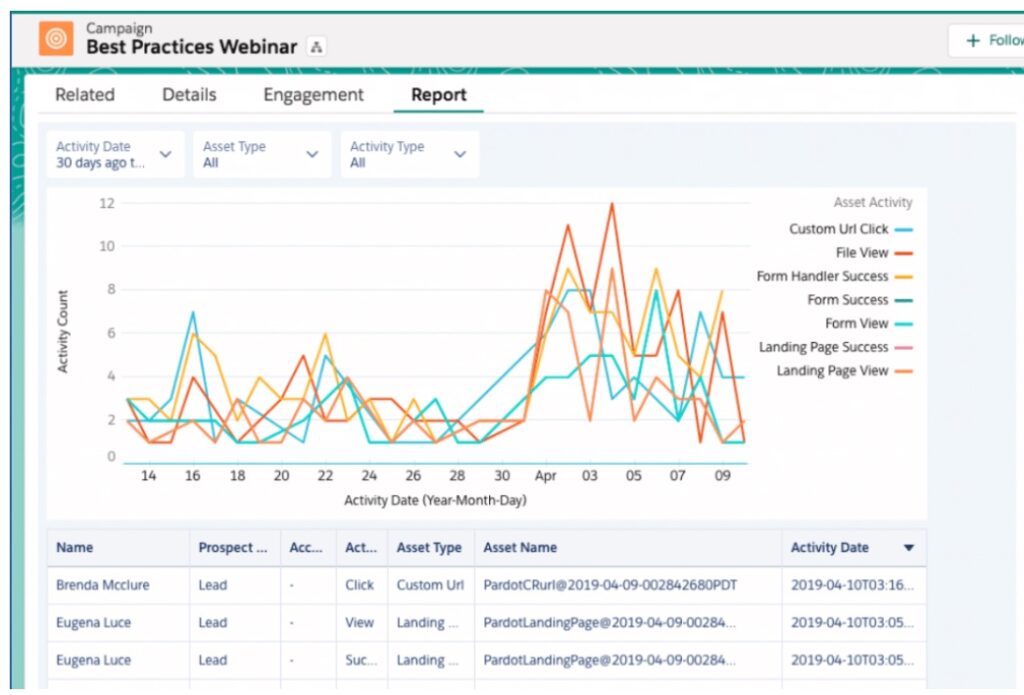
Image source: Salesforce
Related Lists
Related Lists allow you to see the assets separated by type, this is why it's so important Pardot assets are associated with the correct Campaigns! For example, we can see total sends and opens for a list email and views and form submissions for a landing page or Pardot form.
The List emails’ Related List will include automated emails from Engagement Studio, completion actions, and automation rules. However, if you are using it to report on your specific Engagement Studio program, remember that the Engagement Studio Program Name field will not show as default on this related list, but you can add it in the page layout editor!
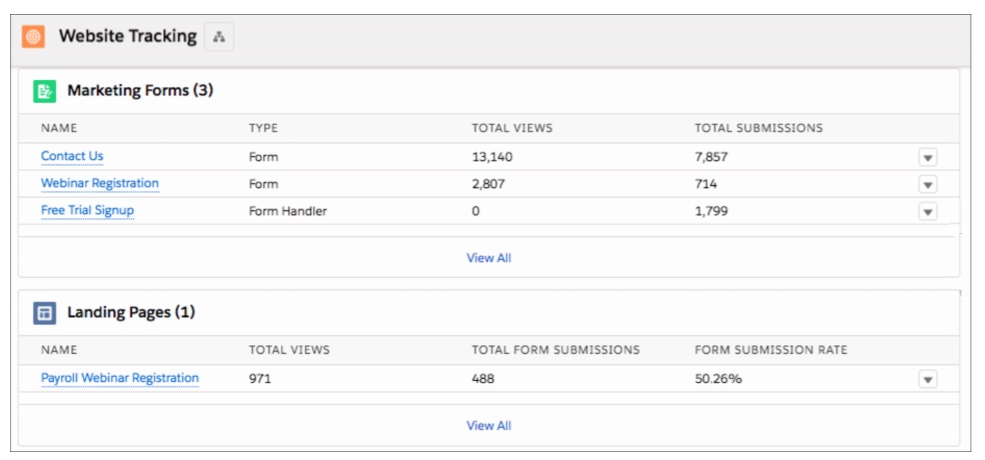 Image source: Salesforce
Depending on your team, some users might prefer one feature over the other. For example, Marketers may use the dashboard to see if list emails were more successful compared to form views, whilst Sales may use the Most Engaged Accounts report to see who engaged.
Whilst all features are equally beneficial to determine which assets were most effective, I do favour the fields on the Campaign record as we can use those metrics to build a custom report.
Fields
By adding the Engagement History metrics as fields on the Campaign layout, not only do you get a quick rundown on performance but you can build a custom report based on the Campaign object as it gives you access to all asset types.
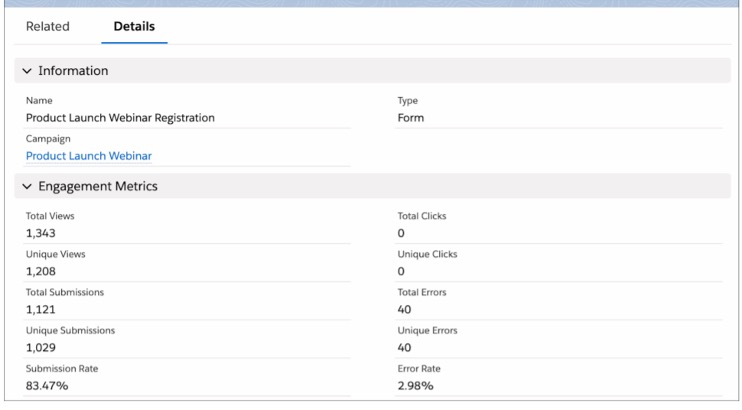 Image source: Salesforce
Steps to enable Engagement History
If you’ve stuck with me this far, I hope you are now ready to set this up. Below I have detailed the steps to enable Engagement History.
1. Firstly check what version your org is. Engagement History is available in: Salesforce Professional, Enterprise, Performance, and Unlimited Editions with Pardot Growth, Plus, or Advanced Editions Edition. There are a few points to consider depending on your edition. For users with Growth Edition, Engagement History can sync up to 90 days or 10 million rows of data, whichever comes first. For Plus Edition and above, users can sync up to 35 million rows or 3 years of historical data. To do this, customers must have B2B Marketing Analytics and the Prospect and Activity dataset enabled.
2. Next, ensure users have the correct permission set in order to view Engagement History. Users need either CRM User, Sales User, or Service User permission set.
3. In Salesforce, go to Setup, and from the Quick Find box, search for Pardot and select Engagement History.
4. What’s great about Salesforce is they have an easy to follow step-by-step guide ready for you. Simply follow the steps on the setup page to turn on Engagement History. Click the arrow next to the first option (Show Engagement History on Campaign Records), then click Go to Page Layout Setup.

5. Click into the campaign page layout and select Related Lists, here you can see all Related Lists that you want visible on your page layout. To add a Related List simply drag and drop to the area you’d like it displayed. The options are:
- Campaign hierarchy
- Campaign members
- Campaign member statuses
- Landing pages
- List emails
- Marketing forms
- Marketing clicks
- Activity history
- Open activities
- Influenced opportunities
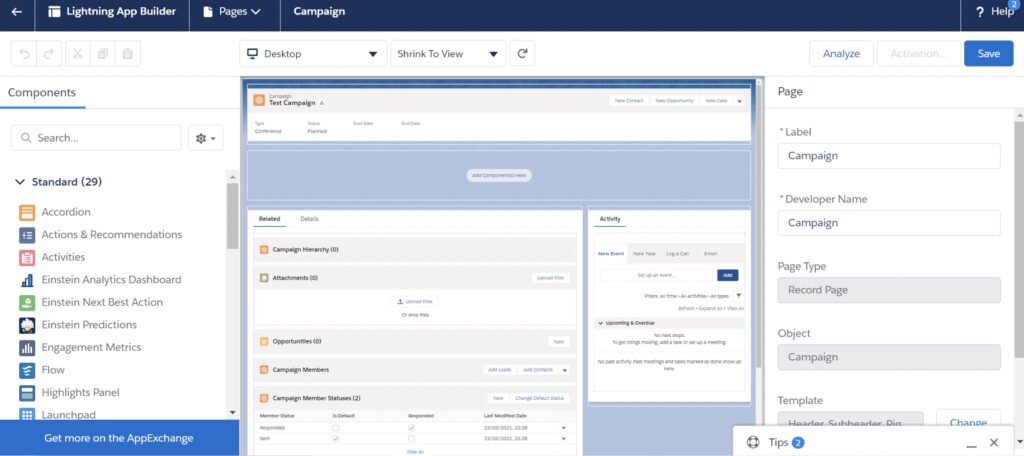
6. To add the Engagement History Metrics, use the Lightning Record Pages. To show recent engagement with marketing assets, we can add the custom component to your lead, contact, and person account record pages (note: this component comes with your Pardot AppExchange package). Select the page that is used. If no pages have been set up, on the right-hand corner click New, then Record Type. Here you can create a brand new Lightning Record page and access the Lightning App Builder.
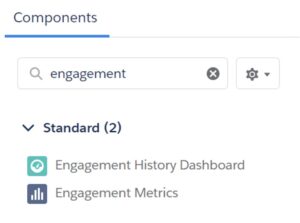
7. Once on the Lightning App Builder, use the quick find search box and enter Engagement Metrics’. Similar to step 3, drag and drop this section on the page layout.
8. Next, it’s time to Enable Embedded Engagement History Dashboards. To ensure you can enable Engagement History Dashboards, make sure you have the Customise Application permission.
9. Once your user has the correct permissions, repeat step 3 (access Setup > and in the Quick Find Box search for Engagement History). The bottom of the page will have step 3: Enable Embedded Engagement History Dashboards. Here we want to switch the toggle to On.
10. Access the Lightning App Builder Campaign Page layout we created/edited in step 6 and find the Engagement History Dashboard component located in the Standard Components section.
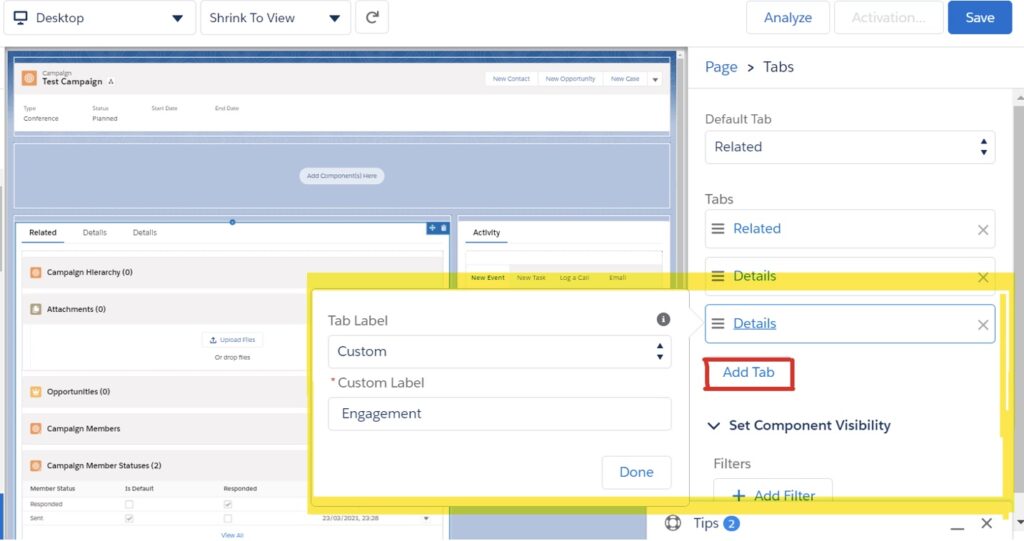
11. Before you drag the component into the tab, we recommend creating a new tab explicitly for this component. To create a new tab, select Add Tab’ from the sidebar. Here we will choose the option Custom’ and enter the name of the tab. We recommend naming it Engagement’ or Reporting’.
12. Now drag the Engagement History Dashboard component into your tab and save the page.
13. The component now needs to sync, and like most things the first sync is always the biggest, so please allow 24 hours for metrics to sync and appear correctly. After this initial sync, the data will be refreshed every 8 hours.
14. Once the initial sync has successfully run, it is time to share your work with the team! To allow users to view Engagement History Dashboards, assign them the Analytics View Only Embedded App’ permission set.
15. Now your users will be able to view the Engagement History Dashboard on Campaigns! To go the extra mile, follow the above steps and add the Engagement History Dashboard on Opportunities and Account Page Layouts.
Now, if you are like me and prefer the Engagement Metric fields, this is how we can create a report by using custom report types.
- Firstly, ensure you have enabled custom report types. Navigate to Setup, enter Pardot in the Quick Find Box and select Engagement History.
- Once enabled, go back to Setup and this time search for ‘Report Types' in your Quick Find Box.
- To create a new custom report, click on ‘New Custom Report Type' and enter all details.
- Once you’ve successfully created your custom report type, scroll down the page to the section titled ‘Fields Available for Reports’ and click Edit Layout.
- Under ‘Field Layout Properties', click Create New Section.
- Title your new section, then drag and drop relevant fields you’d like to include.
I highly recommend creating custom report types for marketing assets, as Salesforce users can quickly run reports on engagement across all marketing assets using the campaign object.
I hope you are now ready to go and set up Engagement History in your org, but feel free to send our team a message if you have any questions or require support.