This blog was written before Pardot was renamed to Marketing Cloud Account Engagement. You can read more about the name change and what it means here.
Once you’ve successfully connected Salesforce to Pardot after following the connection steps, you may think to head straight to migrating your data. However, there’s a little more to Pardot and Salesforce integration and it’s important to do all of the set up before importing any data.
In order for the two systems to work together correctly, you'll need to test and configure your Pardot account by mapping prospect, account and opportunity fields, mapping Salesforce to Pardot usernames, and setting up SSO.
V1 vs V2 Connector
The V2 Connector was released exclusively to new Pardot users in February 2019 and resolved many annoyances of V1.
Unfortunately, you can’t pick and choose which version you’re on as it’s defaulted based on the purchase date.
The key areas where V2 has improved are:
- Set up effort: there’s a guided walk-through.
- B2BMA integration.
- Initial sync is quicker due to the connector being in the paused’ state.
- Data visibility is increased due to Marketing Data Sharing.
In a rush? You can skip to the section that interests you most using the menu below…
Pardot and Salesforce integration tasks
Testing the connector
After you set up the Salesforce-Pardot connector, you can (and should) test to make sure that the connector is syncing as expected.
Depending on how the account is used, the connector can be synced in two ways:
- Accounts that do not allow multiple prospects to have the same email address:
- Create a prospect record in Pardot that already exists in your Salesforce CRM. Select Sync with CRM, and see if the connector initiates a sync.
- Create a prospect record in Pardot with an email address that does not exist in Salesforce. Add a record in Salesforce with the same email, click Sync with CRM and see if the connector syncs.
- Create a prospect in Pardot with an email address that does not exist in Salesforce, assign the prospect a user, and check to see if a record is created in Salesforce.
- If your account is set up to create prospects in Pardot when a record is created in Salesforce, then test to see if creating a record in Salesforce with a new email address will create the same new record in Pardot.
- Accounts that allow multiple prospects to have the same email address (AMPSEA)
- Create a prospect in Pardot, assign them a user, and check to see if the record is created in Salesforce.
- Create a record in Salesforce, click Send to Pardot, and check to see if the record was created in Pardot.
Mapping custom fields
In Salesforce there are leads and contacts, but in Pardot these are rolled into one: prospects.
When converting leads to contacts, only default fields appear and map automatically. By custom mapping, the fields ensure all information is available, and available to sync.
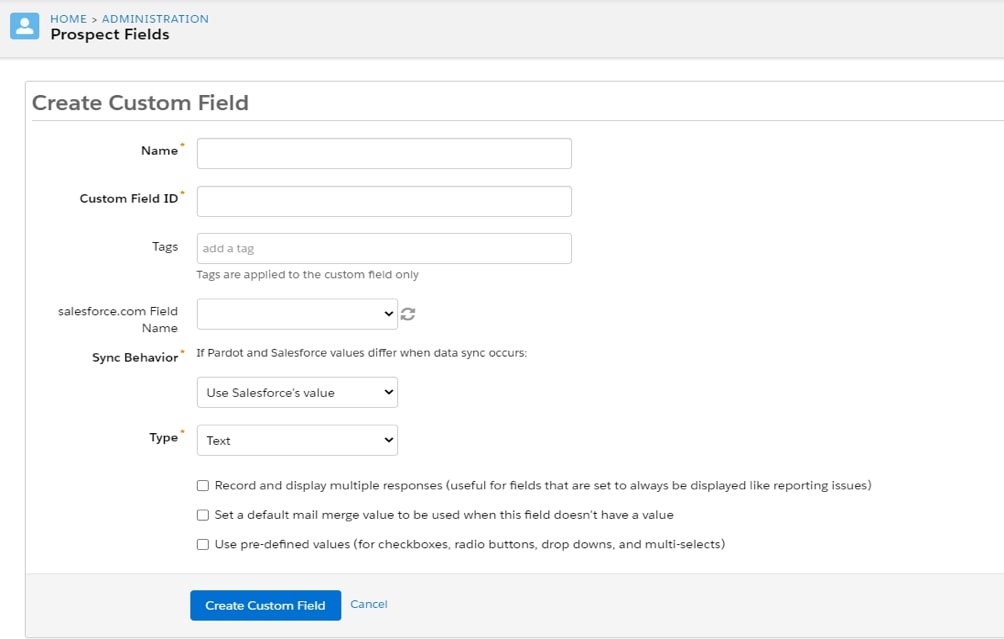
It’s simple to configure and map these fields:
- Admin > Configure Fields > Prospect Fields.
- Add Custom Field and add a name.

- From the ‘Salesforce Field Name‘ dropdown, choose the field you want to map.
- Select sync behaviour and use the most recently updated record to ensure bidirectional syncing.
- Select any additional settings and finish by clicking Create Custom Field’.
By following this process you can map custom accounts and opportunities too.
Another thing to consider is that once you’ve added the custom fields, you can populate the field in both systems by triggering a full sync. Sync behaviour between Salesforce and Pardot can be a little confusing, which is why we’ve got a whole article dedicated to it which you can read here.
Note: When transferring across a custom field you need to include, at minimum, name, type, custom field ID and SF field name.
Mapping Salesforce users to Pardot
Any users with assigned prospects within Pardot should have a Salesforce username.
To do this manually head to:
- Admin > Users Management > Users.
- Under Actions, click the cog icon to edit the user.
- Select the Salesforce username from the drop-down.
- Click save user and you’re all done.
Or to map lots of users in one go, click the “Import Users” button.
For information on connected users, click here.
Add Custom Button
Custom buttons like “Send to Pardot” and “Send Pardot email” make it much easier to add Salesforce leads or contacts into Pardot or Pardot tracked emails.
- Head to your lead or contact page layout for editing.
- In Pardot head to the buttons category and to Custom buttons.
- In Lightning head to Mobile & Lightning Actions.
- Click the Send to Pardot and Send Pardot Email buttons, and drag them to the sections.
- Save when finished and repeat these steps for lead and contact page layouts.
Single Sign On (SSO)
Single Sign On is where users log in once and have access to both systems validated. This allows you to seamlessly jump between Pardot and Salesforce.
By Spring 21, Pardot only log-in will be retired and the only option will be to access via Salesforce.
Pardot Business Units
Business Units allow Pardot users to split their data by region, product or business area whilst still only connecting to a single Salesforce org.
This allows each division and set of users, access to only the prospects and marketing assets they need to market independently (like their own mini Pardots without the additional costs).
Of course, users like Pardot admins and marketing managers can switch between business units to manage assets, records, and settings. For a more in-depth view of business units, Tom has written a comprehensive breakdown of them here.
Marketing Data Sharing
When setting up Business Units as part of a Pardot and Salesforce integration, you’ll want a smooth integration of the right data syncing to the right unit, right?
Marketing Data Sharing (MDS) has this sorted for your leads, contacts, opportunities and custom accounts. MDS links to a single Salesforce field which ensures that the data flows to the right business unit.
To set up Marketing Data Sharing:
- Head to Pardot Settings > Connectors. Click the cog to edit settings and then select ‘Marketing Data Sharing’.
- Open a rule for editing.
- Configure the rule.
- Save the rule.
Top tip: If you do it for one, you do it for all. If you’ve defined rules for leads you must also define rules for contacts, and vice versa.
Campaign Member Sync
Campaign Member Sync allows Pardot prospects to appear in Salesforce as vice members.
First of all, you must have Connected Campaigns enabled. Then you can enable Campaign Member Sync’ in your Pardot Account settings.
- Open the Account Settings page.
- In Pardot, click and select Settings.
- In the Lightning app, select Pardot Settings.
- Open the Connected Campaigns settings.
- In Pardot, scroll to Connected Campaigns and click to expand the settings.
- In the Lightning app, select Connectors. Click and select Edit Settings. Next, click the Campaigns tab.
- Select Enable Campaign Member Sync and click save.
Once you’ve turned on the setting for Campaign Member Sync, every prospect in Pardot will be added to the Salesforce Campaign tied to their Source Campaign.
In future campaigns, prospects will automatically sync.
Tips
- Although you’ve updated fields in Pardot, Salesforce is often the master and can (and will) overwrite field data.
- Lead and contact data fields MUST be the same within the API (case sensitive) to ensure the data is synced.
- On the topic of case sensitivity, Pardot fields aren’t, so, make sure your Salesforce API fields are unique.
- Creating a new field in Pardot does not automatically sync with Salesforce. The systems need to be used and synced bi-directionally to ensure all fields are correctly populated.
If you’re currently tackling a new Pardot and Salesforce integration, or you’ve already done this and now have issues cropping up, we do offer hands-on support and consulting packages. Send us a message for an initial chat.


