Pardot Domain Setup: A Step-by-Step Guide
Clients or consultants don't need to be anxious about their Pardot domain setup. It's pretty easy when you know what to do. Here's a guide!


5 mins
Clients or consultants don't need to be anxious about their Pardot domain setup. It's pretty easy when you know what to do. Here's a guide!
5 mins
I’ve encountered many people scared at the idea of updating DNS records to set up their email domain in Pardot. In reality, I don’t think clients or consultants need to be anxious about this. It’s a pretty easy process when you know what to do.
Granted, if you accidentally delete an ‘A’ record or amend the wrong thing in your domain’s DNS, you could break the company website and suddenly stop emails being sent and received… but follow instructions to the letter and this shouldn’t happen!
In short, configuring your domain DNS for Pardot means adding records to the domain, not editing or removing any (except for the SPF record which we will get into).
Let’s dig into each part of the process step-by-step.
DNS stands for Domain Name System. In a nutshell, DNS translates domain names into IP addresses, which browsers then use to load web pages. Think of it as a phonebook for the internet.
For the purpose of setting up your Pardot domain, you don’t really need to understand more about DNS, other than to know that it’s where your domain records live. Domain records are essentially little instructions for the domain that help browsers understand more about a domain and how to interact with it.
You’ll find your DNS in whichever registrar you used to purchase your domain or within the settings of your chosen website host, depending on your website setup. Popular domain and hosting providers include Kinsta, Bluehost, GoDaddy, Cloudflare, 123Reg, and Siteground.
Some hosting providers provide in-platform email features but most of the time, we want to use external email clients like Outlook or Gmail. For example, to use @marcloudconsulting.com as my email domain instead of @gmail.com, the DNS for marcloudconsulting.com needs to be configured correctly.
The same concept applies to sending emails from a custom domain in Pardot. In order for servers to use your domain for emails, and to ensure the best deliverability rate, the DNS must contain the right instructions.
For the below, you will need Pardot Administrator permissions and you will need to head to Pardot Settings > Domain Management.

So, to send emails using your domain from Pardot, you need to first tell the internet that Pardot does have permission to do so. It’s a necessary step to prove that your company is the legitimate sender of your emails and would be the case for any other email marketing platform too.
Email servers are constantly looking for levels of authentication because we live in a world where scammers will buy email lists and blast emails whilst disguised as another company.
Check the sender information the next time you receive a spam or scam email. It’s often sent to ‘look’ like it’s from @apple.com but it is accompanied by a message of ‘sent via …’. This can mean there is no authentication in place and the sender isn’t who they say they are.
The first and most basic authentication check is the ‘SPF’ (Sender Policy Framework) record and then ‘DKIM’ (DomainKeys Identified Mail). These are both compulsory in Pardot so you must have these levels of authentication set up.
You’ll also require a third ‘validation’ via a ‘TXT’ record. This is relatively new to Pardot. So new, in fact, that I only noticed MarCloud’s account had a ‘Legacy verified’ notice the other day (Jan ‘23). I hadn’t seen this before! I assume that because our domain was already authenticated we didn’t need to re-authenticate.
To recap, you’ll need to set up three elements in your DNS:
Here’s a video guide on how to configure the SPF and DKIM for Pardot, but scroll further for text instructions and additional key information! It was recorded some years ago in a loft in Lisbon so you may notice slight differences in the account interface/terminology.
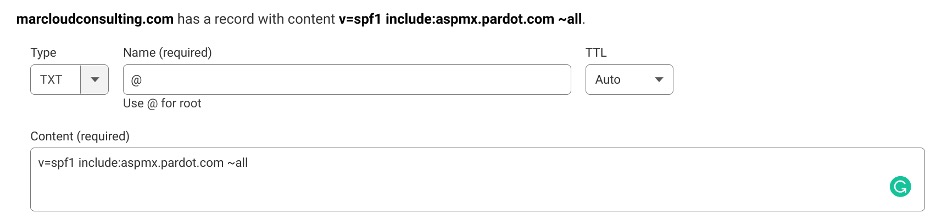
The SPF record to add to your DNS for Pardot is:
v=spf1 include:aspmx.pardot.com ~all

If an SPF record exists in your DNS already, you can copy and paste the include:aspmx.pardot.com part into the existing SPF string.
For companies that have a more technical setup, you should consult with your IT team to work out the best approach to your SPF setup. Some companies have lots of records (more than 10) so you can use a process called ‘flattening’ which allows you more flexibility and more records.
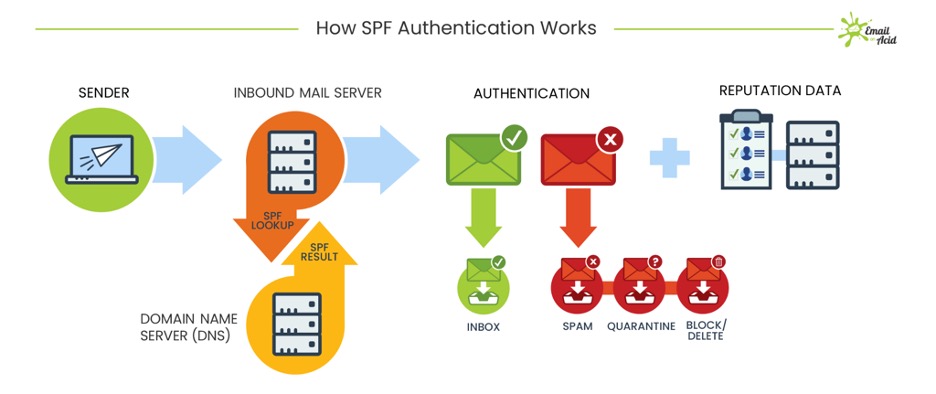
Source: Email on Acid
The steps for adding an SPF record differ among DNS providers, so you’ll need to check the documentation for the provider you use. For example, in Cloudflare, the ‘@’ symbol is used to ‘point’ to the root domain marcloudconsulting.com. Other providers may use a different symbol. Some providers also only allow ‘TXT’ records and there’s no mention of ‘SPF’. If this is the case for you, a TXT record will do the trick.
Source: Email on Acid
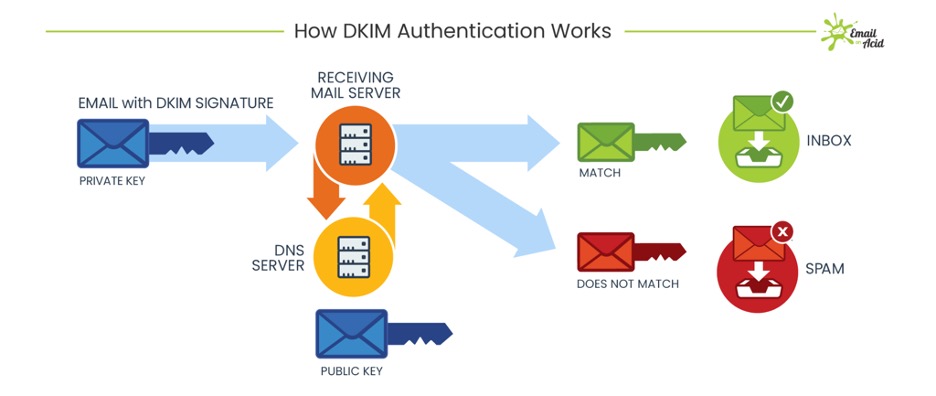
‘DKIM’ stands for ‘DomainKeys Identified Mail’ and this is the final part of the compulsory email domain setup in Pardot.
This one prevents someone from pretending to be you and, as shown in the diagram above, this is checked in combination with the SPF record to authenticate the sender.
Simply add two TXT records on the DNS with the unique values that Pardot provides you. To find the records to add:
Your records will look something like this:

From here, it’s a copy-and-paste exercise using your DNS provider’s documentation on how to create the records.
Following the same process you did to create/edit the SPF record in your DNS, you’ll need to add a new TXT record that looks something like the below but with a string unique to your specific Pardot account (don’t copy and paste the exact record below!):
sending_domain123456=abcde12345l0tsoflettersandn3mber3857384
This TXT record is a unique record that specifically validates and lets Pardot send emails from your domain.

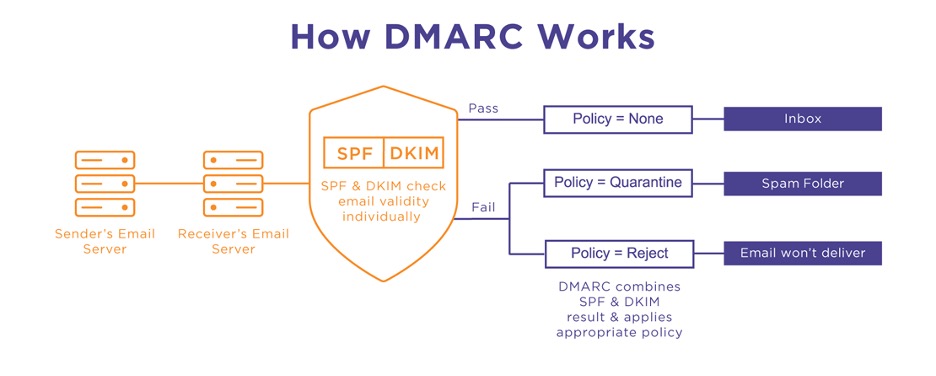
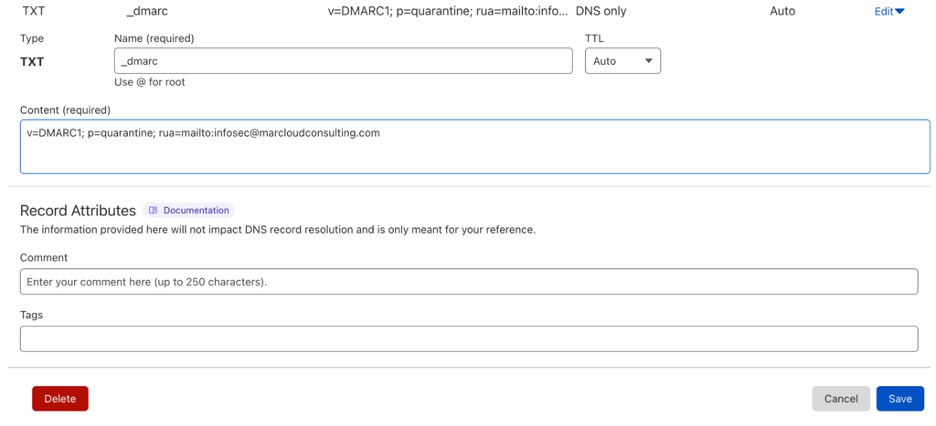
‘DMARC’ which stands for ‘Domain-based Message Authentication Reporting and Conformance’ is an extra step to help with email deliverability. This checks both the SPF and DKIM records and then applies a policy based on the results, allowing the email to either go to the inbox, spam, or quarantine (not delivered).
Its purpose is to tell the recipient email server what to do once it has checked the SPF and DKIM records. So, think of it as a little instruction for the recipient domain.
Source: https://www.agari.com/blog/pros-cons-dmarc-reject-vs-quarantine
While DMARC isn’t compulsory for your Pardot email-sending domain authentication, it’s definitely a good idea to implement it on your domain. Consider it the ‘cherry on top’ when it comes to email authentication.
DMARC isn’t something you’ll find mentioned in your Pardot account, so head to your domain provider for instructions. Here’s how the MarCloud one looks though:
Once Pardot recognises that the compulsory domain setup is in place correctly, you’ll see three neat green ticks appear where there were error notices before.
You’re now ready to start sending emails! Before you celebrate too hard, the next task is configuring your tracker domain, which is a whole separate topic and therefore, I’ve written a guide to Pardot tracker domain setup too.
If at any point you become stuck, don’t be shy, reach out to the team here at MarCloud and we’ll see if we can help. We won’t touch your DNS but we can point you in the right direction, as well as offer other types of Pardot support and consulting.
Founder & CEO of MarCloud, Tom has been on both sides of the fence, client-side and agency, working with Salesforce platforms for the best part of a decade. He's a Salesforce Marketing Champion and certified consultant who loves to co-host webinars and pen original guides and articles. A regular contributor to online business and marketing publications, he's passionate about marketing automation and, along with the team, is rapidly making MarCloud the go-to place for Marketing Cloud and Salesforce expertise. He unapologetically uses the terms Pardot, Account Engagement and MCAE interchangeably.
More by Tom RyanStarting out with Marketing Cloud Account Engagement, formerly known as Pardot, is no easy feat. Set yourself up for marketing automation success with this step-by-step checklist for implementing Account Engagement (aka Pardot). Work through the stages and get in touch if you need support!
Download nowIt’s easy to assume your HubSpot lead scoring is functioning as it should, but if sales reps are pushing back on lead quality, or you’re struggling to prove marketing influence on pipeline, your scoring isn’t accurately surfacing leads worth pursuing.
Tom Ryan
7 mins
There’s a trend in the conversations we’re having with marketing leaders these days. Teams that have been using Salesforce Account Engagement (Pardot) or Marketing Cloud Engagement for years are looking at alternatives, and this typically leads them to two options. Either they stay within the Salesforce ecosystem by moving to Marketing Cloud Next (one of Salesforce’s ‘on core’ marketing platforms), or they switch to HubSpot.
Tom Ryan
8 mins
If you've been using Marketing Cloud Account Engagement (Pardot) for a few years, you'll know the product roadmap has stayed very, very still. Feature requests from years ago haven't arrived, leaving workarounds as permanent fixtures. Many marketers feel as though the platform they invested in isn't keeping up with what teams need it to do.
Tom Ryan
5 mins

MarCloud is a team of certified Pardot, Marketing Cloud, and Salesforce specialists. We help businesses to unlock the potential of marketing automation. Join 2,000+ professionals who receive actionable insights to boost their automation performance.
Sign up to the newsletterSet yourself up for marketing automation success with this step-by-step checklist for implementing Account Engagement (aka Pardot).
Download now