One of the top features of Marketing Cloud Engagement is its ability to integrate with Sales Cloud and Service Cloud via Marketing Cloud Connect. Unlike the easy-to-use connectors Pardot (Account Engagement) users are used to though, Marketing Cloud Connect is tricky to set up.
Of course, a Salesforce Implementation Guide exists and it’s comprehensive, but we want to share and simplify the essentials you need to know when it comes to setting up the connection.

What is Marketing Cloud Connect?
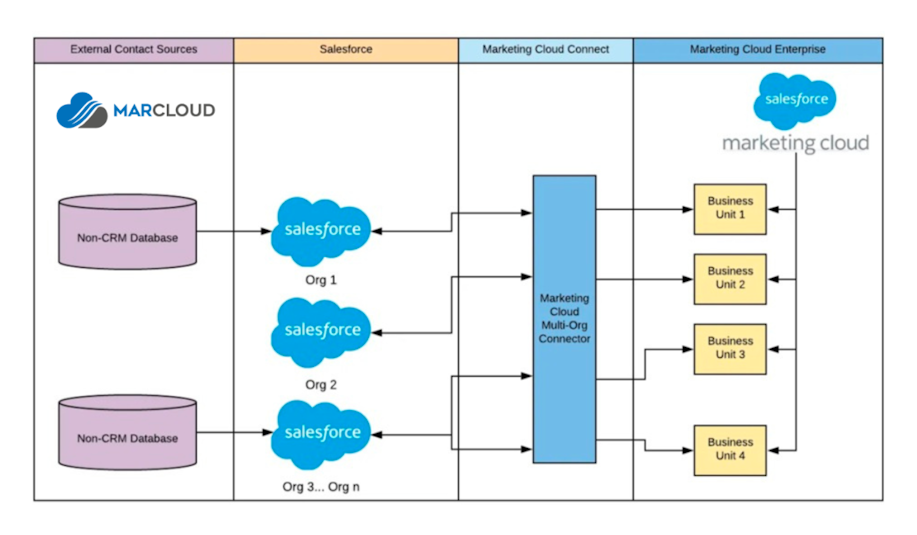
In a nutshell, Marketing Cloud Connect is an API integration that connects Marketing Cloud with other Salesforce systems, such as Sales Cloud and Service Cloud.
It’s a vital piece of the puzzle for SFMC users who want to combine the power of both tools for top-tier marketing and sales activity because it allows them to share key data.
There are many benefits, including:
• Aligning sales and marketing with consistently branded assets for campaigns.
• Triggering marketing communications based on Salesforce CRM values.
• Sending email campaigns to segments created and stored in Salesforce.
• Adding email engagement insights to CRM contact records.
• Avoiding sloppy double-targeting from marketing and sales teams.
• Suppressing contacts who should not receive marketing communications.
• Ultimately, it helps ensure a single view of the customer which makes it easier to target them throughout their purchase journey with relevant, tailored content.
So, using Marketing Cloud Connect seems like a no-brainer, right?
Where Marketing Cloud users often come unstuck though, is in the implementation. As mentioned, configuring MCC is a little complicated but worth the effort! Read on for a short guide.
Implementing
Requirements
Before you press on with any integration, you need to ensure you meet all of the system and user requirements.
Firstly, to install and configure the integration you must have full Salesforce and Marketing Cloud Admin permissions. You’ll also need to choose a designated ‘Marketing Cloud Connect API User’, and a ‘Salesforce System User’ – these are required to complete the account-level connection and should be dedicated system users.
Of course, users will also need system licenses for each software you want to connect i.e. Marketing Cloud and Sales Cloud.
Here’s a rundown of supported editions and packages:


However, there are some limitations for certain editions and user interfaces:
• CloudForce.com and Lightning Platform orgs aren’t supported. You’ll need to enable ‘Custom Platform Events’ in your org to ensure that the managed package installs correctly.
• Lightning Experience isn’t supported for MCC features. Those using Lightning Experience with Salesforce are automatically redirected to Salesforce Classic when MCC tabs are clicked.
• Managing Business Units in Salesforce is only available to Enterprise 2.0 of Marketing Cloud.
Free Customer Journey eBook
This handbook is a fast guide to strategic automated marketing that connects with the customer at each stage of their purchase journey.
- Journey mapping
- Integration & tracking
- Automating journeys
- Challenging assumptions
- Single customer view
- Channel selection

Considerations before installing
Marketing Cloud Connect can connect a single Marketing Cloud account with one or more Salesforce orgs.
To start with, your account has to be enabled for use with Marketing Cloud Connect.
A ‘Subscriber Key’ is required. Check whether this is already enabled in your Marketing Cloud account and if not, complete a Subscriber Key Migration before proceeding with the connection process.
You’ll also need four custom tabs available in your Salesforce org and have enabled ‘Custom Platform Events’.
When it comes to giving users access, there are two types:
• Administrator – users with this permission have full access to manage the setup of Marketing Cloud Connect within Sales or Service Cloud.
• User – these users can access the functionality of Marketing Cloud Connect in both Salesforce and Marketing Cloud. A reminder though, they need licenses for both.
Configure user permissions by heading to Setup > Manage Users > Users in your Salesforce org. Here you can create or update existing users with licenses and System Administrator settings. For Salesforce System users, select the ‘Marketing Cloud for AppExchange Admin’ and ‘Marketing Cloud for Appexchange User’ permission sets.
Steps to installing
The latest Marketing Cloud Connect version (v5) can be found at either of the below links, depending on whether you’re installing on live or sandbox environments.
| Production Org: https://sfdc.co/MCC
| Sandbox Org: https://sfdc.co/MCCSandbox
There are a dozen or so key actions to take during installation and setup, which are:
Step-by-step instructions for each of these stages can be found in the Salesforce Implementation Guide, from page 12 onward.
We won’t repeat them all here because they’re lengthy and won’t be in any simpler terms than Salesforce has already provided! What we will reveal though, are our top tips for setting up.
Have more questions or want to handball this more technical implementation task to a Marketing Cloud expert? No problem! We’re ready and waiting to help, just drop us a message.

Tom Ryan
Founder & CEO of MarCloud, Tom has been on both sides of the fence, client-side and agency, working with Salesforce platforms for the best part of a decade. He's a Salesforce Marketing Champion and certified consultant who loves to co-host webinars and pen original guides and articles. A regular contributor to online business and marketing publications, he's passionate about marketing automation and, along with the team, is rapidly making MarCloud the go-to place for Marketing Cloud and Salesforce expertise. He unapologetically uses the terms Pardot, Account Engagement and MCAE interchangeably.
More by Tom RyanFeatured resource

Creating Customer Journeys in Marketing Cloud
From mapping your typical customer journey to understanding which Marketing Cloud Engagement products are right for your business, this handbook is a fast guide to strategic automated marketing that connects with the customer at each stage of their purchase journey.
Download now
